
Untitled. Getting GREAT Indoor Photos This Christmas! I have had a fabulous reader write in and ask for some tips on getting better shots indoors.
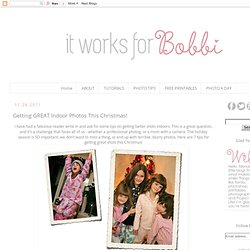
This is a great question, and it's a challenge that faces all of us - whether a professional photog. or a mom with a camera. The holiday season is SO important..we don't want to miss a thing, or end up with terrible, blurry photos. Here are 7 tips for getting great shots this Christmas! 1. Open up wide! If you have a point and shoot, and you aren't sure if your camera has manual settings, try setting your camera to the portrait mode, which most digi cameras have now. Check out this post for even more info on aperture :) 2. 3. If you have a point and shoot camera, you might be able to set the ISO by changing to the "P" mode. Here is another post all about the wonderful world of ISO! 4. 5. Also, strategically placed constant light (such as tungsten lamps using soft white bulbs) work excellently for providing additional ambient light without sacrificing the atmosphere of the setting.
How to resize images for the Internet in Photoshop Elements. One of my most frequently asked questions is how to resize images for uploading to the Internet, on like a blog or Facebook.

I have shown it many times in other video tutorials, but never did a tutorial just on resizing by itself. First let me explain few fundamentals about the Internet and pictures and file size. A full size (i.e. print size) picture can be up 3 megabytes in size (sometimes larger)A web size picture is usually 100 to 300 kilobytes in sizeLarge files take up more space on your server (especially if you are on a WordPress.org blog)Blogs/sites have to work much harder to pull up a large size file than a small size file, so your blog may be slower to load and frustrate your readers Each time you crop or resize an image, make sure to save that as a different file name so you are not overwriting the original.
Note below that I have FIVE files for one image: So, with a few reasons why you should resize your pictures, let’s get into resizing. Coloring an old, black and white photo. You start by organizing and thinking what colors to use.

Before you start coloring you need to set your brush to a 0% Hardness. Now I will start with the background. Select the color (I used #5b4219) and create a new layer on top of the original photo layer. Name it Background Color and fill the layer with the color you selected. Advanced Color Correction Tutorial that will Knock Your Socks Off! This tutorial shows you an advanced method of evaluating your photograph’s color accuracy and making the proper color correction adjustments.
It is a more sophisticated technique of removing unwanted color casts, but the result’s will knock your socks off. Does require some basic knowledge of Photoshop. For this tutorial I will be working in Photoshop CS3 using a stock photograph that came with Aperture 2. The original As you can see above, the original photo is much too dark… But even with some basic ‘Levels Adjustments’ to brighten up the original, even though the image is much improved, we can now see a red color cast in the people’s faces, in the lower part of the wedding dress and in the white shirt of the man in the background.
Preparing Photoshop Open the original photograph in Photoshop. On the bottom of your ‘Layers’ palette you will notice a half black, half white circle, which is your ‘Create new fill or adjustments later’ button. Let’s get into it… Locating the white points. 60 Photoshop Tutorials for Photo Touch-Ups. Photoshop has tons of potential for improving photos in one way or another.
Even subtle improvements can make a big difference in the end result. Whether you are interested in touching up your own photos or doing professional photo editing for clients, Photoshop can allow you to get the job done. This is a categorized collection of tutorials that will show you some new tricks for photo touch-ups. You’ll find tutorials for working with skin, eyes, teeth, nose, hair, body, colors, lighting, and more. How to Touch Up Skin in Photoshop: Really Cool Digital Make Up in Photoshop in 10 Minutes Airbrushing – Natural Smooth Skin How to Smooth Skin in Photoshop.