
CreativeFan - Inspiration, Resources and Tutorials for Creative Professionals.
Sew a bag with the free bag pattern. Clothes That Clean Themselves Using Only Sunshine. Scientists from Shanghai Jiao Tong University in China have come up with a unique cotton material that can clean itself when left under ordinary sunlight.

The fabric includes a coat of nanoparticles made from a compound of titanium dioxide, nitrogen, silver and iodine. From a test experiment, the special coating was able to remove an orange stain when exposed to sunlight for just two hours. Furthermore, the coating remained intact even after washing and drying. Researchers Mingce Long and Deyong Wu published their findings in the American Chemical Society Journal Applied Material & Interfaces.
However, it is not expected that the breakthrough invention will be hitting retail shelves anytime soon. Shanghai Jiao Tong University. T-shirt latch hook rug tutorial. I really love flokati rugs. I have two that are safely tucked away in my parents basement awaiting our reunion. When I learned that I would be having a child and building a nursery for him, I wanted a flokati. A gray one. Being a flokati snob though, I knew that I couldn’t afford the price tag ( ), and I knew that I would be too precious about the rug ( ). So I chose the only sensible alternative: I would make a rug. I’m going to show you how it’s done, but let me warn you- while this rug was super inexpensive to make with the resource of money- it was very costly in the resource of time.
And now, this is how to make your very own latch hook rug. Supplies: Latch hook canvas latch hook tool old t-shirts scissors or rotary cutting tool/mat seam binding masking tape dye (optional) All of these things should be available at your local craft store, with the exception of the old t-shirts. On to the making! Once you have all of the strips cut, it’s time to dye them if you’d like.
Xo. Cascading Garden Pom Poms! Great Wedding or Party Idea! So I've been searching of ways to start doing crafts for budget weddings and fell in love with the idea of the very popular can't-get-enough-of-POM POMS.
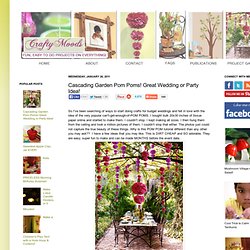
I bought bulk 20x30 inches of tissue paper online and started to make them. I couldn't stop. I kept making all sizes. I then hung them from the ceiling and took a million pictures of them. I couldn't stop that either. Things you may need: Tissue paper ScissorGalvanized wires or any thin floral wire (optional)Fishing line or clear sewing thread to hang I cut my 20x30 inch tissue paper into 2 pieces measuring 15x20in. I started by folding the 10 sheets of 7.5x10in inch tissue paper. Accordion folds. Cut the ends round (semi circle) for roses. Do the other side... Cut your wire about 5-7 inches. Tie the folded sheets together and twist the wires at the bottom. Make sure you tie the wire in the center of your fold. Hold it fanned out. Start separating one sheet at a time on one side then do the other side. Both sides-top view. Enjoy... How-To Make and Use a Light Box to Improve Your Product Photography.
Article by: Anna from The House of Mouse Original article Great photos are one of the most important things to get right if you sell online. Your photographs are your virtual shop window: If they are not light, bright and eye-catching then often buyers will surf right past your store without even noticing your work. Really beautiful photographs will bring buyers through your virtual door and keep them there long enough to remember your creations.
These photography tips are designed to help you make your photographs looks bright, eye catching and professional and you don’t need to have an expensive camera to do this! This tutorial comes in two parts: How to make a Light Box How to edit your photos to make them pop I use both processes for all of my photographs. Part 1: How to make a Light Box These tips are one way of taking great photos, but they are certainly not the only way. First select a box that is the right size for what you want to photograph. DIY Pom Pom Project.. - this is how its done apparently - BILLIEWINTERs... - StumbleUpon. Do-it-Yourself DIY String Wedding Lanterns Yarn Chandeliers - StumbleUpon. Jessica of Wednesday Inc shows us how to make those gorgeous twine chandeliers from the inspiration shoot she shared with us this morning.

Using balloons, glue and twine, you can also make these lanterns for your wedding – and then bring it home and use it as your very own mid century lampshade. What you will need are: balloons, glue, yarn, tray for glue, corn starch 1/2 cup of Corn starch, 1/4 cup of Warm water, clear fast drying spray paint, hanging lamp cord or fishing line (depending on your desired final product), and a lighting kit if you’re looking for a fully functional lantern. Jessica recommends using a sharpie to mark on the inflated balloon how much room you need to leave for the lighting cord.
She also recommends coating the balloon with vaseline prior to wrapping the yarn coated with glue so it doesn’t stick on the balloon once it’s dry. You can see all the details on Jessica’s blog.