
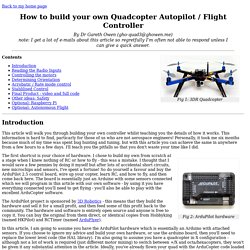
SmartPropoPlus Cable for Spektrum trainer socket - SmartPropoPlus. UAV tutorials and Guides - Unmanned Tech Drone, Ardupilot, UAV supplies. Intro to FPV Racing and Mini Quadcopters - Dronethusiast. How to build your own Quadcopter AutoPilot / Flight Controller. Back to my home page.
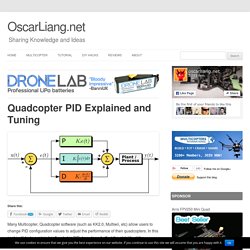
P, I (and D) gains in a nutshell. A lot of people say a lot of things about setting P and I gains for multicopters.

While a lot is true for some cases, it seems a lot of people do not really understand how these gains work to keep you plane or multicopter in the air. There are whole books dedicated to control theory that go into a lot of detail on PID or PI control loops and these gains, for the theoretical (poles, imaginary numbers...) to the practical, but my goal here is to keep it simple and applied to multicopters.
So, for the sake of explanation, we'll assume that the only objective of the control loop (the logic that uses the P and I gains) is to keep the multicopter level (centered sticks). From there, it is easy to understand that moving the sticks simply moves the desired position (attitude) and the control loop will aim for that instead of level. Quadcopter PID Explained and Tuning. Many Multicopter, Quadcopter software (such as KK2.0, Multiwii, etc) allow users to change PID configuration values to adjust the performance of their quadcopters.
In this post i will try to explain briefly what is PID, how does it affect the stability of the quadcopter (or multicopter), and how to tune the PID for your quadcopter. Be prepared, this article is a bit more “academic” than mine other PID explained post, so do check it out also! HobbyKing Forums - How-to: Using your transmitter for simulator use - Page 1. While this was written for the Tunigy 9X most steps should apply to other transmitters.

Note that the cable required may vary on other brands. What you need A 3.5mm minijack cable (male-male)PPJoy (free)SmartPropoPlus (free)A computer with a line-in or microphone socket.A simulator, ie FMS or HeliSimRC. 9X) Er9x - model situations and mixs step by step - RC hobby by RiMr. Tuesday, 12.
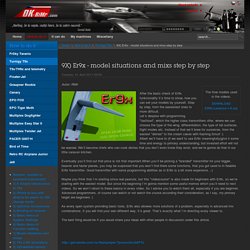
April 2011 00:00 Autor: RiMr After the basic check of Er9x funkcionality it´s time to show, how you can set your models by yourself. Step by step, from the easiestest ones to more difficult. Let´s despise with programming "fastfood", which the higher class transmitters offer, where we can choose the type of the wing, differentiation, the type of tail surfaces, flight modes etc.
Crius All In One Pro GPS Howto – Updated for MW2.2 : FPV Central. Crius All In One Pro GPS Howto – Updated for MW2.2 : FPV Central. ArduCopter by Sandeep Jadoonanan on Prezi. Common-Camera Control and Auto Missions in Mission Planner. This article describes ArduPilot’s camera and gimbal commands, and explains how these can be used in Mission Planner to define camera survey missions.
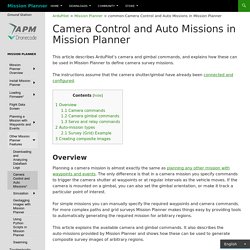
The instructions assume that the camera shutter/gimbal have already been connected and configured. Planning a camera mission is almost exactly the same as planning any other mission with waypoints and events. The only difference is that in a camera mission you specify commands to trigger the camera shutter at waypoints or at regular intervals as the vehicle moves. If the camera is mounted on a gimbal, you can also set the gimbal orientation, or make it track a particular point of interest. For simple missions you can manually specify the required waypoints and camera commands. This article explains the available camera and gimbal commands.
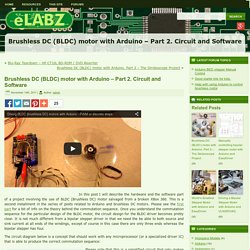
Camera commands DO_SET_CAM_TRIGG_DIST — Trigger the camera shutter at regular intervals. Camera gimbal commands Servo and relay commands Note: Mission Planner supports the following Auto Waypoint options. Brushless DC (BLDC) motor with Arduino – Part 2. Circuit and Software. Const int buttonPin = 8; const int ledPin = 7; const int potPin = 0; const int potPinFlash = 1; const int motorPin1 =9; const int motorPin2 =10; const int motorPin3 =11; const int flashPin =12;
Building UP an ArduCopter! : 3D Printed Gimbal. I looked at the different gimbals available for sale, but I wasn't really satisfied with the quality to price ratio of them.
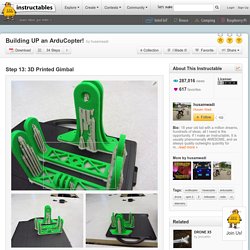
Furthermore, most of the gimbals were made out of very thin fiberglass and seemed like they would vibrate a lot. So I decided to 3D print my own gimbal! There was no reason to reinvent the wheel, so I searched Grabcad.com for gimbal designs and I found this awesome gimbal that was ready to print: However, there were a couple of problems with the design: The new KK2 FC, info and Q&A in first post. Read it before asking a question. HK KK2.0 Control Board Set Up - RC Groups. Question HK KK2.0 Control Board Set Up Hi, I have built a HK X525 Quadcopter, and I am using the KK2.0 Control Board.
The Quad Copter Guy: Choosing Your Parts. Multirotor becoming very popular nowadays.
It's real fun and pleasure to see them flying, however making them at home from scratch is tough job. If you are thinking to make one then this tutorial might help you. You don't need to ask someone or search over forums or blogs to troubleshoot your issue. Here i am trying to put everything together for you. MegaPirate/Arducopter Setup. What is MegaPirate ? Program on the flight controller: MegaPirate = Arducopter Software on PC: MegaPirate = Arducopter Hardware: MegaPirate = MultiWii Mega How to upload the flight controller program to MultiWii Mega board ?
By using Arduino on PC/Mac. Building UP an ArduCopter! Hobbyking KK2.1.5 Multi-rotor LCD Flight Control Board With 6050MPU And Atmel 644PA. The next evolution of the rotor revolution is here!! The KK2.1.5 is packing new found power with updated sensors, memory and header pins. The KK2.1.5 is next big evolution of the first generation KK flight control boards.
The KK2.1.5 was engineered from the ground up to bring multi-rotor flight to everyone, not just the experts. The LCD screen and built in software makes install and setup easier than ever. A host of multi-rotor craft types are pre-installed, simply select your craft type, check motor layout/propeller direction, calibrate your ESCs and radio and you’re ready to go!