
Glitter-toed Flats. Have you seen those glittery heels that are popular right now?

Very glamorous, but not something I'd get to wear a whole lot. I pinned THESE shoes the other day because I thought they were adorable. So, I decided to marry the two and make some glitter-toed sparkley flats for myself. They are casual enough for jeans and dressy enough for a dress. They were fast and easy to make, too. I bought some inexpensive black flats from Target. I taped off the area I wanted to add glitter to. I peeled off the tape and voila! I think it would be fun to make some bolder ones for a little girl - like purple with bright kelly green toes or something kind of wild. That's all for today. Ten minute no-sew recycled t-shirt bag! Tutorial time!

I got a gig teaching a recycled t-shirt project at the library a few months ago, with a request for a recycled tee bag – the only bags I’d made from tees in the past had required sturdy sewing, and I didn’t want hand-sewing to be the only thing holding the bottom closed in a class version of the bags, so I started brainstorming about some kind of hand-sewing-friendly or no-sew bag idea…. and here’s what I came up with! The simplest version of these bags is great for smaller tees, or the more light-weight kind of girl-tees – just turn the bottom of the shirt into a drawstring and tie it closed! As you can see, even with a not huge tee, this will still leave a significant hole in the bottom of your bag, but for purposes like grocery shopping, this size hole shouldn’t really matter… But to make smaller holes, just make more than one of them!
Here’s a bag bottom with 2 holes: You could make it rounded, V-shaped, or squared like this one: My finished Sonic bag! DIY projects made from everyday objects. I was inspired to make this DIY tote bag after I took a trip to the farmer's market and realized I needed a comfortable and lightweight bag to carry all my goodies.
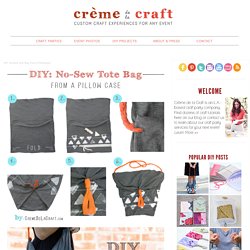
I love the way this DIY project turned out and, more importantly, there was no sewing involved! A pillowcase already has all the stitching you need to create this easy and stylish tote bag. The cross-body shoulder strap also makes it super comfortable to carry around all day. Just grab a pillowcase from your dresser, stamp it, give it a couple snips and you've got a custom carry-all tote for your next trip to the market! Follow the steps below to make your very own. Materials: • King Size Pillowcase (you could also use a standard size, but the bag will be smaller. . • Acrylic Paint and a Dish Sponge (if you wish to add a pattern to the bag) • Long Fabric Strip (for the strap) • Scissors • Lay the pillowcase flat with the open end facing towards you. The Shirt Jumper- Men’s Shirt to Girl’s Dress Refashion Tutorial. September 23, 2009 8:46 am I saw this western-y dress for kids the other day and it inspired me to do this one.
Let’s get started! Grab a men’s shirt. Cut off the sleeves. We need to create a chest band for the dress. Sew the two end pieces together so it makes one circular piece. Fold it over, with the right side out and iron in half. Now we need to cut out the straps. Sew the long pieces together and turn them right side out. Now for the dress piece. Trim the bottom hem so it is straight. Now for pockets. I cut out two pockets and two strips for hemtape. The first thing i do is get a lining for the pockets. Sew them around the sides, leaving the top open.
Get your hemtape. Fold it over once in half. Then open it up and fold the two ends in towards the center. Open it up and pin it to the top of the pockets, as shown. Stitch the hemtape onto the pocket as close to the edge of the hemtape as you can get. Now find where you want to put the pockets and pin them in place, and sew them on.