
DIY Beaded Stackable Bracelets {EASY} Upcycled Bracelets. I bought this handbag at the thrift store a while back.
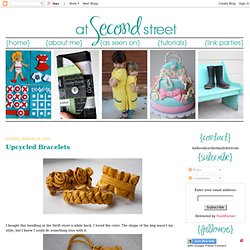
I loved the color. The shape of the bag wasn't my style, but I knew I could do something else with it. These are my creations. Other than the bag the only supplies I needed were a few beads, a needle and thread. My favorite thing about repurposing things is that most of the hard work is done for you. Now I just have to decide which one to keep and which to give away. How to Make a Fork Bracelet DIY Fashion and Craft Tutorials. I've always loved taking everyday items and making them into something interesting.

Ever since I was a little crafty kid I loved devouring books that taught me how to make little dolls from clothespins, beads from rolled up magazines, and little fairy ornaments from wire and fake flower petals. The first time I saw my friend wearing a bracelet made from a fork a few years ago, I knew I had to try it (*ahem Carly ;)). I wrote up a tutorial a while back, but I've had some questions about the directions I gave so I decided to make a proper tutorial with a video! :) (Please excuse my intro, if you can't hustle your website on your Youtube channel, where else are you supposed to do it?
DIY Macrame Bracelet. Growing up by the beach in Southern California, the ability to knot a macrame bracelet was practically a right of passage.

Although those days are long behind us, we’ve never forgotten the ever-so-simple square knot technique. This time, however, we’re replacing hemp and wooden beads for more updated elements like colorful nylon cord and glossy metal charms. Happy knotting! You’ll need: Start by cutting the knotting cord into two 30 inch, two 20 inch and one 10 inch lengths. Center the 30 inch cord under the two middle strands. Pull tightly and slide the knot up to the top. Finish the 2nd half of the square knot by folding the left cord over the middle strands and under the right cord. Pull tightly and repeat the steps – left, right, left, right . . . To finish the knots, thread one of the cords onto a needle and sew up the center of 3-4 knots along the backside.
Repeat the same step on the other cord. Antique Gold Spike Slave Bracelet Hand/Finger by StudsandRoses. DIY Braided Clay Bracelet. Yes I am obsessed with polymer clay.
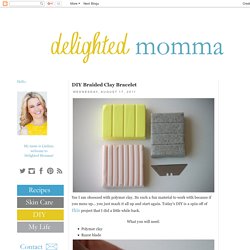
Its such a fun material to work with because if you mess up... you just mash it all up and start again. Today's DIY is a spin off of this project that I did a little while back. Knead the clay with your hands to soften it up. Using the palm of your hand roll out three long tubes. Mash the top of the tubes together and begin braiding. Using your own wrist as a guide determine how long you want to make your bracelet.
Connect the two ends and gently mash ( I cant think of a better word so mash it is) the two ends together. Diy clay bangles. I have a bangle obsession...and I have a deep love for polymer clay.

I am definitely keeping the polymer clay section at Michaels in business. I have quite the collection going, which is filling up our kitchen panty pretty quickly. Ian opened the cabinet to get some food goodies last night and told me I should "Probably get organized. " What?!! LEDERSCHLEIFENARMBAND. Donnerstag, 3.
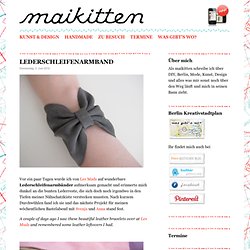
Juni 2010 Vor ein paar Tagen wurde ich von Les Mads auf wunderbare Lederschleifenarmbänder aufmerksam gemacht und erinnerte mich dunkel an die bunten Lederreste, die sich doch noch irgendwo in den Tiefen meiner Nähschatzkiste verstecken mussten. Nach kurzem Durchwühlen fand ich sie und das nächste Projekt für meinen wöchentlichen Bastelabend mit Svenja und Anna stand fest. A couple of days ago I saw these beautiful leather bracelets over at Les Mads and remembered some leather leftovers I had. Zunächst schnitt ich eine etwa 24 cm x 10 cm lange ovale Form aus, die ich in der Mitte mit einem kurzen Stück zu einer Schleife band und mit Alleskleber fixierte (besser hält: Leder- oder Textilkleber). How to:DIY Crobra Braid Bracelet! A Super Easy DIY Beaded Leather Bracelet. Nest of Posies: woven chain-chain-chain bracelet.
As you all have probably seen ~ these woven bracelets are all the rage right now.

Hello, my name is Kellie & I’m a sucker for trendy things. I really am. Gosh, darn it. There’s tutorials out there like crazy, so I wont even try to subjected you, to one from me. However, this post is about a “golden” tip & of course, my favorite Spring colors. Tangerine tango, pink, mint with a hint of aqua. = deliciousness! You know in Joanne’s where they have every trim imaginable? How to Create a Beaded Leather Wrap Bracelet. DIY Ribbon + Chain Bracelets from #MAGICLV. Here’s the second DIY I led with with BurdaStyle direct from the MAGIC floor.

We did these bracelets on Wednesday, the final day of the show. It was a perfect project to wrap-up with because it was fast and easy. I think we were all feeling a little bit like the walking dead after spending the 4 days running around Las Vegas 20 hours a day. Photo courtesy BurdaStyle The supplies are simple: chain + ribbon. For each bracelet you’ll need about 6″ of chain and 16″ of ribbon. Sidenote: Do you guys know about Fray Check? The last step it to clip off the (fraying) ends of ribbon at an angle and apply Fray Check. One more MAGIC DIY to come next Tuesday: Faux turban fabric headbands! Tagged as: bracelets, burdastyle, chain, diy, magic, wwdmagic.