
Photoshop : Comment réaliser un portrait typographique. Dans ce tutoriel, nous allons voir comment réaliser un portrait typographique à partir d’une photographie.
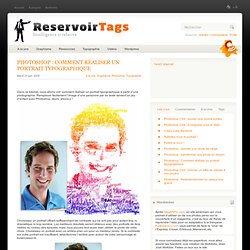
Remplacer facilement l’image d’une personne par du texte devient un jeu d’enfant avec Photoshop. Alors, allons-y ! Choisissez un portrait offrant suffisamment de contraste qui ne soit pas pour autant trop ni dramatique ni trop sombre. Les meilleurs résultats seront obtenus avec des portraits de face cadrés au niveau des épaules, mais vous pouvez tout aussi bien utiliser la photo de votre choix. Choisissez un portrait avec un arrière-plan uni pour un meilleur rendu. Créez un nouveau document (Fichier > Nouveau) d’une taille légèrement inférieure à votre photo. À présent, revenez sur votre photo. Comme précédemment, sélectionnez Palette de couleur via le menu Sélection. Masquez le calque d’arrière-plan en décochant l’œil situé à gauche de sa vignette dans la palette des calques.
Tutoriaux photoshop, des tutoriels photoshop cs5, cs4, cs3,tutoriaux graphisme,photoshop tuto gratuit. Tutoriaux Photoshop. Tuto Photoshop les meilleurs tutoriaux photoshop parmis les tutoriaux photoshop du net cs4, cs3 et cs2. 40 tutoriel photoshop dédié au vintage et au style rétro. Cretinimbus. Nouvelle publication ici.

Make a Retro Space Themed Poster in Photoshop. Yuri Alekseyevich Gagarin, Soviet pilot and cosmonaut, was the first human being to journey into outer space, when his Vostok spacecraft completed an orbit of the Earth on April 12, 1961.
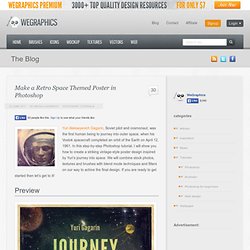
In this step-by-step Photoshop tutorial, I will show you how to create a striking vintage-style poster design inspired by Yuri’s journey into space. We will combine stock photos, textures and brushes with blend mode techniques and filters on our way to achive the final design. If you are ready to get started then let’s get to it! Preview Step 1 Open up Adobe Photoshop and create a document with your desired poster dimensions.
Step 2 To start, download and open the Capodimonte Deep Field, use Free Transform (Ctrl/Cmd + T) to rotate and resize image so that it fits within our canvas. Add Hue/Saturation adjustment layer (Layer > New Adjustment Layer > Hue/Saturation) and lower Saturation to -60 and Lightness to -15, to drop down colors a bit. Step 3. 50 Beautiful Retro and Vintage Photoshop Tutorials. Six Revisions Skip site navigation 50 Beautiful Retro and Vintage Photoshop Tutorials May 2 2010 by Tomas Laurinavicius | 29 Comments Retro and vintage designs are valued for nostalgia and sentimental memories.
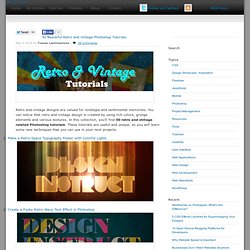
You can notice that retro and vintage design is created by using rich colors, grunge elements and various textures. 1. 2. 3. 4. 5. 6. 7. 8. 9. 10. 11. 12. 13. 14. 15. Design a Vintage Car Poster with Grunge Texture, Font and Brushset in Photoshop. Design a Vintage Car Poster with Grunge Texture, Font and Brushset in Photoshop Guaranteed success with testking 642-982 labs, testking EX0-101 video and testking 640-816 demo tests!
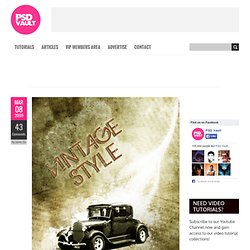
In this tutorial, I will show you the processes involved in making an old-looking, vintage car poster with grunge texture, font and brushset in Photoshop. Along the way, we will be using a series of Photoshop techniques such as layer blending options, image adjustments, filter effects and masking. Some of the techniques can be a bit tricky (especially with the Pen Tool), but why not just have a try :) Here is preview of the final image result for this tutorial: Alternative version with Newspaper Texture overlay – This idea comes from one of my workmates Claudia Ferreira, who is awecome web/graphic designer and a very nice person!
PSD File Download You can download the PSD File for this tutorial via the VIP Members Area for only $6.95/Month (or less)! Ok let’s get started! Design a Vintage Poster, Part II. Welcome to part two of designing a vintage poster.

If you missed part one, be sure to catch up! Last week’s tutorial covered most of the heavy lifting: concept, color, and composition all took place in Illustrator using elements from Vector Set 16. Today we’re going to take our design into Photoshop for some tender love & care. We’ll learn about adding tactile character using Photoshop’s Bitmap filter, applying Spray Paint Textures for a handmade urban vibe, polishing with motion blur, and finally adding selective contrast with the dodge and burn tools.
Giving your design a face lift in Photoshop Now before we get started in Photoshop lets open a new file and set size to 15×20 300 dpi. Step One Duplicate the layer three times, simply hold down alt and drag layer up. Author’s Note: It is important to properly name your layers so you don’t get confused. Step two Next create a bitmap, select bitmap layer and click image mode gray scale. 35 tutoriels photoshop vintage pour la reproduction des anciens modèles et des styles rétro » Hicham Nejjahi. Définir comme page d'accueil|Favoris Login Enregistrement DataLife Engine - Softnews Media Group Bienvenue sur mon site web.

J’espère que vous y trouverez ce que vous êtes venu y chercher, ou mieux, quelque chose d’intéressant que vous n’étiez pas venu y chercher ;) Reading RSS. Créer un carnet de voyage vintage avec Photoshop. Subscribe Créer un carnet de voyage vintage avec Photoshop Dans ce tutoriel Nikola Lazarevic aka Colaja de Nis, Serbie, va nous montrer comment créer un très élégant carnet de voyageur vintage avec Photoshop.
Pour se faire nous allons mélanger les pinceaux avec des photos stockées et les modes de fusion pour obtenir l’effet. Jetons un coup d’œil à notre image finale. ETAPE 1 Commençons par la création de nouveau document dans Photoshop. Télécharger la texture molle du grunge BittBox : J’en prends une deuxième (free_high_res_texture_102), et le placer au-dessus du calque de fond. Maintenant téléchargez Waterlogged Carte Brushes by ~ Arbenting : Créer un nouveau calque au dessus « background Layer » et nommez-le « map ».