
Tutorial: Owl Eye Mask. Hi Everyone!
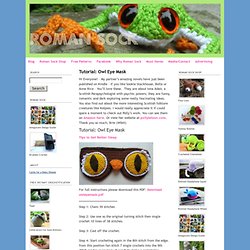
– My partner’s amazing novels have just been published on Kindle – If you like Sookie Stackhouse, Bella or Anne Rice – You’ll love these. They are about Iona Adair, a Scottish Parapsychologist with psychic powers; they are funny, romantic and dark exploring some really fascinating ideas. You also find out about the more interesting Scottish folklore creatures like Kelpies. I would really appreciate it if could spare a moment to check out Polly’s work. You can see them on Amazon here. Tutorial: Owl Eye Mask Tips to Get Better Sleep For full Instructions please download this PDF: Download owleyemask.pdf *******************************Step 1: Chain 39 stitches Step 2: Use one as the original turning stitch then single crochet 10 lines of 38 stitches.
Step 3: Cast off the crochet. Step 4: Start crocheting again in the 8th stitch from the edge.from this position fan stitch 7 single crochets into the 9th stitch (or however many it needs to make a semicircle) Optional Extras (Owl) Tortoise. "Rory the Reindeer" Crochet Amigurumi Christmas Ornament Free Pa. "Bo the Snowman" Crochet Amigurumi Christmas Ornament Free Patte. Zen and the Art of Stash Diving. Author by Robyn Chachula Introduction Its 2 days before Christmas and I haven’t started the scarf for my mother in-law.
Its 2 days before my niece’s birthday and I haven’t started her purse. OR its 2 days before my best friend’s baby shower and I haven’t started the baby afghan. First things first, you have to realize that with only 2 days you have your limits on what you can create. And that’s it. Materials List Light Pink Scarf (pictured at right): 2 Skeins, Sirdar Primavera Double Knitting #840, (65% Cotton, 35% Acrylic), 250 yards, F hookFuchsia Scarf: 2 Skeins, Berroco Mohair Classic Heather #9543, (78% Mohair, 13% Wool, 9% Nylon), 180 yards, I hookOrange Scarf: 2 Skeins, Spectrum Cotton DK Classics Panache, Color: Manderin, (100% Cotton), 250 yards, E hookLight Blue Scarf: 2 Skeins, Berroco Glace, Color: Work Shirt, (100% Rayon), 150 yards, I hook Gauge Not critical. The Pattern Repeat rows 2-5 until desired length is achieved. Fasten Off and Tuck in Loose Ends. Crochet pattern for lace gloves. Step 1: Getting Started Image: courtesy of our friend emilynd06 from Ravelry.com Special note about emilynd06's pictured version: Modified to work back and forth for the first 8-10 rows, in order to create a button-over wrist.

Worked two small Solomon’s Knots for each one written in the pattern, as I liked the look of the lattice better that way. I also worked a lace border from a different pattern at the wrist, instead of additional Solomon’s Knots. Size: To fit average hand Note: These gloves will stretch to fit most women's hands; washing will restore them to their original size. Materials:1-1/2 oz of a fine mercerized crochet cotton (No. 20); Size 7 steel crochet hook; Tubular elastic to fit around wrists. Gauge:6 Solomon's knots to 2" worked on size 7 steel hook. Wool Eater Instructions « Crocheted Wool-Eater Blanket © 2007 Sarah London.
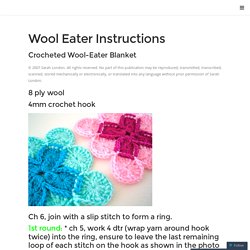
All rights reserved. No part of this publication may be reproduced, transmitted, transcribed, scanned, stored mechanically or electronically, or translated into any language without prior permission of Sarah London. 8 ply wool 4mm crochet hook Ch 6, join with a slip stitch to form a ring. 1st round: * ch 5, work 4 dtr (wrap yarn around hook twice) into the ring, ensure to leave the last remaining loop of each stitch on the hook as shown in the photo below, now, yarn over and pull the yarn through all 5 loops on the hook. {1 cluny group made}. ch 5, slip stitch into the ring. Rep from * 3 more times. {4 cluny groups made}. Round 2: * ch 2, work 12 dtr into the top of the cluny group, ch 2, slip stitch into the slip stitch of the previous round. Rep from * 3 times. Fasten off. {4 corners made}. Round 3: Join new colour in between any 4th and 5th dtr of the previous round.
Continue working round in this manner, finishing with a slip stitch. Enjoy! Related.