
You knew i was going to make one. They are all over pinterest....
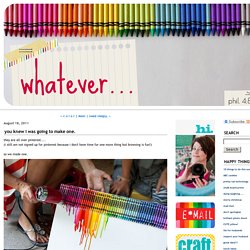
(i still am not signed up for pinterest because i don't have time for one more thing but browsing is fun!) So we made one. i took a box of 64 crayons and took out the blacks and browns.i used another small box and doubled up on the good colors i liked and hot glued them to the top of our canvas. then we turned our blow dryer to hot on high. not long after you set the hair dryer by the crayons they get shiny and then the wax starts to melt! And it dries really quickly too. seriously. what could be happier than this?? GREAT project. loved it today is the first FULL day with ALL my kids in ALL day school.yeah...i am smiling as i type that. it's good. it's quiet. i am rockin' it. removing wallpaper.....making code for craft weekend stuff.....doing my hair....going to lunch..... it's all good. hooray for school! Two Color Paracord Solomon Bar. Mermaid Gloves. I finished the Mermaid Gloves just in time to go camping in Big Sur.

They came in handy (haha) because it got pretty chilly at night! Mermaid Gloves among the beautiful scenery. How about a close-up? Notice the scarf? It's the first one I ever knit and I still wear it all the time! During the camping trip, the Mermaid Gloves were well-used and got kind of dirty... Takin' a bath. Now they are dry, clean, and happy. Specs:Yarn: Socks That Rock Lightweight Apple Valley LaneAmount: 77gramsPattern: Mermaid Gloves (using the Pomatomus Sock pattern and these and these and these and these for inspiration)Needles: US0Started: November 1st-ish, 2006Finished: January 12th, 2007 Yay for cool pink gloves. The first glove took awhile because I kept messing up the thumb gusset. Make It and Love It: Piecing and Binding a Quilt.
Looking for the Ribbon Retreat +Fabric giveaway?
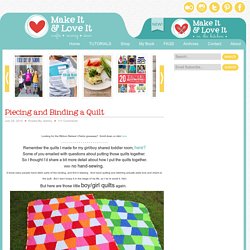
Scroll down or click here. Remember the quilts I made for my girl/boy shared toddler room, here? Some of you emailed with questions about putting those quilts together. So I thought I’d share a bit more detail about how I put the quilts together. With no hand-sewing. (I know many people hand stitch parts of the binding, and find it relaxing. But here are those little boy/girl quilts again. Happily bound around the edges. But I’m going to be a bit more specific about how I put these together, in case you’ve never pieced a quilt together.
The easiest shape to start a quilt with, is to use squares (or one whole piece of fabric)….but these quilts will work as an example. Cut out as many shapes/blocks as you need to create the right sized quilt for your project. Lay out the pattern that works for you visually. Then start sewing each row together, side to side, until all the rows are completed. Here was the fun part. All quilted.