
TLC Home &Piano Keys Quilt Border Pattern& The Piano Keys Quilt Border Pattern makes a delightful quilt border that will surround your quilt with vibrant, playful contrast.
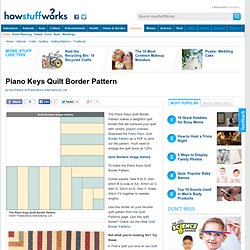
Download the Piano Keys Quilt Border Pattern as a PDF to print out the pattern. You'll need to enlarge the quilt block at 125%. Quilt Borders Image Gallery To make the Piano Keys Quilt Border Pattern: Corner square: Sew A to A, then stitch B to side of AA. Use this border on your favorite quilt pattern from the Quilt Patterns page. Not what you're looking for? Find a quilt you love on our Quilt Designs page.Flip through our Quilt Blocks to find one for your next quilting project.Learn How to Quilt or brush up on the basics with our refresher course.
Elsie marley & Blog Archive & the quick little bunny tutorial. I really wanted to make the sock bunny that Heidi (from My Paper Crane) created, but I didn’t have any of those fantastic red and brown monkey socks.

What I do have is baby socks: tons of cute, mismatched, totally useless, never stay on baby socks. Now that my littlest is very much not an infant and too soon will be a toddler it seems kind of silly to keep all those teeny tiny socks. So I made a bunny out of them. And a tutorial too. This is indeed a quick little bunny. Materials: baby socka handful of stuffingheavy duty threadscissors Make that bunny: Before you start sewing take second to look at the sock you have. The body: Take some stuffing and stuff the foot part of the sock–not too tight! The tail: On the top of the bunny’s back, sew a circle about an inch in diameter with a simple running stitch. The head: To make the head, put a little stuffing inside the sock and sew a running stitch around the top of the heel.
The ears: Cut a big V shape out of the top of the sock. Kool-Aid Dyed Playsilks - Tried and True. A couple months ago I came upon a tutorial on The Artful Parent for Kool-Aid Dyed Playsilks.
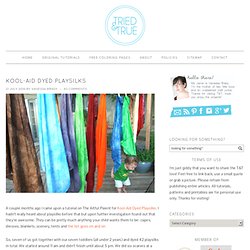
I hadn’t really heard about playsilks before that but upon further investigation found out that they’re awesome. They can be pretty much anything your child wants them to be: capes, dresses, blankets, scenery, tents and the list goes on and on. So, seven of us got together with our seven toddlers (all under 2 years) and dyed 42 playsilks in total. We started around 11 am and didn’t finish until about 5 pm. We did six scarves at a time, with the other mothers pitching in to watch the child of whoever was working on their playsilks. After we did the first batch of Kool-Aid packets, some of the mothers decided to get a bit creative with color combination and as a result we ended up with 14 different color at the end of the day.
Edit: Here are a few answers to some of the more popular questions posted in the comments. Where did you get your scarves/What size were they?