
How to make a ruffle scarf in 3 easy steps. Wardrobe refashion: t-shirt to cardigan. Shaped Twisted Bias Insertions. Pintuck a Ruffle. Pintucks instead of gathers add fullness but not a lot of volume.
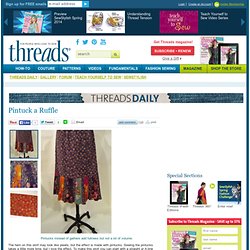
I pieced the band on my skirt from four compatible prints before a sewed the tucks. Mark the vertical tuck lines and a horizontal line to indicate where to stop stitching on the right side of the fabric. The hem on this skirt may look like pleats, but the effect is made with pintucks. Sewing the pintucks takes a little more time, but I love the effect. To make this skirt you can start with a straight or A-line skirt pattern and cut it so the lower edge (before adding the ruffle) ends above the knee. Fabric I've used silk jersey and wool jersey for this technique and it works beautifully with knits.
Creating Perfect Bias Fabric Loops. A student of mine was working on a lovely Marfy pattern the other day.
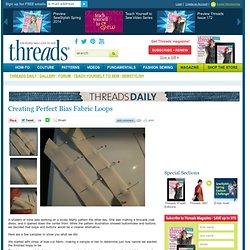
She was making a brocade coat dress, and it opened down the center front. While the pattern illustration showed buttonholes and buttons, we decided that loops and buttons would be a cleaner alternative. Here are a few samples to show you what we did: We started with strips of bias-cut fabric, making a sample or two to determine just how narrow we wanted the finished loops to be. The strips are carefully folded and pinned to maintain their bias, then machine stitched. I love to turn loops (and narrow fabric tubes) with a simple loop turner. How to Sew a Thread Bar. Facing a Facing. I used silk organza for both facings and interfacings.
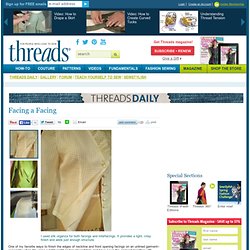
It provides a light, crisp finish and adds just enough structure. This "facing the facing" technique provides a quality finish on lightweight silk garments. Sew interfacing to edge of facing, right sides together. One of my favorite ways to finish the edges of neckline and front opening facings on an unlined garment–especially when I'm using a lightweight and/or sheer fabric and have sewn the garment together with French seams–is to face them with the interfacing. It works beautifully, even when the interfacing is fusible. 1. 2. Keep These Seam Finishes in Your Bag of Tricks.
Pinking or zigzagging are great ways to beautifully finish a seam's edge.
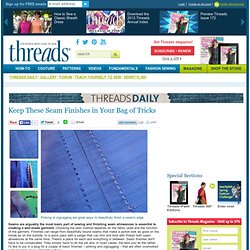
Cut along the very edge of the seam allowance with pinking shears. When pinking, take off just a tiny scrap. Seams are arguably the most basic part of sewing and finishing seam allowances is essential to creating a well-made garment. Choosing the best method depends on the fabric used and the function of the garment. Finishes can range from beautifully bound seams that make a jacket look as good on the inside as on the outside, to a quick pass with a serger that can trim and bind with thread both seam allowances at the same time. If you've set aside your pinking shears because you think they're passé and difficult to use, or, if you think a zigzag stitch on your sewing machine can't compete with the complex stitch produced on a serger – maybe you just need a refresher on how to do them effectively and why they're are often the best choice when all you really need to do is prevent the fabric from fraying.
How to hem a circle skirt. How To: Attach Bias Tape (with mitered corners) Bias tape, also referred to as bias binding, has many practical applications.
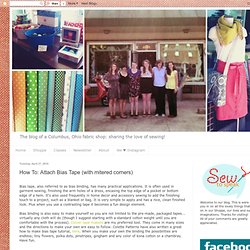
It is often used in garment sewing, finishing the arm holes of a dress, encasing the top edge of a pocket or bottom edge of a hem. It's also used frequently in home decor and accessory sewing to add the finishing touch to a project, such as a blanket or bag. It is very simple to apply and has a nice, clean finished look. Plus when you use a contrasting tape it becomes a fun design element.
Bias binding is also easy to make yourself so you are not limited to the pre-made, packaged tapes... virtually any cloth will do (though I suggest starting with a standard cotton weight until you are comfortable with the process). Here we go... First completely unfold you bias tape. Pre-made bias tape and tape made with some bias tape makers (such as Clover brand) will have one side narrower than the other. Take your project out from under your presser foot, fold your bias tape up and to the right forming a 90 degree angle.
How to Make Ribbon Trim. Recently I purchased a stole at a vintage shop.
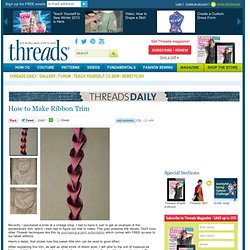
I had to have it, just to get an example of this extraordinary trim, which I then had to figure out how to make. This post presents the results. Don't miss other Threads techniques like this by purchasing a print subscription which comes with FREE access to our tablet editions. Here's a detail, that shows how this sweet little trim can be used to good effect. When explaining this trim, as well as other kinds of ribbon work, I will refer to the unit of measure as "ribbon width". Using the width of the ribbon as the increment of measure, makes any work easily scalable, either larger or smaller. Since you will lose 25% of the ribbon length when making this trim, make sure to cut your ribbon length 125% of the finished length you need.