
Lieu genois corse : torregiani histoire genoise de la corse. Nodal Point. The Nodal Point The Nodal Point of the lens (or more correctly, the entrance pupil) can be considered as the point at which the rays entering the lens converge.

Entrance Pupil Database. Wouldn't it be great if everyone entered their values for their NPP / Nodal Point / Entrance Pupil for lens and camera combinations. Some searching on the web will find a lot of people saying they want to start to create a database of some kind, but have not seen anything substantial so far (correct me if I am wrong). Please enter your own values if they are not listed. Thanks, -- Richard Korff 11:12, 13 May 2005 (EDT) To cater for all the different camera bodies and lenses, the tables have been split into 3 parts: The first table shows the position of the tripod mount in relation to the lens axis.
Manual Exposure Blending With Photoshop. Beginning real estate photographers may wonder what people in the PFRE flickr forum are talking about when the talk about “Exposure Blending”.

Is this the same as “Exposure Fusion”? No, it’s not. Exposure Fusion is where you combine a number of bracketed images with an automatic algorithm built into software such as Photomatix, Lightroom/Enfuse or other similar applications. Exposure blending is where you combine several bracketed images manually with layers in Photoshop. Since the images are on different Photoshop layers you have exacting control of how the layers are blended together.
This YouTube video by Simon Maxwell, an Architectural photographer working in the UK illustrates how to use exposure blending to carefully control the color balance in an interior shot. You can also blend images with different exposures as well as different white balances. Noise Reduction with Smart Object Stack Modes. Last week we took a look at Stack Modes in Photoshop, and found that all we needed was a layered Smart Object, and we could use the Stack Modes to great effect. This week we will continue to look at uses for Smart Object Stack Modes, looking at a very effective technique for removing color noise in photographs. I first saw this demonstrated by Katrin Eismann at Photoshop World some years back, when CS3’s stack modes were first introduced as part of Photoshop “Extended.” You are surely familiar with color noise – the downside of digital photography, which is brought on by either inexpensive sensors or high ISO settings.
It appears as a splattering of magenta and green spots throughout your image, particularly in the shadows, and brightening the shadows always seems to bring the color noise out even worse. For example, here is an image taken at ISO 3200: Not so bad, you think? See the purple and green “spattering” going on? For this example, we’ll start in Adobe Photoshop Lightroom. Image Stacking Noise Reduction Technique. Hello PentaxWorld,The other day I decided to try a trick that I read about in one of my Photoshop manuals (Adobe Photoshop CS3 for Photographers by Martin Evening).

Even though I have moved onto CS5 it is still one of my favourite Photoshop guides, possibly due to the quality of Martin Evenings efforts.In the manual he discussed some of the many benefits of Photostacking. In a previous thread in this board Manesty discussed Photostacking to achieve combined focus properties through a series of individual images to produce a single image that offered a depth of focus greater than possible from a single image.I would like to offer another use for Photostacking. Photostacking can be used to reduce the effects of noise. The technique is based on the fact that noise generated by high ISO is not always created the same for each photo.
The second photo is a stack made up of 5 photos / captures. Bret Edge Photography » Ten Killer Exposure Blending Tutorials. Delta Pool, Utah Back when I shot Velvia I extended the very limited dynamic range of that beautiful but contrasty film by using graduated neutral density filters. The digital revolution has all but eliminated GND’s from the backpacks of many landscape photographers. I use to carry three of them. I now carry only one, a Singh-Ray 3 stop soft-sep GND. Why? Exposure Blending in Photoshop – Sean Duggan This might be the best place to start.
The Basics of Exposure Blending – Sean Bagshaw Here’s another excellent primer to get the virgin blender well on their way to exposure blending bliss. Blending Exposures in Photoshop – John Williams This tutorial not only walks you through how to blend exposures for increased dynamic range but also how to blend images with different focal points for increased depth of field.
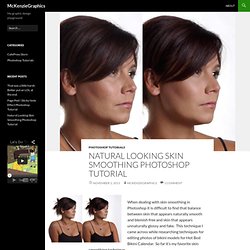
Natural Looking Skin Smoothing Photoshop Tutorial. When dealing with skin smoothing in Photoshop it is difficult to find that balance between skin that appears naturally smooth and blemish free and skin that appears unnaturally glossy and fake.

This technique I came across while researching techniques for editing photos of bikini models for Hot Bod Bikini Calendar. So far it’s my favorite skin smoothing technique. Step 1: Duplicate your background layer. Blog Archive » How to smooth skin in Photoshop. Retouching skin is rarely an easy task.

There are no absolutes when it comes to making skin look the “right” color, smoothing out wrinkles, or reducing blemishes and blotchiness. This tip will take you through one popular technique for smoothing skin texture for a younger, smoother look. Step 1: Duplicate the background onto a new layer. Anyone who as taken one of Jason Hoppe’s Photoshop retouching classes knows he is a strong advocate for non-destructive retouching techniques. As usual, we’ll preserve the original photo by duplicating the background image onto a new layer.
Step 2: Apply the Surface Blur filter. The Surface Blur filter was introduced in Photoshop CS2. Choose Filter > Blur > Surface Blur Blur the new layer to the point where the skin imperfections are no longer noticeable, but no further than that. Step 3: Add a Layer Mask. To finish up this quick technique, we add a layer mask to our newly blurred layer. Smooth Skin.