
A beautiful mess. Some of my favorite DIYs have been born from the need to solve a problem.
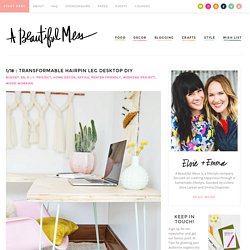
In this instance, my problem was needing more tabletop space in a studio that was always needing to be rearranged depending on the task at hand. A crafted passion. Our next Turning Tables DIY guest is yet another talented DIYer and blogger, Amanda from A Crafted Passion, and she's here to show you how she built an easy DIY modern side table, perfect for a living room or a nightstand.
We also sketched up a building plan to make it extra easy for you to build your own! Give Amanda a warm Remodelaholic welcome, and don't forget to check out all of the #TurningTablesDIY posts here (and be sure to subscribe by email or RSS and follow along over on Facebook so you won’t miss a single one of the amazing posts we have coming up!) Click Here to Get a Free Printable Version of this Building Plan Hi there! A Houseful of Handmade. I am excited to share another DIY that I made for my office & craft room remodel.
When you make over an entire room for only $100, you have to creatively DIY pretty much everything in the space! Luckily, I made a couple quick DIYs that have a huge impact on the room. A Houseful of Handmade. One of the most important parts of my office & craft room makeover was a desk.
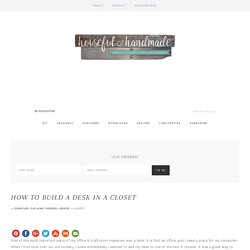
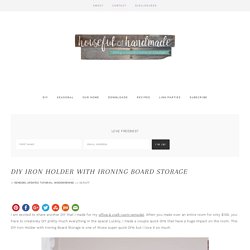
It is first an office, and I need a place for my computer. When I first took over our old nursery, I knew immediately I wanted to add my desk to one of the two 5′ closets. A Houseful of Handmade. One of the reasons it took me so long to finish up our coffee station was the drawers.

I had never done them before and everyone was telling me how hard they were. I almost left them out of the design, but I really wanted the drawers. I needed them to keep me organized. Addicted 2 DIY. Adventures of a DIY Mom. At our house we have tons of books.
It has gotten to the point that we don't have enough room for them all anymore. Adventures of a DIY Mom. My 6 year old has been bugging me about having a bookshelf in her room for ages.
All the other kids have one, so she felt left out. I finally made one for her for her birthday. That was back in July - I'm just now getting to the tutorial. I actually built and painted it all on the 4th of July. Always never done. There’s always a little bit of space that is left open after you finish a new room decoration and a lot of the time you just don’t know what to do with it.
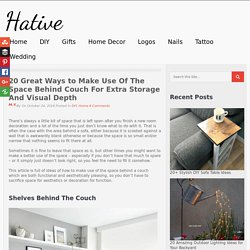
That is often the case with the area behind a sofa, either because it is scooted against a wall that is awkwardly blank otherwise or because the space is so small and/or narrow that nothing seems to fit there at all. Sometimes it is fine to leave that space as is, but other times you might want to make a better use of the space – especially if you don’t have that much to spare – or it simply just doesn’t look right, so you feel the need to fill it somehow. This article is full of ideas of how to make use of the space behind a couch which are both functional and aesthetically pleasing, so you don’t have to sacrifice space for aesthetics or decoration for function.
Shelves Behind The Couch Installing shelves on the wall behind the couch is a fantastic way to make use of the available space and provide a support for some decoration. Always Never Done. As you know if you read my last post, we bought a new sofa for our living room.
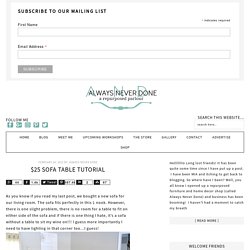
The sofa fits perfectly in this L nook. However, there is one slight problem, there is no room for a table to fit on either side of the sofa and if there is one thing I hate, it’s a sofa without a table to sit my wine on!!! I guess more importantly I need to have lighting in that corner too…I guess! You see what I mean. Ana White. Dimensions are shown above Preparation Instructions: Fill all holes with wood filler and let dry.
Apply additional coats of wood filler as needed. When wood filler is completely dry, sand the project in the direction of the wood grain with 120 grit sandpaper. Vacuum sanded project to remove sanding residue. Ana White. Ana White. I ran into a friend of mine the other day, and after the normal how are yous, she looked at me straight, and said, "Ana, HOW are you? " "I'm great . . . what do you mean? " I asked. And she said, "I read your blog, and I've noticed that you haven't been posting as often, and was just wondering if everything is okay with you.
" I was quite touched that my friend took her time to read my blog faithfully enough to know that I have not been posting six . . . sometimes seven . . . days a week, and even more touched that she would stop me to make sure everything is okay. That evening when I was putting hinges on this very trash bin cabinet, I thought about our conversation in the condiment aisle. Ana White. Preparation Instructions: Fill all holes with wood filler and let dry. Apply additional coats of wood filler as needed. When wood filler is completely dry, sand the project in the direction of the wood grain with 120 grit sandpaper.
Vacuum sanded project to remove sanding residue. Remove all sanding residue on work surfaces as well. Ana white. Preparation Instructions: Fill all holes with wood filler and let dry. Apply additional coats of wood filler as needed. When wood filler is completely dry, sand the project in the direction of the wood grain with 120 grit sandpaper. Vacuum sanded project to remove sanding residue. Remove all sanding residue on work surfaces as well. Ana White. DISCLOSURE - I'm super excited to partner with The Home Depot to host and design plans for the DIH Workshop. I am being compensated for my work, but all opinions, giddy squeals and enthusiasm are my own. I can hardly wait!!! Tomorrow night (Thursday, August 21, 2014), from 6:30-8:00, is the Home Depot DIH Workshop - Rolling Storage Cart!!!
Ana White. Well, you're here, so you've seen the new blog design. I hope you like it. I loved the old design. Every one of them. But as we get more and more content, the graphics are just having to become less and less. Some good news . . . that also brings more content, we just signed with an advertising agency that only works with home improvement brands! And I have to tell you, I've spent a few not so fun days behind the computer working on the design and the layout of the blog. Apartment Therapy. As renters, we take what we can get, and what we often get are miniscule (or non-existent) entryways and a lack of built-in storage. This multi-faceted organizer has a variety of ways to hang your stuff — coats, bags, and umbrellas — so they are at your fingertips as you head out the door, and stay tidy when you come back in. Apartment Therapy. At Home with Sweet T. Bigger than the 3 of us.
My posting cycle is all off and to be quite honest, I’m not really sure what the ‘norm’ is anymore. So, let’s get through the holidays and then I’ll get it figured out. Bits of Everything. Build Basic. This midcentury nightstand was inspired by a similar version available at West Elm, and was actually built long before Build Basic was launched.
To hear the full story about how a reader spotted it in the background of another photo, check out the full Blog Post! Build Basic. With the addition of a sliding tray for keeping office supplies handy, and a built-in fabric bulletin board for posting reminders and inspiration swatches, this chest is sure to be a welcomed addition to any office space. Build Basic. Build Basic. If you’re looking for clutter-free DIY storage without the complexity of building drawers–or using any fancy tools for that matter–this simple basket cabinet is a perfect solution. The paneled sides and shelves may make this cabinet look complex, but underneath it’s just a series of basic parts screwed together. And with endless basket options, the look of this cabinet easily adapts to any style.
Build basic. With just a few ½-inch square dowels, some twine and a few nuts, this handy trivet can be pulled together before the dinner bell rings. By dawn nicole. Canadian home workshop. Canadian home workshop. Cathy Green Interiors. Last week, I took a pair of old brass lamps that were my parents and updated them with spray paint. Today, I want to show you where we put them and share a few other updates to our family room. When we ordered a new sofa (the Davis sectional from Crate & Barrel), we decided to get rid of our coffee table and instead use a console table behind the sofa. The new console table still provides a place for magazines and drinks, while also giving us added storage.
Country Living. Creative decor by Brooke. Darice. Decorating your small space. Design Dining & Diapers. Design Evolving. Designer Trapped. Designs by Studio C. Designs by Studio C. Designs by Studio C. Designs by Studio C. Designs by Studio C. Designs by Studio C. Designs by Studio C. Designs by Studio C. Designs by Studio C. Designs by Studio C. Designs by Studio C. Designs by Studio C. Designs by Studio C. Designs by Studio C. Designs by Studio C. Designs by Studio C. Designs by Studio C. Designs by Studio C. Designs by Studio C. Designs by Studio C. Designs by Studio C. Designs by Studio C. Directions not Included. Doodle Craft Blog. East Coast Creative. eHow. Francois et Moi. Goods Home Design.
Goods Home Design. Goods Home Design. Her Tool Belt. Her Tool Belt. Homedit. Honey bear lane. How About Orange. Hymns and Verses. I spy Diy. Imperfectly polished. In my own style. In my own style. In my own style. Infarrantly Creative. Infarrantly creative. Infarrantly Creative. Inspiration Made Simple. Jenna Sue Design. Just a girl. Keeping it Simple. Knock off Decor. Living in O. Making it in the mountains. Making it in the mountains. Mom 4 Real. More Like Home. My Repurposed Life. My Repurposed Life. Natalme. Natalme. One More Time Events. Paper Daisy Design. Paper and Stitch.