
Vintage reclaimed wood sign par SlightImperfections. Tutorial: Vintage-looking painted sign from salvaged wood. Today I have a little tutorial for you.
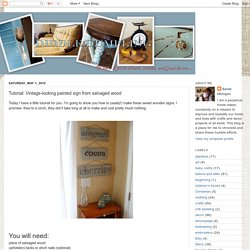
I'm going to show you how to (easily!) Make these sweet wooden signs. I promise- they're a cinch, they don't take long at all to make and cost pretty much nothing. You will need: piece of salvaged wood upholstery tacks or short nails (optional) hammer acrylic paint (background color) black acrylic paint (or other color to fill in letters) large paint brush small paint brushink jet printer twine Sharpie Marker or other dull, rounded tool This project started with a pile of cedar fence pieces that we've had sitting in our backyard for ages. I loved how grey and weathered they had become from sitting outside. Next, distress the wood to your liking. Next, choose your paint. Alisa Burke — doodle delight. Doodle delight After lots of requests from many of you out there- I am super excited to announce my new online class- Doodle Delight!
While I touch on doodling in many of my classes I have yet to dedicate a class just to the art of doodling. While I believe ANYONE (despite experience) can create great doodles I have put together this little class to share my own process, demonstrate techniques, ideas, prompts and inspiration to keep your doodling authentic and unique! Well explore how to use lines, shading, how to create unique doodles, how to use and apply inspiration, play with scale and more! All you need is a pen and paper and you are ready to go! Once you register and pay, within 72 hours you will receive an email confirmation with login information about the site where the the class is held. Important Facts- All of my classes have unlimited access- once you register you can create and access at any time and work at your own pace.
Wooden Wall Letters / Wood Wall Letters / Wood Lettering / Wooden Lettering.
Free and Easy DIY Furniture Plans to Save You Money. Baby Craft Tutorials + Ideas « Paperseed. My Projects T-shirt to Tank Top with Rosette Re-Fashion DIY Mustache Pacifier Printable Pdf Making Freezer Paper Stencils + Printable PDF Baby Hair Clip Tutorial Easy, Store Bought, Iron-On Transfer Onesie Making Appliqued Onesies Baby Shoe Tutorials Burp Cloths Cute Fabric Art Cards Baby’s Minky Blanket Bias Tape Bib Template and Tutorial Other Projects I like Noodlehead Diaper Pouch Tutorial Hair Clip Holder: Clothes Line Simple Kimono Wrap from Habitual Modern Baby Mary Jane Booties Tutorial & Pattern Poopy Clutch (Diaper/Wipes Pouch) from ISLY DIY Pillowcase Baby Dress Pattern Rainbow Sunshine Plushie Mini Sunshade Dress DIY Button Craft Monogram Letter Tutorial.
Platform Bed. Digital Home Thoughts: The Great Photo Book Round-Up Review: Who Makes The Best Photo Books? This review has been updated as of April 2011.
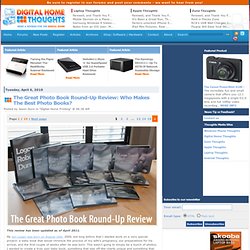
My son Logan was born on August 16th, 2009, but long before that I started work on a very special project: a baby book that would chronicle the process of my wife's pregnancy, our preparations for his arrival, and the first couple of weeks after he was born. This wasn't going to simply be a bunch of photos; I wanted to create a truly epic baby book, something that was off-the-charts unique and something that would become a family treasure. I've wanted to use FotoFusion (see below for a discount coupon) to create customized page layouts for a long time now, because I knew it would allow me to break the limited confines of what typical photo book software permitted. I had carefully created all the pages in FotoFusion, exported each page as a high-resolution JPEG file, and dropped the images into full-page layouts. This review is likely the most intense writing project I've ever undertaken short of writing my last book. Let's get started! Photobook Reviews.
I have been promising for quite a while now that I would be posting a review on photobook printers.

FINALLY, I have all of my books in and am ready to tell you what I learned. This is a looooooong post and meant to be a resource. We think that it is easier for you to find what you are looking for, at a later date, if all of this information is in one big post instead of broken up over several days. Before we get started, I would like to thank my “super secret super spy” that let me set up accounts all over photobook-land using her name and contact information, she went in and paid for the books after I added them to the cart, using her credit card or PayPal information (for which THE DAILY DIGI reimbursed her), received all of the books and got them to me, and also dealt with issues that came up in printing.
Use of colors in web and graphic design. Diaper Cake Tutorial. UPDATE: check out my most recent diaper cake for some optional revisions to supplies and instructions. I. Supplies Needed: One large telescoping mailing tube (mine was 4 inches in diameter). I found mine at The Container Store. You'll also need: a large piece of cardboardwhite butcher paper or wrapping paperdoilies2 bags clear rubber hair bands (think Goody) - about 100 bandslarge rubber bands, preferably white (I also found these at the container store - Can Bandz)a strong cardboard wrapping paper tube2 packs of good-quality diapers, preferably plain whiteribbondecorative papersafety pinsa hot glue guntaperubber cementsharp scissorsflowers for decoration First, roll all of your diapers.
It will look like this. II.