
Reviews: Insanely Easy DIY Projects. Simplify Your Life We think these DIY projects are easy, useful and fun to do in good company.So, whether you engage yourself in this with a friend, roommate or significant other, you'll end up with something interesting to share through pictures later on!

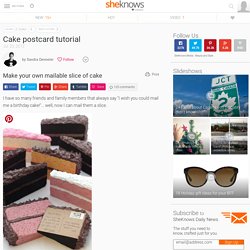
Lets begin, shall we? Cake postcard tutorial. Supplies Materials needed to make two cake postcards: 1 large sponge (yellow paints the best)Serrated knifeX-Acto or utility knifeSpray paint (brown, yellow, pink or white)1 tube acrylic latex caulk (brown, cream or white)Spray adhesive (3M Super 77 works great!)

Cardboard, kraft paper or scrapbook paper Instructions Cut sponge into wedge shape With a serrated knife, using a sawing motion, cut a sponge into two, cake wedge shapes. Cut a center groove into sponge Using an X-Acto or utility knife, cut a section of foam from the center of the sponge. Paint the sponge wedges in desired color. Trace the slice of cake When the sponge wedges are dry, trace around them on a piece of cardboard, kraft paper or colorful scrapbook paper. Spray glue the postcards to the solid, flat sides of the sponge wedges. DIY Picture Tiles - You Will Never Buy a Photo Frame Again. Lately I’ve been having this huge urge to decorate the house.

This is big news. I do not decorate. Arguably, one of the reasons why is because I. absolutely. hate. to. buy. mass. produced. decor. (Also, I can’t ever remember if pink and purple go together or not.) Anyway, this extends to photo frames. Nope. Long story short, I discovered this method of transferring my photos cheaply, quickly, and beautifully to something uncommon and unique. Tiles. The only thing that’s not particularly crunchy about this is that it uses Modge Podge or similar (and I’m not sure what’s in Modge Podge). Untitled. DIY 'Light Bright' Installation from Blueprint Magazine.
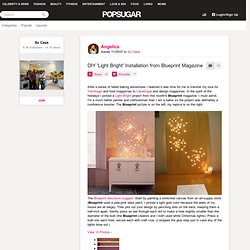
After a series of failed baking adventures I realized it was time for me to transfer my love for YumSugar and food magazines to CasaSugar and design magazines.

In the spirit of the holidays I picked a Light Bright project from this month's Blueprint magazine. I must admit, I'm a much better painter and craftswoman than I am a baker so the project was definately a confidence booster. The Blueprint picture is on the left, my replica is on the right. The Blueprint directions suggest: Start by painting a stretched canvas from an art-supply store (Blueprint used a pale-pink latex paint, I picked a light gold color because the walls of my house are all beige). Then plot out your design by penciling dots on the back, keeping them a half-inch apart. DIY Leopard Print Cut-off Shorts. How great are these shorts!?

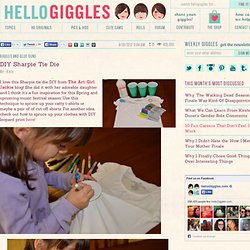
Also, so DIYable! I did a similar DIY before using acrylic paint here! I found these mustard beauties during one of my mad pinning rampages – Pinterest is so addictive, I posted about it before here, and you can follow my boards here. I want to wear these shorts this Spring, paired with a soft white tee and black boots! All you need to DO IT is: 1) A pair of denim cut-off shorts from the thrift store. 2) Dye them a mustard yellow color with fabric dye or just leave them as is. 3) Paint on leopard spots sporadically using fabric paint or markers in black and dark tan. Hmm, in case you’re unsure how to hand-paint leopard spots, I created this How-to Draw Leopard Spots Diagram… DIY Sharpie Tie Die. I love this Sharpie tie die DIY from The Art Girl Jackie blog!

She did it with her adorable daughter and I think it’s a fun inspiration for this Spring and upcoming music festival season. Use this technique to spruce up your ratty t-shirts or maybe a pair of of cut off shorts. For another idea, check out how to spruce up your clothes with DIY leopard print here! What You Need: Pre-washed white or light colored t-shirtRubbing AlcoholLiquid dropper or medicine dropperSmall plastic cup(s)Rubber bandsVariety of colored Sharpies Do It! Choose a spot to start and put your cup in right side up and secure a rubber band around the cup rim holding the shirt tightly in place.Pick your colors and create a small design in the center of the stretched circle. Photos and DIY via The Art Girl Jackie. DIY Macrame Bracelet. Growing up by the beach in Southern California, the ability to knot a macrame bracelet was practically a right of passage.

Although those days are long behind us, we’ve never forgotten the ever-so-simple square knot technique. This time, however, we’re replacing hemp and wooden beads for more updated elements like colorful nylon cord and glossy metal charms. Happy knotting! You’ll need: Start by cutting the knotting cord into two 30 inch, two 20 inch and one 10 inch lengths. Center the 30 inch cord under the two middle strands. Pull tightly and slide the knot up to the top. Finish the 2nd half of the square knot by folding the left cord over the middle strands and under the right cord.
Pull tightly and repeat the steps – left, right, left, right . . . To finish the knots, thread one of the cords onto a needle and sew up the center of 3-4 knots along the backside. Repeat the same step on the other cord. After sewing up both knotting cords, trim away any excess. Homemade Lip Balm - How to Make Lip Balm with Beeswax, Honey and Cocoa Butter.