
36 DIY Gift Box Tutorials. Magic Boxes. Due to popular demand, I am doing a tutorial on the Magic Boxes I showed off in some previous posts. To begin, choose your paper. You need six sheets of matching paper (preferably a heavier weight). Choose one for your outside, budgeting for a contrasting one for your lid, and 4 to create the inside boxes. Cut as follows (all measurement are in inches): Outside: 6 x 11 3/4ths Lid: 8.5 x 8.5 4 inner boxes: 8 x 8 The only challenging part of this project is creating the lid and inside compartments. 1. 2. fold the tips of your paper in so that they meet at the center. Fold in all four sides, and then unfold. 3. This fold gives you the sides of your box. Making a bow with a fork. I made this fork bow tutorial for you.
It's very easy and makes cute little bows that can be tied to favors, small earring boxes, homemade Christmas ornaments and more! I used an old, big serving fork to demonstrate, but you can use a regular size fork or dowels glued on a wooden base. Picture 1 Below: All you need is some kind of 4 pronged fork, ribbon and a pair of scissors. Picture 2 Below: First off, start by weaving the ribbon in and out of the fork. Leave a little extra ribbon on the left and just let it lie there. Picture 3 Below: Take the ribbon on the right hand side over the top of the fork and weave the ribbon in and out. Picture 4 Below: Then, do the same thing again on the left hand side of the fork, weaving the ribbon in and out, coming the opposite direction. Picture 5 Below: Now, finish weaving in and out until you almost reach the top of the fork. Picture 6 Below: Take a separate piece of ribbon and slide it through the bottom in the middle of the fork. Clay Imprinted Gift Tags. While walking down the aisle of Michaels (where I always seem to inexplicably end up during my spare time), this clay stuff caught my eye.
It’s called Crayola Model Magic. It’s made for little kids. I don’t care, I want to play! Intrigued, I bought a small tub for $3.49 and I have to say, I’m really impressed with this stuff!! It’s light and airy so when it hardens, it’s not heavy at all. I decided to make some gift tags. Materials needed: Crayola Model Magic clay, rolling pin, cookie cutters, mini alphabet stamps, wooden chopsticks, parchment paper (not pictured) Make a little bow with a fork.
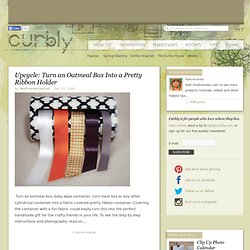
Oatmeal Box Ribbon Holder. Turn an oatmeal box, baby wipe container, corn meal box or any other cylindrical container into a fabric covered pretty ribbon container.

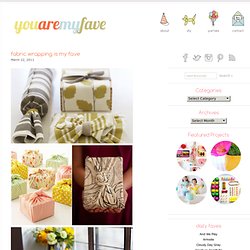
Covering the container with a fun fabric could easily turn this into the perfect handmade gift for the crafty friends in your life. To see the step by step instructions and photographs, read on.... What you need: containerfabricscissorstape measurestraight edgeutility knifespray adhesivefabric gluegimp or other trim for the topdowel rod (optional) What you do: Fabric wrapping. I seem to have this habit of getting stuck on one thing and I really love it (borderline obsession love it) until I tire and move on.

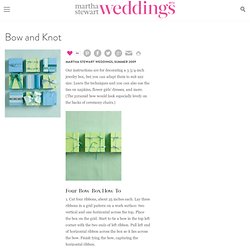
Sometimes it manifests itself in the form of a movie, like that one summer when I was nine and watched Mighty Ducks every single day. Sometimes it manifests itself in a food, like the month I put mustard on everything. And right now it manifests itself in the beauty of fabric wrapping. I’m spending my days studyingthese tutorials from Chewing the Cud and thrift shopping for pretty scarves. It’s going to be hard to kick this one. images: Studio Patro, Joseph De Leo for Handmade Weddings, Chewing the Cud, Angela Gaspar styled by You + Me via Brooklyn Bride, Chewing the Cud. Bow and Knot tying. Our instructions are for decorating a 3 3/4-inch jewelry box, but you can adapt them to suit any size.

Learn the techniques and you can also use the ties on napkins, flower girls' dresses, and more. (The pyramid bow would look especially lovely on the backs of ceremony chairs.) Four-Bow-Box How-To1. Cut four ribbons, about 25 inches each. Lay three ribbons in a grid pattern on a work surface: two vertical and one horizontal across the top.