
Fourth of July Citronella Candles. Jun24 by Brenda Ponnay It turns out citronella candles are pretty easy to make!

They are a bit fussy and require a lot of microwaving and some pouring of hot wax but the end result is fun and pretty. DIY Sun Jars. The principle is simple and seductively clever: solar lights that store energy during the day and release light at night.

These can be purchased ready-made in a variety of colors (yellow, blue and red) but they can also be built at home. A simple, less-technical approach involves buying a conventional solar-powered yard lamp and then essentially harvesting it for key pieces to put in a jar. A Little Fall Leaf Re-use Project. Ok!

This may look a bit familiar. While I sat brushing Mod Podge on dozens of leaves to use on my Fall wreath, I decided to light a little jar candle covered with fall leaves that I made last year to keep me company. Doily Lamp. Yarn Chandeliers.
Jessica of Wednesday Inc shows us how to make those gorgeous twine chandeliers from the inspiration shoot she shared with us this morning.

Using balloons, glue and twine, you can also make these lanterns for your wedding – and then bring it home and use it as your very own mid century lampshade. What you will need are: balloons, glue, yarn, tray for glue, corn starch 1/2 cup of Corn starch, 1/4 cup of Warm water, clear fast drying spray paint, hanging lamp cord or fishing line (depending on your desired final product), and a lighting kit if you’re looking for a fully functional lantern.
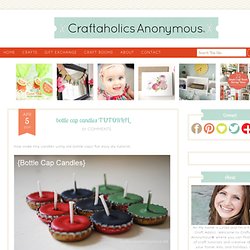
Jessica recommends using a sharpie to mark on the inflated balloon how much room you need to leave for the lighting cord. She also recommends coating the balloon with vaseline prior to wrapping the yarn coated with glue so it doesn’t stick on the balloon once it’s dry. Faux Capiz Shell Chandelier. Bottle cap candles. How make tiny candles using old bottle caps!

Fun easy diy tutorial. these tiny candles are a really fun to make and come together quickly. AND you can up-cycle several materials in the process, which makes this a fabulous Earth Day craft :) {Earth Day is April 22} to make these colorful tiny candles, i used several materials that usually end up in a land fill: bottle caps, broken crayons, and empty soup cans. the only thing i bought to make them was the pre-waxed wicks which cost me $1.50 for a set of 12. these make a great kid craft {with supervision, of course!}
How to Make Bottle Cap Candlessupplies: bottle caps, crayons {or wax}, pre-waxed wicks, soup cans, wax paper {optional}, small cooking pan, scissors, and water remove paper from crayons. you can also use candle wax if you wanted. put crayons in clean, empty soup cans. take your pre-waxed wicks and… Photo lampshades. PINTEREST UPDATE: This is a post from 2010.

I do not take custom orders, only the tutorial is available. The lamps have held up wonderfully. As many of you requested, Marie is sharing a little tutorial here on how she made her lampshades. When she made them she was not planning on doing a tutorial for this blog, so be sure to thank her for taking the time to write all this out. Also, for those wondering…Kara will be sharing some tutorials for her book art on her blog soon. Marie is happy to do custom orders for those that prefer buying over making! * LAMPSHADE – Hobby Lobby carries self-adhesive shades & nightlights, Target has some smaller lamps for $19 that would be perfect for this project, I’ve found some lamps & shades on Craigslist. DIY Thread LED Tealight Cover. I was messing around with different materials trying to dress up a little LED tealight, and this is one of the versions I ended up liking (plus it’s dirt cheap since it’s just thread!).

I love me some textures. This may be useful for those with wedding venues that don’t allow real flames. Finding these* at the dollar store is what started this mess… 1) Get your hands on some thin cardboard that you’ll be recycling anyway. I used the back of a pasta box. 2) Find some wrapping plastic (try to use something you’ll toss anyway!) 3. 4. 5. 6. 7. How to obtain solar panels for free. Make an Oil Lamp with an Orange - Portugal Smallholding.
Plastic Cup Lamp. Now that my university is closed for winter holidays, I finally have more free time to do all the crafty things I’ve been wanting to.

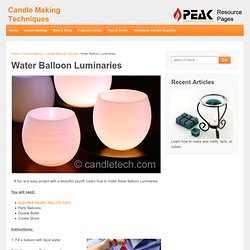
One of these is a lamp made from plastic cups I’ve seen at taf, the art foundation, in the Monastiraki region in the center of Athens. When I first saw it at taf, I was amazed; I looked closely and I couldn’t believe my eyes! The object itself is so peculiar, modern and alien-like it could be in any design exhibition. Water Balloon Luminaries. A fun and easy project with a beautiful payoff.

Learn how to make these Balloon Luminaries. You will need: High-Melt Paraffin Wax (IGI 1260)Party BalloonsDouble BoilerCookie Sheet Instructions: 1. 2. 3.