
Paper, Plastic, or Furoshiki? Envelope Clutch & The Hybrid Chick. I made a cash envelope clutch in January for the Paper Craft Planet challenge, and had a few requests on how to assemble it.

So here it is, another sassy clutch using the Envelope Template. Supply List: Template: Standard Envelope Template Set by Kelleigh Ratzlaff Designs Digital papers: Share the Moments Designer Kit by Danielle Engebretson Ribbons: Thin flat ribbons like binding tape, or Taffeta ribbon recommended Others: Magnet snaps, thread and needle, sticky double sided tape or glue. For the paper clutch, I printed two of the envelope templates on both sides of the paper, one for front flap & back body, and the other one for the front body. I cut out some flaps and added extra score lines to make into a clutch.
If you want, you could enlarge the templates a bit to make it bigger than the envelopes that will go inside. Coat with a glossy glue/sealer like Mod Podge to make it sturdier. Add the double sided tape on the bottom flap (front body piece) to the other piece. Flatten it down. DIY {doily canvas bag} & ashleyannphotography.com. Thankfully everyone seems to be making a switch from plastic to lasting when it comes to shopping bags, so here’s another fun little tutorial on customizing one to make it oh so cute.

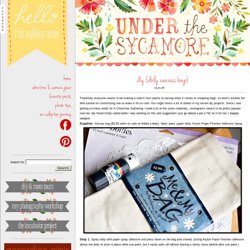
You might notice a lot of doilies in my recent diy projects. Since I was getting so many ready for A Christmas Gathering I used a lot of the same materials…monograms seems to be pretty popular now too. My friend Cindy called while I was working on this and suggested I just go ahead a put a “W” on it for her, I happily obligied. Canvas bag ($2.00 when on sale at Hobby Lobby), fabric paint, paper doily, Krylon Paper Finishes Adhesive Spray : Spray doily with paper spray adhesive and press down on the bag (not shown) . : Gently paint over the holes – I recommend paint meant for fabric, not crafts. . : Peel back doily before paint dries. Bag after doily is removed. Saltwater Kids: RETRO DUFFEL bag TUTORIAL. Boys, boys, boys.

The silly things they say and do keep me laughing all the time. In fact, as I was working on this post my three year-old came blasting by, one arm outstretched, clutching his toothbrush, shouting (in a deep manly voice) "Oh, Mr. Plaque I am coming to get you! " Dental Superheros make my day! My favorite part of making this tutorial, by far, was the photo shoot. I am so excited to share this project with you because it is as fun as my two silly boys. The design of the RETRO DUFFEL is based on the original Duffel Bag - the manliest of all the bags in the luggage family. This is a miniature version of the typical duffel bag, perfect for an overnight stay at Grandma's, hauling gear to the big game, or for storing my all-time favorite gift - the FORT KIT!
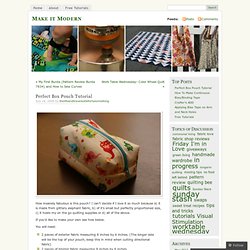
OK, lets get started! Materials: *if you have trouble finding a 16" zipper, a larger size will work fine. Perfect Box Pouch Tutorial & Make it Modern. How insanely fabulous is this pouch?

I can’t decide if I love it so much because a) it is made from glittery elephant fabric, b) of it’s small but perfectly proportioned size, c) it holds my on the go quilting supplies or d) all of the above. If you’d like to make your own see how below. You will need: 2 pieces of exterior fabric measuring 8 inches by 6 inches. (The longer side will be the top of your pouch, keep this in mind when cutting directional fabric)2 pieces of interior fabric measuring 8 inches by 6 inches2 pieces of mid-weight woven non-fusible interfacing (This helps add body to your bag, because without it it wouldn’t be very “boxy””1 12 inch zipperCoordinating thread (this will be visible on the outside of the bag) Things that will come in handy: rotary cuttercutting matshearscraft scissorsclear ruler Step 1: Choose and cut your fabric- is it just me or is this oftentime the hardest part?
Step 2: Layer your pieces. Step 3: Stitch the layers together 1/4 in from the edge.