
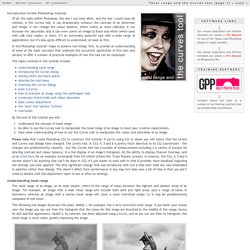
L’outil Curves pour retoucher vos images. L’outil Courbes («Curves» de Photoshop est un «must» pour vos retouches photos et cela, même si vous avez pris une superbe photographie. « Article original paru sur le site web de Tutorial9.net et a été écrit par Owen James . » Avec l’outil d’ajustement des courbes, vous avez la possibilité… d’ajuster les et les de votre photo d’une manière globale ou locale d’ajuster les Présentation Un pixel possède une certaine clarté (brightness) et vous pouvez changer cette propriété pour plus foncée ou plus pâle.
The true power of Photoshop Curves Adjustment tool: Luminosity & contrast. The true power of Photoshop Curves Adjustment tool: Luminosity & contrast. Photoshop tutorial: Tonal range and the Curves tool. Of all the tools within Photoshop, the one I use most often, and the one I could least do without, is the Curves tool.
It can dramatically enhance the contrast of an otherwise dull image; it can change the colour balance, either subtly or more radically; it can increase the saturation; and it can even covert an image to black and white (when used with LAB color mode). In short, it’s an extremely powerful tool with a wide range of applications; but it’s also quite difficult to understand, at least at first. In this Photoshop tutorial I hope to achieve two things: first, to provide an understanding of some of the basic concepts that underpin the successful application of this tool; and second, to offer a number of practical examples of how this tool can be employed. Using the Photoshop Curves Tool. The Photoshop curves tool is perhaps the most powerful and flexible image transformation, yet it may also be one of the most intimidating.
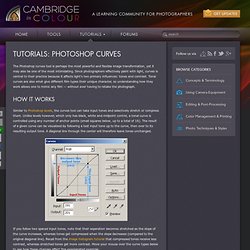
Since photographers effectively paint with light, curves is central to their practice because it affects light's two primary influences: tones and contrast. Tonal curves are also what give different film types their unique character, so understanding how they work allows one to mimic any film — without ever having to retake the photograph. Similar to Photoshop levels, the curves tool can take input tones and selectively stretch or compress them. Unlike levels however, which only has black, white and midpoint control, a tonal curve is controlled using any number of anchor points (small squares below, up to a total of 16).
The result of a given curve can be visualized by following a test input tone up to the curve, then over to its resulting output tone. Note: curves and histograms shown above are applied to and shown for luminosity (not RGB) Using the Photoshop Curves Tool. Courbe des tonalités LR 4 sur Tuto.com. Ce tuto vidéo "Courbe des tonalités avec Lightroom 4" fait partie d'une formation complète qui vous permettra de découvrir plus en profondeur Lightroom.
Découvrez sans plus attendre la formation "Lightroom 4 : Les fondamentaux" dans laquelle vous retrouverez cette vidéo et tous les fichiers source utilisés par le formateur.Les fichiers source ne sont pas fournis dans les vidéos vendues à l'unité. La courbe des tonalités sert à corriger plus finement le contraste dans des zones précises de l'image. Jetez un oeil à ces autres tuto Lightroom 4 Pour vous faire un avis, voici un extrait de quelques secondes. Correction des couleurs dans Lightroom avec le panneau TSL. Tone Curve Lightroom Tutorial. This extract is from chapter 4 of the Wiley title 'Lightroom 4: Streamlining Your Digital Photography Process' by Nat Coalson.

After adjusting the settings on the Basic panel, you can further refine the photo's contrast by manipulating specific tone ranges with the Tone Curve panel (see Figure 4–26). If you’ve used curves in Photoshop or other software, the Tone Curve panel may seem familiar to you. The horizontal axis represents the original, unaltered values in the image, with the black point at the left and the white point at the right. Réglages et Courbe [2/2] Si vous avez bien suivi l’article de la semaine dernière, vous avez du voir qu’il reste quelques réglages de bases que nous n’avons pas encore abordés.
![Réglages et Courbe [2/2]](http://cdn.pearltrees.com/s/pic/th/cosmetique-reglages-courbe-11071078)
Aujourd’hui, on va donc s’intéresser à la clarté, la saturation et la vibrance. On va aussi aborder la courbe des tonalités histoire de démystifier cet outil bien pratique. N’hésitez pas à participer au sondage : “Quel logiciel de développement utilisez vous?” Mastering Lightroom: How To Use the Tone Curve Panel. In this short tutorial I will show you how to use one of the easiest and most powerful tools found in Lightroom – the Tone Curve. In my previous tutorial about black & white conversions , I briefly showed you how to use the HSL Panel’s Luminance section to control the lightness of separate colors of the image.
Using the Tone Curve Panel is very similar as it also allows you to control the lightness and darkness of various parts of a given photograph, however, rather than altering separate colors, the Tone Curve tool controls certain ranges of actual tones in the image. Tonal Adjustments in the Age of Lightroom 4. The Power of Curves In Photoshop, my primary tonal adjustment tool has been the Curves Adjustment layer.
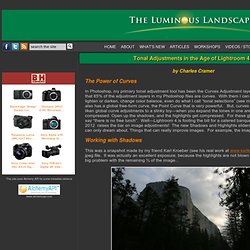
I would wildly guess that 85% of the adjustment layers in my Photoshop files are curves. With them I can add or subtract contrast, lighten or darken, change color balance, even do what I call “tonal selections” (see my article here ). Lightroom also has a global free-form curve, the Point Curve that is very powerful. But, curves do have their limits. Working with Shadows This was a snapshot made by my friend Karl Kroeber (see his real work at www.karlkroeber.com), and is a jpeg file.
Some very dark shadows The dark trees above are almost completely black. Now Photoshop does offer what could be called a predecessor to the new Lightroom Shadows and Highlights sliders, but it works in a very different way, and not quite as well.