
The TUTORIAL: QUICK & SIMPLE UPDO. Here's an easy and quick updo that's super fun.
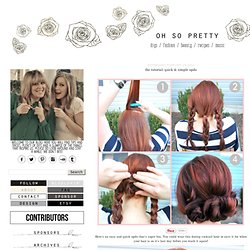
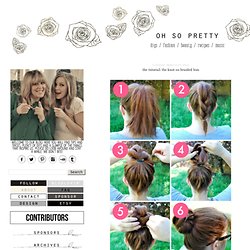
You could wear this during cocktail hour or save it for when your hair is on it's last day before you wash it again! Start with brushed-through hair. Tease your hair at the crown. The TUTORIAL: THE KNOT-SO BRAIDED BUN. 24K+ We love love buns!
They are easy and super fun when you can get it right. I personally love a messier bun but it always starts falling apart at the wrong time. With this bun you can rest assured it won't be going anywhere but you can still achieve a messier not-so-put together bun. Read on to see how we did it! Donut Bun Tutorial Two Ways - Regal + Rocker. Time for another hair tutoriaaaaaal!
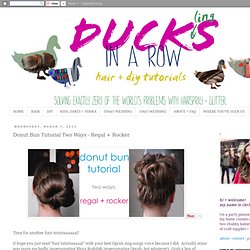
(I hope you just read "hair tutoriaaaaal" with your best Oprah sing-songy voice because I did. Actually mine was more me badly impersonating Maya Rudolph impersonating Oprah, but whatever). Grab a box of munchkins because today we're doing two versions of the donut bun, a staple in the Adele hair rotation. I think I actually love Adele more than I love donuts, which says a lot. Tips for Sewing Stretch Fabric + D.I.Y. Hi friends!

Today we're going to share some tips for sewing stretch fabric and teach you a fun D.I.Y. project to practice with! These velvet turbans were one of our favorite products to make and sell at Red Velvet last year. We've since sent them off to retirement, so I'm here to teach you how to make your very own today! Styling Tip: one fun way to wear a silk scarf. Hi there!

I'm excited to share this quick and fun styling tip today. I have an insane collection of silk scarves. How To Style A Messy Bun. After many reader requests, I've put together a fun and simple photo how-to for styling a messy bun!

It's easier than you think to get a nice high messy bun. Here's how I do it... How To Style A Messy Bun 1. Depending on how long your hair is you can style the bun on the top of your head, towards the bottom (near your neck) or to the side. My hair is pretty long, so I can style it all three ways. How to style long hair short. Sometimes you want to have a short hair day, but without the commitment of actually getting your hair cut!

Here's a fun and cute way to style your long locks into a short bob do. Enjoy! 1. The Perfect Holiday Hair Tutorial. Katie always has amazing, fancy hair!
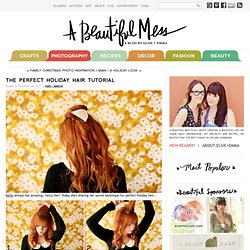
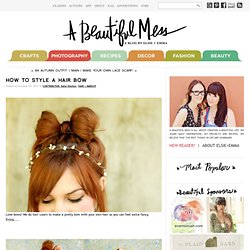
Today she's sharing her secret technique for perfect holiday hair... Step 1: Gather a section of hair from the top/center of your head. Step 2: Give it a little back-combing to add some texture and volume. How To Style a Hair Bow. Love bows?
We do too! Learn to make a pretty bow with your own hair so you can feel extra fancy. How To Style a Side Braid. Here's a brand new, extra magical hair how-to by Katie of Skunkboy. 1.Start with a dramatic side part. 2.
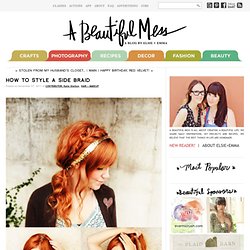
Separate a small section of hair on the side. This will be the beginning of your braid. 3.Taking that section, separate it into two smaller sections. 4. Using a fishtail braid method, begin braiding. 5. Continue the french braid until you reach behind the ear. Then finish your braid all the way down using the regular fishtail method. 6. D.I.Y. Curls: How To Rag Roll Your Hair. I love the look of naturally curly hair! My sweet friend, Katie, told me about rag rolling.
It's a quick and simple way to get natural looking curls without using a curling iron! I asked her to share her method here on A Beautiful Mess because I knew you'd be itching to learn like I was! How To Style a Fishtail Braid. We love the look of fishtail braids! This trend is incredibly easy to style, even on your own hair. Kinsey and I photographed the steps so you can try it out for yourself... Here's how to style a fishtail braid... 1. Part your hair into two even sections. 2. A Tutorial on how to create a messy textured bun. As I’ve mentioned before many a time I don’t really “do” hair. One I don’t get time and two, I’m frankly not very good at it. However apart from my “just got out of bed” look (bit of mousse, dry upside down, few waves) I am partial to a messy textured bun. By this I mean an up-do that looks kind of “casual” has lots of volume and pretty much stays in for a few days at a time, perfect for a fine locked Madam such as myself. And it doesn’t take that long either – promise.
To Add Colors in Life - StumbleUpon. We women adore fashion and style. Fashion comes in clothes, shoes, makeup, fancy accessories, styles the way we carry things and hairstyles. We enjoy dressing up, getting ready and styling our hair. Hair is the part of fashion and beauty and Hair-styling is an art, to carry your hair according to your style statement and your physical appearance is a really tough job. Working girls got a small amount of time for their hairdos and hair-styling in their daily routine. How To Use A Sock To Get Beautiful Curly Hair Without Heat.
If you are a mom on the go with long hair you HAVE TO try this. It will knock your socks off and have you wrapping your hair up in them! This is all about how to make your hair beautiful with no heat and no time. Curl your hair in your sleep with a sock. Yup, you heard me right. Have you heard of this sock bun? How-To: The Cascade/Waterfall Braid - StumbleUpon.