
Fox Pincushion Amigurumi Blue by minibytes. Zip-up Earbuds. All Free Sewing - Free Sewing Patterns, Sewing Projects, Tips, Video, How-To Sew and More.
Tutorial - Crop Circle Table Runner. Hello!

Welcome to my first tutorial! I'm so excited to share this fun table runner idea with you.... Sew,Mama,Sew! Is having a scrap tutorial contest and I thought I'd try my hand at making one for you using a fun technique for turning scraps in to "FABRIC STICKERS". You read that right - it's a simple case of scrap, cut, sew, flip and stick! Here's what you need:- fabric scraps at least 3" square- background fabric (I used a piece of organic linen 18"w X 55" long)-backing fabric the same size as your runner-lightweight, fusible woven interfacing the same size as your runner (I used this to stabilize my linen by fusing it to the wrong side of the linen before starting any applique)-scraps of lightweight, fusible non-woven interfacing like "Sewer's Dream" large enough to cover your largest circle template.
Here's how you do it: 1) Pick a crop of scraps that look nice together. 3) Trace a variety of circle sizes onto the wrong side of your scrap fabric pieces. How to Make a Basic Pillow + How to Finish a Pillow with Binding. Julie Herman from Jaybird Quilts shows us how to make a basic pillow today (the foundation for the rest of our tutorials all month long!).

Once you’re comfortable with the basic pillow, she shows you how to step it up a notch by finishing your pillow with binding. Enjoy today’s tutorials, and use your new skills to “wow” everyone with your entry in our Great SMS Pillow Contest! Pillows are a great simple project that can be made from start to finish in no time! While you can make a pillow and stuff it I suggest using a pillow form. Pillow forms are available at most quilt shops and hobby shops and take one step out of the process!
Tutorial ~ Zippered and Slip Pocket Tutorial. Many of you know Autum from her fabulous creations and her blog, Creative Little Daisy.
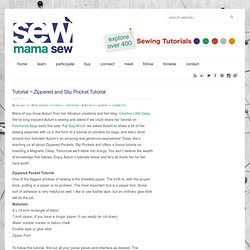
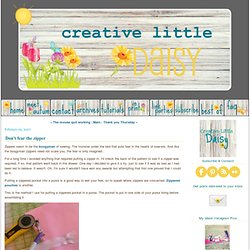
Creative little daisy: Don't fear the zipper. Zippers seem to be the boogyman of sewing.
The monster under the bed that puts fear in the hearts of sew-ers. And like the boogyman zippers need not scare you, the fear is only imagined. For a long time I avoided anything that required putting a zipper in. I'd check the back of the pattern to see if a zipper was required, if so, that pattern went back in the drawer. Installing a Zipper ~ Tutorial by Michelle. How to add a zippered pocket to a purse-Tutorial. I am currently in the process of building up inventory for my Etsy & Artfire shops...................so this is the right time to create tutorials as I am anywayz sewing quite a bit.All I have to do is click pics:) One thing that I have come across very often is how lot of crafters are REEEALLY scared of zippers!

Believe me its much easier than it looks!! Today I am going to do a quick tutorial on adding zippered pockets to your bags & purses. OK............lets roll. 1. Firstly cut your lining piece................I know its probably dumb of me telling it but we will be adding the pocket before we assemble the inner lining.Take one of the lining pieces.If you are using printed fabric like me,take a piece with nice print as it will show up . I made this yesterday night so pardon the pics quality:) 2. 3. 4. 5. 6. 7. 8. 9. 10. Add a zippered pocket to a purse lining. Sewing Zippers in Bags Tutorial 1. (aka Zippered inner bag pocket)
**UPDATE** If you'd like this tutorial (or any of my others) in PDF format click here.

Note: to view the PDF tutorial, you will need the latest Adobe Viewer program. Get the latest version of the viewer absolutely free by clicking on the button below:
Add a strap to an iPad case. Freckled Whimsy: iPad Pouch Tutorial. First line of business...HAPPY EASTER!!!!

I hope all of you are having a grand day! So it seems that you like tutorials, hm? Me thinks so. :) Upon popular request, here is the iPad Pouch/Case tutorial. This will fit the first generation iPad as well as the iPad 2. Fabric used in above photo: Front cover is Treasures & Tidbits by Piece O Cake and back cover is Pick A Bunch by Nancy Mims, both for Robert Kaufman. Materials: Zipper - 10" or longer Scrap pieces of fabric. iPad Case Tutorial (with Handle Variations!) Jen Carlton Bailly is back today with a fun, new tutorial (remember the His + Hers Pillows?!).
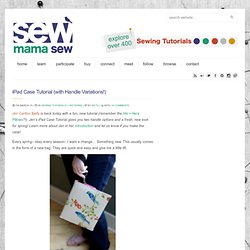
Jen’s iPad Case Tutorial gives you two handle options and a fresh, new look for spring! Learn more about Jen in her introduction and let us know if you make the case! Adding a Strap to any Strapless Case. Tutorial - Voile Scarf. Down here in Texas, we have no need for thick knitted scarves, as gorgeous as they are, because winter lasts all of about 5 days... but we still like to be stylish!

So, I recently ordered my first batch of Spoonflower fabric on the sheer-ish cotton voile, specifically for this purpose and am very pleased. I immediately set to work sewing up this sweet little scarf, taking photos along the way so I could share it. The fabric I'm using is one of my original designs, "Love Birds - Twilight" and you can find it and other color variations here. The silk crepe de chine or the cotton silk fabrics are also lightweight and lovely options. To start with, I washed my fabric first, as a precaution.
Then just cut a long, rectanglular piece that is equal to the length you desire by twice the width plus extra for hemming all the way around. Now stitch along the length of the pinned edge, (I used a 3/8 in. seam allowance), securing both ends with a few backstitches. Turn your fabric right side out. CHICKPEA SEWING STUDIO: Anna Maria's Multi Tasker Tote. This weekend was the first time since coming back from the Vegas vacation I had any time to sew.
