
Tutorial: How to make a Fabric Headboard. In my master bedroom, I wanted an extra large headboard that would make a statement.Here are my instructions on how to make a fabric headboard…not just any fabric headboard...you’ll see.

Step 1: Find fabric that you love! I found this fabric at my favorite fabric store called Home Fabrics and Rugs. It cost 5.99 a yard, and I bought 10 yards. (I still have some left over, but we’ll just play it safe and say it cost me $59.00 for the fabric. One of the main reasons I chose this fabric was because it was neutral in color. Step 2: Measure your space. Go big or go home right!?!? Step 3: Divide your space into squares. Step 4: Buy 2 sheets of thin backer board and cut them PRECISELY the right size. Step 5: Buy some foam and cut it into precisely the right size. Test Tube Spice Rack. Here's a test tube spice rack that I made to hold all of my spices.
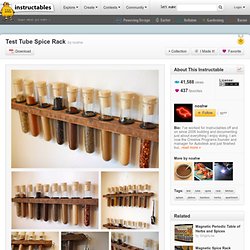
I tried to improve upon previous test tube spice racks that I've seen by using a nice looking piece of bamboo plywood and by using oversized O rings to "float" the tubes in the rack and eliminate the base plate. Also, my kitchen is short on counter space, so moving the spices out of the cupboard and onto the wall was a bonus. I've got a lot of spices, so I made two of these racks, but the design would work well with just one, or as many as you might need to hold all of your spices. Sorry I can't publish this as a full step by step Instructable since this was one of the few builds I've done where I didn't take pictures along the way, but I'll do my best to explain how I made it in the text below.
Materials: Cut appropriately sized strips of wood for your test tube rack. Installation: Hang test tube rack onto the wall with small steel L brackets using appropriate anchors or hardware for your specific wall type. Make an Ottomon Out of an Old Suitcase. This is really easy to make and, if you have the right scavenging abilities (and luck), then you can find many of the ingredients at little to no cost.

Recycling is always good! You can likely get the fabric, suitcase, plywood, and possibly the plumbing stuff all used/found in an alleyway or thrift store. Tools: Staple gun - I got the cheapest one they had at the hardware store, but a bigger one might be helpful depending on the weight of your fabric. My fabric was on the heavy side, so I probably should have been using bigger staples. Jigsaw - This you'll use to shape the plywood base to fit snugly into the suitcase. Screwdriver - This can be electric or manual. Utility knife - to cut the foam.
Cardboard Chaise Lounge. Recently my roommate and I moved into an apartment. We both lacked any furniture so we had somewhat of a shopping spree at the local IKEA. So with all that new furniture came lots of boxes. However, a box from IKEA does not equal the fun large box of my youth. Make a Lamp from a Bottle. Ring Storage ∙ How To by PlaidCrafter on Cut Out. TwoFriendsTwoCitiesOneVision. Turquoise key hook wall key hanger mason jar vase by OldNewAgain. The Anthro bookcase « whollykao. Have you ever seen something in a catalog, gawked at the price tag, and thought ‘I could totally make that?

‘ That was my reaction to this bookcase in the Anthro catalog. Cool vintage books, beautiful bookcase, but why the heck does it cost $1400? So I set off to make my own. The case is custom made to fit certain books. I wanted to make one for our cookbooks, so that’s what I based my measurements around. At first, I thought I could just buy a big piece of birch plywood and get the guys at Home Depot to chop it down to the many individual pieces. I had my dad cut several pieces of wood at these heights (below).
To determine how many pieces I needed at each height, I measured the spine of the cookbooks we had at home. I sanded all the pieces with super fine sandpaper. Then it came down to gluing and staining the case. The wood was actually kind of tough to glue together, because all the interior segments are different heights. So the steps were: glue, wait 24 hours, then stain. DIY: Stencil Pillow. January 16th, 2012 Have you tried fabric markers yet? I finally got around to it, and they work great. Paired with a stencil you can use them to stencil your favorite quote on a tea towel, apron, t-shirt, table runner, pillow cover, place mat, cloth napkin, old pair of blue jeans—anything you can think of!
The Burlap Bag - High Quality Handmade Goods Shop - Austin Texas. November 15, 2011 by Lauren My awesome Grandma said she would make curtains for our shop.
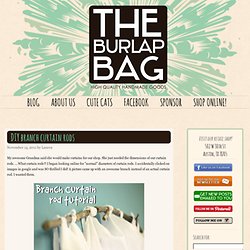
She just needed the dimensions of our curtain rods. ...What curtain rods?!