
Home Rock Climbing. DIY Climbing Hand Holds. Eastern Mountain SportsThere are plans all over the internet on how to build your own indoor climbing wall like over at Eastern Mountain Sports.
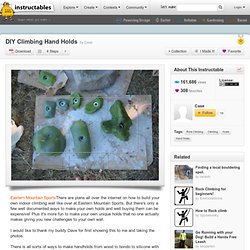
But there's only a few well documented ways to make your own holds and well buying them can be expensive! Plus it's more fun to make your own unique holds that no one actually makes giving you new challenges to your own wall. I would like to thank my buddy Dave for first showing this to me and taking the photos. There is all sorts of ways to make handholds from wood to bondo to silicone with fiberglass resin and while they all work none of them work well without lots of time lotss of practice and a ton of money spent in materials getting that practice time in. The Bondo Fiberglass resin + sand yields the best results and is real close to commercial climbing holds you would buy in texture and feel. Don't let my frustration as well as others fool you there is light at the end of the tunnel. Build Your Own Ultra-Affordable Home Bouldering Cave.
Ghettofabulous.
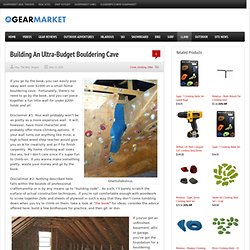
If you go by the book, you can easily piss away well over $1000 on a small home bouldering cave. Fortunately, there’s no need to go by the book, and you can piece together a fun little wall for under $200– holds and all. Disclaimer #1: Your wall probably won’t be as pretty as a more expensive wall. It will, however, have more character and probably offer more climbing options. If your wall turns out anything like mine, a high school wood shop teacher would give you an A for creativity and an F for finish carpentry.
Disclalimer #2: Nothing described here falls within the bounds of professional craftsmanship or is by any means up to “building code”. Unfinished Areas Like This Are A Wallbuilders Best Friend. If you’ve got an unfinished basement, attic or garage, you’ve got the foundation for a bouldering cave. When choosing a site for your wall consider the following: Structural Integrity: Will the building itself support climbing? 3/8" STEEL T NUTS: The More the Merrier. Rock Climbing Tech Tips: Building A Home Wall. Building A Home Climbing Wall The "Woodie", or home climbing wall is a project many a climber has dreamed into existence.
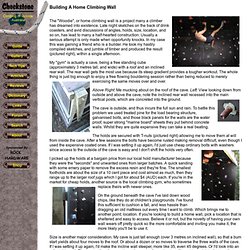
Late night sketches on the back of drink coasters, and avid discussions of angles, holds, size, location, and so on, has lead to many a half-hearted construction. Usually a serious attempt is only made when opportunity knocks. In my case this was gaining a friend who is a builder. He took my hastily compiled sketches, and jumble of timber and produced the result (pictured right), within a single afternoon. My "gym" is actually a cave, being a free standing cube (approximately 3 metres tall, and wide) with a roof and an inclined rear wall. Above Right: Me mucking about on the roof of the cave. The cave is outside, and thus incurs the full sun and rain.
The holds are secured with T-nuts (pictured right) allowing me to move them at will from inside the cave. On the ground beneath the cave I've laid down wood chips, like they do at children's playgrounds. Cheap Holds, Climbing Holds, Rock Climbing Holds, Gear, Kids Climbing, T-Nuts. Garage Climbing Wall. This is the part that you sit down and decide what you want from your climbing wall and combine that with what you're capable of doing based on space limitations, cost, ability, etc.
After brainstorming I compiled a list of the things I NEEDED my wall to have:-Large 45 degree overhang for the main climbing area, to be used for strength and endurance training. -Smaller 90 degree overhang for super intense workouts. -25 degree lead out from the 90 degree that i could mount a Jacobs ladder to for finger strength training-A pull up bar-Access to the inside And a list of things i WANTED to have:-A vertical wall just for fun-A variable angle part-Some sort of bulge-Anchors at the top to belay small children I also instituted a budget of $500 that I didn't want to exceed.
You take all your requirements then go on the the next step DESIGN where you put all this together to make the best wall possible that meets as many of your constraints as possible.