
Urethane Foam , Expanding Marine Polyurethane Foam. Making of a Dress Form Part 1 of 4 - Cast Yourself. I've always wanted a custom made dress form, but one can run upwards of $800, and the cheapies sold at a local craft store are just unusable.

Also, custom made is really not an exact replica of you, just measurements and generalizations of your body. But what could be better then draping over a form that's an exact copy of you! Supplies... Bulk Plaster Gauze 4in x 135 feet [at least]Plastic TubSmall amount of waterSharp Scissors [other sites will say you need bandage scissors, really good ones are pricey, and cheap ones at a local drug store will fall apart, halfway through]Plastic drop clothPlastic wrap [from local supermarket]Plastering assistant [human you are comfortable with]Portable heaterRubber bandsPermanent markerLet the mummification begin...
Cut plaster roll into strips. Wear a tight tee shirt. Stand straight. Wet one strip at a time and start wrapping from the bottom up. The plaster will start to become colder as it dries. The cast should feel dry to the touch. Making of the Form Part 3 of 4 – The Stand. You can find everything you need for the stand at your local hardware supply store.
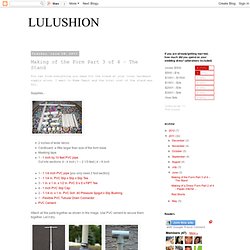
I went to Home Depot and the total cost of the stand was $22. Supplies... 2 inches of wide VelcroCardboard a little larger than size of the form baseMasking tape1 - 1 inch by 10 feet PVC pipeCut into sections: 4 - 4 inch | 1 – 2 1/3 feet | 4 – 8 inch Attach all the parts together as shown in the image. Use PVC cement to secure them together. Let it dry. Trace the pipe on the cardboad and cut a hole [1 inch diameter]. Insert the tube with the form and trace around the cardboard, positioning the form so that it is perfectly vertical. Cut out the traced lines, place the cardboard back onto the form and secure it with masking tape all around. The stand is complete. Making the cover for the form coming soon.... Update - 07.16.11...Velcro alone did not do a good enough job of holding the form securely onto the stand. Making It Well: I Made My Own Dress Form!
Here she is!
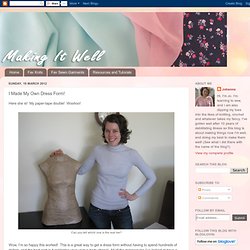
My paper-tape double! Woohoo! Wow, I’m so happy this worked! This is a great way to get a dress form without having to spend hundreds of dollars, and the best part is it replicates your unique body shape! All of the mannequins I’ve looked at have a bust that is still bigger than mine at their smallest measurement, and I am no expert on mannequins but I think you’d probably be hard-pressed to find one with a sway back!
I researched this method of making a dress form on the internet quite a lot, and I found most of the information I found glossed over some of the aspects I wanted to know about. It was quite fun to make (well, mainly after I’d gotten out of my papery prison- that bit wasn’t so fun)- it sort of took me back to school days where you’d get to make papier mache projects! Well, shall we get started? Here’s what you will need: -paper tape* -scissors -garbage bag or thin t-shirt you don't mind cutting up -masking/duct tape -newspapers/fabric scraps/stuffing.
Duct tape dressform. After watching tons of you tube videos and reading others tutorials on making your own dressform out of duct tape I decided to go for it.

It's a lot cheaper than the alternative and more true to your size, not to mention loads of laughs if you do it with someone you like. First step my husband made me a stand using a huge wooden spool that wire came on. We had it leftover from when he ran electricity out to his shop. I wouldn't let him throw it away because I knew I could recycle it somehow. He cut it down an bit and used an old piece of pvc pipe to mount in the center for the pole. So next was the actual wrapping of duct tape. Let the wrapping begin!!! I wanted my form to be white so I had Ryan first use the silver duct tape then had him put a layer of white over the top. Ryan wrapped me too tight in parts. If your considering making your own dressform I suggest you watch this youtube tutorial by Tish.TV DIY or read this Threads article. Tish.TV DIY // Duct Tape Dress Form.