
DIY Woodgrain Pencil Holder from Recycled Soup Cans! Oh soup can, how do I use thee...let me count the ways!
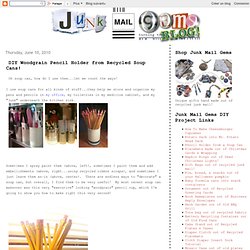
I use soup cans for all kinds of stuff...they help me store and organize my pens and pencils in my office, my toiletries in my medicine cabinet, and my "junk" underneath the kitchen sink. Sometimes I spray paint them (above, left), sometimes I paint them and add embellishments (above, right...using recycled ribbon scraps), and sometimes I just leave them as-is (above, center). There are endless ways to "decorate" a soup can, but overall, I find them to be very useful! My most recent soup can makeover was this very "executive" looking "woodgrain" pencil cup, which I'm going to show you how to make right this very second! Step 1: Eat some soup. Step 2: Remove the label and wash the can. Step 3: Obtain some woodgrain Con-Tact paper from your local hardware store. Wire wrapped earring on Etsy, a global handmade and vintage marketplace. Kyanite wire wrapped earrings Still Waters par DreamsByDelisse.
A bit more cutting, and some sewing then you're done! How to Draw On Canvas Shoes (even if you're not an artist) About a year ago I set out to design my own pair of shoes because I couldn't find anything remotely close to what I wanted and the things that were just 'ok' were ridiculously expensive.
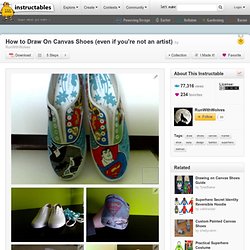
I'm sure you've been there. Unfortunately there wasn't a lot of comprehensive guides out there and I ended up winging it. Taking that into account I made a second pair, they turned out even better and took about half the time so I thought I'd share the process with you. Bear in mind: The first time I did this it took me almost a week to do the whole thing. The second time it took a couple of days. Items Necessary: 1) A pair of white canvas shoes. -Keep in mind the amount of time you intend to wear them and buy accordingly. How to make your own rings.
Wire Wrapped Bangle Tutorials. Freeform Multibead Wire Ring. More Wire Wrapped Ring Tutorials. Wire wrapped rings are really popular.

It's a good thing artisans are always coming up with different approaches and variations of wire wrapped rings. So here are more! The first one by me is really a review of a single bead wire wrapped ring. Fake prong ringUsing montees for single bead wire wrapped rings is a cheat way of getting the look of prong rings! These are Swarovski rhinestones in different colors which are foil-backed and come all pre-mounted in a cup setting. If you have never done any rings before, they are worth a go as they are so much fun to make once you get the hang of the basic steps. Wrap it around the mandrel such that the wire with the crystal is in the middle. Next wrap the outer wires around the crystal. Remove the ring from the mandrel and trim the wire ends to manageable lengths for wrapping around the two wires which form the ring. Real prong ring This super tutorial by My Beads shows a lovely way of making a real prong setting.
Past ring tutorial posts: How to Make Button Rings Tutorials. Double Holed Inspirations Part 1 of 2 Button rings are really fun to do - I can get carried away doing a whole bunch of them.
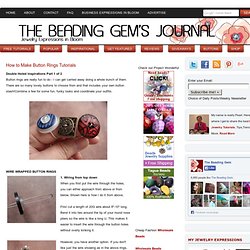
There are so many lovely buttons to choose from and that includes your own button stash! Combine a few for some fun, funky looks and coordinate your outfits. 1. Wiring from top down When you first put the wire through the holes, you can either approach from above or from below. Shown here is how I do it from above. Wire Wrap Earrings Tutorial: InterMed: How To Make Three Spirals, Wire Earrings. These might take a time or two.

They're great to use for anything but perhaps the spirals take some practice. I'd recommend craft wire until you get the feel of it. Otherwise, this is my THIRD tutorial! Hooraaay! I hope you enjoy them. The finished project are the wire spirals in that photo. Click on any of the images to enlarge. You'll Need:1. 1. 2. 3. 4. Wire bonsai tree - the tutorial (with lots of pictures) - JEWELRY AND TRINKETS. These photos have been sitting around for ages, so it's about time I posted this!
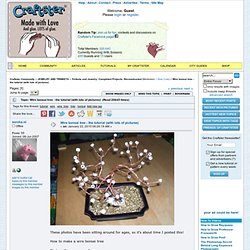
How to make a wire bonsai tree First, gather your supplies. You will need: needle nose plierswire (I used old electrical cable copper wire, about 2mm in diameter. I probably used about 10m of wire, measured as a single strand)beads for the leaves (I used uv reactive pony beads)oasis or foam for the base (I used an old foam wrist rest previously used at my computer)a dish to put the tree ingravel to cover the baseglue to hold the gravel in placebonsai decorations (I didn't use the bridge this time) Cut the foam base to fit your container and strip the plastic covering off the wire if you need to. In groups of 2 or 3 strands of wire held together, push them through the foam base from the bottom leaving the wire folded in half on the other side of the base.
Time to make the trunk of the tree. Twist all the wires together to form the trunk. (sorry, a bit out of focus) Do the same for you other branches. The Burlap Bag - High Quality Handmade Goods Shop - Austin Texas. Organization Week: Products to Organize Your Scrapbook Supplies. Hanging Jewelry Holder – Space Saver. I have mentioned before that the reason we moved to Colorado 2 months ago, was for my husband to complete several clinical rotations (for PA school) before graduating next spring.
And lucky us, we were able to bum my parents basement apartment off of them while staying here. (Thanks Mom and Dad!) The basement has everything we need; bedrooms, a bathroom, a family room……even a kitchen. But overall, it’s a smaller space than what we had in GA. So downsizing has been tricky. 100 Totally Awesome DIY Projects For Your Dorm Room. Finally getting to move into your own space and out of your parents’ house can be an exciting time for many college students.
Of course, with moving out comes a whole host of expenses too. Luckily, there are some ways you can cut down on the costs and still get a room that reflects your style and makes living so close with someone else a little easier. Here are some DIY projects to try out for your dorm room that range from super simple to those requiring some tech know-how. Privacy and Security Try out these DIY projects to keep your dorm room safe and ensure you have a little privacy when you need to study or sleep. Pappersblommor – Paper flowers. Idag har jag imponerats av de fina pappersblommorna på duktiga Joans blogg Wooz.dk och ville testa göra något liknande.
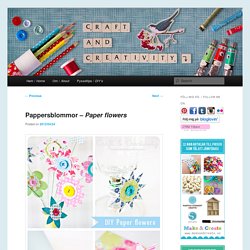
Blommorna påminner lite om pappersstjärnorna jag gjorde innan jul. DIY: Curtain Tie-back Bracelet with Vintage Button Clasp. How to Organize Small Spaces. DIY Artwork: Botanical Prints - Better Homes and Gardens - BHG.com. What You Need -- Cold-press board -- Frisket masking liquid -- Paint brush -- Silk or plastic greenery -- Spray paint -- Eraser -- Kraft paper or newspaper(See "Tips for Success," below, for buying information.)
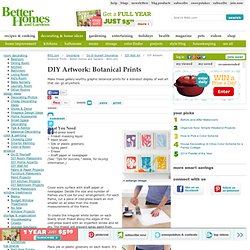
Cover work surface with kraft paper or newspaper. Decide the size and number of frames you'll use for your arrangement. For each frame, cut a piece of cold-press board an inch smaller on all sides than the inside measurements of the frame. To create the irregular white border on each board, brush frisket along the edges of the cold-press board with an imperfect stroke and let dry. Place silk or plastic greenery on each board. Spray the board with a single coat of paint. Remove the greenery, and allow the paint to dry, following the recommended guidelines on the paint can for dry times. Carefully remove the frisket. Use an eraser (a regular pink eraser works well) to remove the portions of the frisket you cannot lift off with your fingers Tips for Success. DIY News, Videos, Reviews and Gossip - Lifehacker.