
Panda Boots. . .(W/ Instructions! Based Off Of Angelichigo's Panda Sleeper Boots!) ∙ How To by Liddlehopper on Cut Out. Tetris Lamp. How To: Make Fabric Wall Silhouettes. Make Your Own CloudsIndoor Cloud Gazing. DIY Solar Lamp: Make Your Own Eco-Friendly Sun Jars. The principle is simple and seductively clever: solar lights that store energy during the day and release light at night.

These can be purchased ready-made in a variety of colors (yellow, blue and red) but they can also be built at home. A simple, less-technical approach involves buying a conventional solar-powered yard lamp and then essentially harvesting it for key pieces to put in a jar. This is simply a way of taking an existing solar lamp design and appropriating its parts to make something more attractive for display around a house or home. A more electronically-savvy individual can take the more complex route and built a solar lamp from the ground up using small solar panels – though the aesthetic result may not be as impressive. Whatever route you choose to go, these are fun and sustainable gadgets that make it easy to go green, automate the process of turning on lights at night and can add some color to your porch, patio, garden or windowsill.
Terrarium Centerpieces The other week, my good friend Stephanie and I planned out a craft weekend.
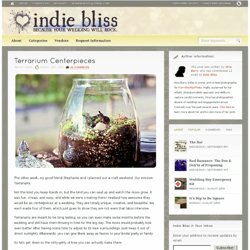
Our mission: Terrariums. Not the kind you keep lizards in, but the kind you can seal up and watch the moss grow. It was fun, cheap, and easy, and while we were creating them I realized how awesome they would be as centerpieces at a wedding. They are totally unique, creative, and beautiful. We each made four of them, which just goes to show they are not even that labor intensive. Terrariums are meant to be long lasting, so you can even make some months before the wedding and still have them thriving in time for the big day. So lets get down to the nitty-gritty of how you can actually make them: Step 1: Materials • Glass containers in whatever size you heart most. . • Good dirt and rocks. . • Figurines or decorative rocks to place inside. . • Horticultural Charcoal. . • Moss (another one of those things you can find outside, but can also order if you don’t live somewhere it doesn’t grow naturally). - Paula Hayes - Eco Sphere. Fabric Pumpkin Tutorial.
Can you believe we are to fall?

I love this season. Do you remember these fun Fabric Pumpkins from last year? I thought I would share the tutorial again this year...but, early enough that you might actually make some. They are so much fun to make. I am sure I will be making a few to sell at the small boutique I am helping to put on. Really, who wouldn't want these cuties in their home? You are going to cut out a a piece of fabric that is 7" X 14" (small size) or 9"x18" (Medium size) or 11"x22" (large size).
I will be showing you the small size. Here are all of mine ready to go. Next, you are going to make a tube. Make sure right sides are together. Then with your sewing machine sew down the side. Press open the seem. Then grab your needle and thread (I double my thread to make it stronger), and gather all along the bottom of of the tube. It should look like this when you are done. Turn the fabric right side out. Everyday is a Crafting Day!: A Floating Ghost... This is one of our Families favorite Halloween Decorations.
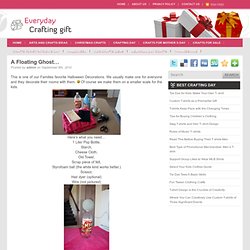
We usually make one for everyone and they decorate their rooms with them. Of course we make them on a smaller scale for the kids. Here’s what you need… 1 Liter Pop Bottle, Starch, Cheese Cloth, Old Towel, Scrap piece of felt, Styrofoam ball (the white kind works better.) Scissor, Hair dyer (optional) Wire (not pictured) First thing you are going to do is cover your working area with your towel. Typical Dutch Kitschy Cartboard Box Cathouse.