
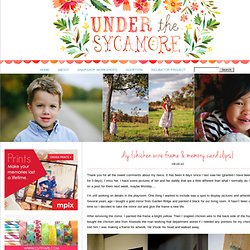
Doily canvas bag. Thankfully everyone seems to be making a switch from plastic to lasting when it comes to shopping bags, so here’s another fun little tutorial on customizing one to make it oh so cute.
You might notice a lot of doilies in my recent diy projects. Since I was getting so many ready for A Christmas Gathering I used a lot of the same materials…monograms seems to be pretty popular now too. My friend Cindy called while I was working on this and suggested I just go ahead a put a “W” on it for her, I happily obligied. Canvas bag ($2.00 when on sale at Hobby Lobby), fabric paint, paper doily, Krylon Paper Finishes Adhesive Spray : Spray doily with paper spray adhesive and press down on the bag (not shown) . : Gently paint over the holes – I recommend paint meant for fabric, not crafts. . : Peel back doily before paint dries. Bag after doily is removed I traced on my letter and filled it in with paint.
Plexi glass frame. Contest winners are: Lauren -” if you pick me as the winner, i’ll be you a big ol’ kiss and squeezy!”

….thanks for the offer, but I’ll pass amanda torres – “I just got a little squeezy from my teeny weeny.” UPDATE: Contest is now closed. Julie A. has the last counting comment. I recently acquired the Graffiti art from Design Aglow…you’ll be seeing it pop up a lot on my pictures now…just so much fun. Here’s a picture Shannon took of Chris & I…with a little graffiti. I have an old French frame I’ve been wanting to use in the house and didn’t want to add glass to it. Step 1: Decide how you want the design of your frame to look.
Step 2: Your supplies – 2 sheets of “plastic glazing” (thin plexi glass), your poster, sharpie marker, paint, small paint brush, easy tack adhesive, scrapbooking paper (if you want) Step 3: Print out the design you want on your frame. Step 4: Paint over the marker lines with craft paint and a small brush. My finished product! Giveaway Details: 2 winners chosen at random …. Chicken wire frame & memory card clips. Thank you for all the sweet comments about my niece.
It has been 4 days since I last saw her (granted I have been out of town for 3 days). I miss her. I have some pictures of her and her daddy that are a little different than what I normally do. I am working on a post for them next week, maybe Monday…. I’m still working on details in the playroom. After removing the mirror, I painted the frame a bright yellow. To hold pictures to the chicken wire I hot glued small clothes pins to the back of some of my Charlie Harper memory cards. Super easy, super affordable and I think it is pretty practical and cute! Anthropolgie Inspired Pendant Light. Poor Chris…he has watched me for the last week as I’ve dealt with the server/hosting issues.

Tonight he came home and I was still unable to upload photos and had not heard a thing from the company (I am choosing to take the high road right now and not name them…that is not what this blog is about). Anyway, Chris suggested I look into free image hosting for the time being until my account is back to normal. So I signed up for a PhotoBucket account – which was super easy.
So thank you PhotoBucket – I can post again! I’m still working on details for the kitchen. I headed to Lowes and bought a spool of wire and tried forming one…it wasn’t working so well for me. Step 1: Cut off basket handles and bottom middle wire (to center pendant) Step 2: Spray paint basket and outlet cover. Step 3: Adhere outlet cover to bottom inside of basket. Step 4: Turn basket over for glue to dry Step 5: Add weight on top of outlet cover while glue drys.