
DIY Calming Glitter Jars. Make your own calming glitter jar!

Fun for kids and adults--don't take my word for it--make one! You'll need a Mason jar...or a bottle... Some glitter glue and some chunky and fine glitter. The glitter glue gives the liquid a different viscosity and makes the swirls of glitter more lifelike! Put about 2 tablespoons of glitter glue into the jar. Add 1 cup of hot water and some glitter... whisk the concoction to break up the glitter glue a tad... Add fine glitter until there is about a 1/2 to 3/4 inch layer on the bottom. fill the jar with water, leave about 1 inch at the top for shaking room! It settles quickly. We added some chunkier glitter and a few flower sequins too! 1 drop of blue... shake shake shake! Settles after about 2 minutes or so... So fun to watch the glitter tornado vortex of swirly fun! Some people use this for time out...not me.
I use it as a reward jar...like if they clean their room or do something nice for someone else, they can sit and use it. 10 Mason Jars, 10 Awesome DIYs. Craft: stencil labeled oil bottles. Today i’m getting crafty and sharing a DIY stencil tutorial you can use to label glass bottles, thanks to a little inspiration from Martha Stewart Crafts! I grew up in a house where cooking oil meant that giant plastic vat of canola in the cupboard, and having these glass bottles of oil feels very special and fancy. but our sharpie-code-on-the-back-of-the-bottle-sort-of-secret labeling system was decidedly un-fancy, so i decided it was time for an upgrade!
Materials needed: glass bottles stencil template printable (click here to download) Martha Stewart satin acrylic craft paint (available here from Jo-Ann) colors shown: cloud, blue sky, blue calico, wild blueberry. Martha Stewart adhesive stencil film (available here from Jo-Ann) Martha Stewart multipurpose heat tool (available here on Amazon - affiliate link) glass surface (i used an old picture frame) rubbing alcohol and paper towels paint brush, scissors, tape toothpicks 4. cut out stencil, peel away from paper, and adhere to bottle. Painted Mason Jars: Easy Peasy. Mason jars are big right now!
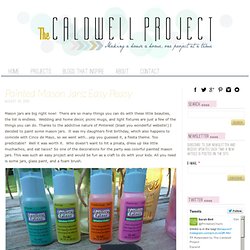
There are so many things you can do with these little beauties, the list is endless. Wedding and home decor, picnic mugs, and light fixtures are just a few of the things you can do. Thanks to the addictive nature of Pinterest (blast you wonderful website!) I decided to paint some mason jars. It was my daughters first birthday, which also happens to coincide with Cinco de Mayo, so we went with...yep you guessed it, a fiesta theme.
There are lots of different kinds of glass paint you can use. When you get to the top take your brush tip and smooth out around the threads. They were great centerpieces for all of our tables and have now been adopted into our home decor. Linked With: Happy Hour Projects. Faux Stained Glass Mosaic Luminary. I’ve always been in love with luminaries.
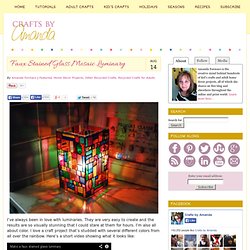
They are very easy to create and the results are so visually stunning that I could stare at them for hours. I’m also all about color. I love a craft project that’s studded with several different colors from all over the rainbow. Here’s a short video showing what it looks like: In case you are wondering, I used a votive sized candle inside a glass votive holder. Recently I was able to try my hand at using DecoArt’s glass stain paints. In case you missed it, I made this Beach Flag Suncatcher and it was incredibly fun and rewarding to make! They come in a variety of colors, and when I made the flag I only used three.
I am really, really pleased with how this came out! So let me show you what I did… Because the glass stains will run while wet, you need to work on a fairly flat surface. Multicolored Round Geometric Stained Glass Panel from GoodGriefGlass on Etsy – click photo to visit her shop. First I traced the container onto a piece of paper.