
Easy DIY Painted Baby Shirt. You don't need any fancy cutting machines or expensive materials to make this fun baby t-shirt!
I use my Silhouette in a lot of my tutorials, but not everyone has a cutting machine. And a lot of my friends claim they are not crafty. So, being your frugal friend, I thought I'd show you all a super easy way to paint a shirt. You will need a t shirt stickers tape (I used washi) paint (I used fabric paint but acrylic would work, too) For the step by step, please check out my video tutorial! Whatcha Know, Mo? 10 Ways to Turn a Scarf into a Vest. When we stumbled across this gorgeous DVF scarf vest on Shopbop the other day, we were intimidated by the $295 price tag but super inspired by the design.

Not only do we have a surplus of colorfully patterned scarves, but vests happen to be one of the best ways to transition summer clothes into early autumn. So, instead of creating one way to turn a scarf into a vest, we created 10! Half of these how-tos involve a sewing machine or needle and thread, and the other half are created with a few clever knots. Here we go! 1. The contrast of a highly structured belt and flowing jersey knit makes for a gorgeous little piece. The first thing to do is cut off the buckle or d-ring at the end of your belt and sew off the end. 2. We promise, you will use this one more than you think. It works for just about any long scarf. 3. The steps for this are in the title! Take two summery silk scarves. 4. Ok, maybe this is a little risqué to wear just as a halter, but it definitely echoes summer halter style. Homemade Costume Wings. It doesn't have to be special holiday for children to adorn a costume and play make-believe in their own imaginary land.
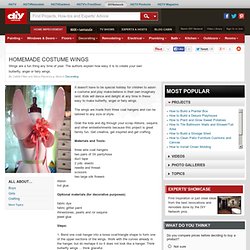
Kids will dance and delight at any time in these easy to make butterfly, angel or fairy wings. The wings are made from three coat hangers and can be tailored to any size or style. Grab the kids and dig through your scrap ribbons, sequins and other embellishments because this project is great family fun. Get creative, get inspired and get crafting. Materials and Tools: three wire coat hangerstwo pairs of 3X pantyhoseduct tape2 yds. elasticneedle and threadscissorstwo large silk flowersribbonhot glue Optional materials (for decorative purposes): fabric dyefabric glitter paintrhinestones, pearls and /or sequinsjewel glue Steps: 1. 2. 3. 4. 5. 6. 7. 8. 9.
Upcycle Style: Braided T-shirt Rug. I love making projects that involve at least one of the following criteria: decluttering, upcycling, sewing and a need.
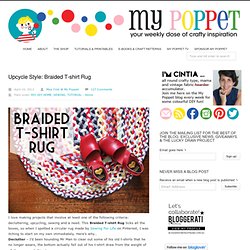
This Braided T-shirt Rug ticks all the boxes, so when I spotted a circular rug made by Sewing For Life on Pinterest, I was itching to start on my own immediately. Here’s why…Declutter – I’d been hounding Mr Man to clear out some of his old t-shirts that he no longer wears, the bottom actually fell out of his t-shirt draw from the weight of all the excess clothing! Upcycle – Most of said t-shirts were well past their use by date with most of them having holes, stretching or stains, so charity donation was not an option. Usually I tear old shirts up for dusting rags, but the truth is, who needs to dust that much? Sewing – enough saidNeed – With a chilly winter on the way in Melbourne, I thought it would be lovely to finally have a bedside rug to treat my feet to some cushy comfort on a chilly morning. You will need: How to: Here is what you want your stitching to look like.
Crayon on shirts. Sara - Wacapaka dijo...

Quina passada Marta!! Mola molt molt ;) 5 de septiembre de 2012, 18:17 Moi Coquette dijo... jooo ha quedado genial, me debería de dedicar a hacer más diy de ropa, que me encantan y los tengo olvidados!!! 5 de septiembre de 2012, 19:36 momitablog dijo... que original!!! 5 de septiembre de 2012, 21:23 Marta lo comparto en el grupo del facebook. 5 de septiembre de 2012, 22:32 la inglesita dijo... ha quedado estupenda! 5 de septiembre de 2012, 22:32 Marta Funniest dijo...
Encantada Momita! 5 de septiembre de 2012, 23:07 Sylvia - Dare to DIY dijo... Wowwww acabo de alucinar con esta técnica, la pondré en práctica segurísimo!!