
Decorative Decal Pillar Candles - Martha Stewart Wrapping & Packaging. Decoupage Rose Votives. These elegant votive candles are very easy to make and look so beautiful on your table.

These will make a pretty but simple centerpiece on your holiday table this year. You will need glass votive holderwhite tissue paperdried or fresh rose petals and leavesMedium paint brushwhite craft gluewatersmall bowlpaper towelswax paper What you do If using dried rose petals you will need to soften them up by soaking them in a cup or dish of tap water. Tear tissue paper into 1" squares, no need to be precise. Mix together equal amounts of white craft glue and water in a small bowl. When the rose petals have soaked long enough to make them pliable, remove them and the leaves from the water and place onto paper towels.
To decoupage, paint the back of one of the rose petals with the paintable glue mixture and position onto the glass votive. Working in sections, decoupage the torn pieces of tissue paper over the top of the rose petals and the leaves, completely covering the entire votive. Easy Pebble Votives Tutorial — Dream a Little Bigger. I’m one of those lighting people.

You know the type. If it’s day time all of the curtains have to be open so that the house is as light and bright as possible. At night, I like mood lighting. In fact, I used to collect little animal shaped tiffany lamps and I’d turn off all of the lights and only have my little frogs, kittens and turtles glowing. So when I saw these pretty little glass pebbles in the home decor aisle at Wal-Mart, I first thought of how pretty light would be coming through them.
For this project you will need: glass pebbles (Wal-Mart about $4)glass votive holder (Wal-Mart about $5)votive (Wal-Mart about $1)lots of glue sticks and a hot glue gun I sat here for a while trying to figure this out when I decided just to do it. I didn’t plan out the pieces, I just grabbed and glued and it worked really well for me. You can’t tell but I’m actually going around and around the votive to keep the weight even. And this is what she looks like when complete. Votive centerpiece. Snowflake votives. Paper cup candle lamp. No sew t-shirt made into halter. I have the exciting opportunity to head to the beach for a couple of days, to relax and soak up a little of that beautiful Florida sunshine.

I wanted to do one more halter top to take to wear with my jeans and this is what I came up with. It can be changed in so many ways let's just say this is a 3 in one shirt. It seems like I am packing all of my DIY tops and dresses to wear. Video Tutorial Things You Need. Tee-Shirt~ mine is a mens mediumScissorsChalk Front Cut where the red lines are. The back cut the red lines Back Cut down the middle of the back cut out.. Front after cutting NOTE* you cut one continuous line from the front to the back. Back After cutting now tie the front wrap around your neck and tie to the two straps in the back. If you want to trim off the excess off the straps. I am leaving mine so I can play and change it up some more.. or tie them into a bow. Happy Monday. Lots of <3, 31 Cheap And Brilliant Dollar Store Hacks. Milk Jug Votives. Since today is Earth Day, I thought I'd dig into our recycle bin and come up with an upcycle project.
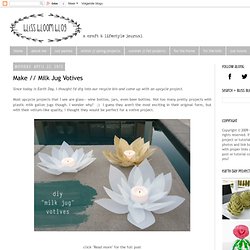
Most upcycle projects that I see are glass-- wine bottles, jars, even beer bottles. Not too many pretty projects with plastic milk gallon jugs though. I wonder why? ;) I guess they aren't the most exciting in their original form, but with their vellum-like quality, I thought they would be perfect for a votive project. click "Read more" for the full post Since I want to use these in our backyard this summer, I decided to make them as water-resistant as possible while also keeping it an easy DIY. Why I didn't use a hot glue gun... If you don't have any milk jugs on-hand or don't feel like an upcycle project, you can also purchase polyethylene plastic sheets.
Instructions: The first step is to make a template for your petals. Cut out your petals from the milk jug as well as a round piece for the center. Bend the end of your petals. Now it's time to glue everything together. During the day...