
V and Co how to: shag pillow. *no animals or plants were hurt in the making of this project.
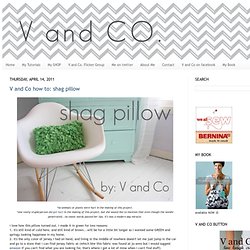
*one really stupid person did get hurt in the making of this project, but she would like to mention that even though the needle penetrated...no swear words passed her lips. it's was a modern day miracle. i love how this pillow turned out. i made it in green for two reasons: 1. it's still kind of cold here, and still kind of brown...will be for a little bit longer so i wanted some GREEN and springy looking happiness in my home. 2. it's the only color of jersey i had on hand, and living in the middle of nowhere doesn't let me just jump in the car and go to a store that i can find jersey fabric at (which btw this fabric was found at jo-anns but i would suggest amazon if you can't find what you are looking for, that's where i get a lot of mine when i can't find stuff) now lets get started: cutting: *cut from jersey fabric 19 strips at 1 1/2" each. *from each of the 19 strips cut 15: 4" length rectangles.
SEW Hip! Slouchy Slippers...completed! - Sewing Daisies - StumbleUpon. SEW Hip!

Slouchy Slippers (issue 20) have been made... The SEW Hip! Pattern is advertised as a beginner's pattern, and I wholeheartedly agree. The Slouchy Slippers are incredibly easy to make. If you are short on Christmas gift ideas and you fancy 'making' your loved ones a present, then this pattern is for you. Being Spring 'down under' I adapted the pattern a little... Instead of using fleece on the inside of my Slouchy's, I went for Osnaburgh Cotton; it's lightweight and works well with every colour imaginable. plus I have loads of it ... Of course, being Spring doesn't alter the fact that I need non-slip fabric. A Purse Thingy. So, how was your weekend?
Mine was fun, but exhausting. I decided to go and visit TheSecondChild on Saturday. It’s a six hour drive, so I got up early and I was down there by noon. I made a quick fabric shop stop and then TheSecondChild and I had a little lunch. Then we had a fun-filled afternoon of cleaning the house he lives in with 2 other 22-yr. old pigs guys. Anyway, last week. before all that excitement, I had fun making some little keychain cell phone id coin whatever-else-you-want-to-throw-in-there purses. They’re pretty easy to make and I thought you might like to make some too, so I took some pictures of the process and thought I’d write a little tutorial. Here’s a shot of the back of the purse with my cell phone tucked into the little pocket. So, shall we start? Some scraps of fabric — I used three different prints. Purse Back: Cut a 7″ long x 5 1/2″ wide piece of fabric. Quilt this little sandwich however you would like — stipple, straight lines, or make up your own.
Oops! Tutorial: This Mama’s Fab Travel Chair. This fabric “high chair” is perfect for away from home dining. It’s no 5-point harness, but it helps secure them in the chair. This one was made from an old thrifted, quilted ottoman cover Gather materials: Quilted fabric for outer*, cotton broadcloth or similar for lining, Velcro. *Batting combined with broadcloth can also be used. For this one, I used a thrifted bedspread and bed sheet. Step 1 – Make pattern pieces. All measurements include 3/8″ seam allowance. Step 2 – Add markings 2 1/4″ apart at center of each piece as shown in picture. These markings will help you place the connector piece. Step 3 – Using a single layer of lining and a single layer of quilted fabric, cut each piece out together. Curve the corners of velcro pieces so there are no sharp points. Step 4 – With right sides together, sew connector pieces together along long edges. (3/8″ seam allowance) Step 7 – Turn all pieces right side out and press.
Step 8 – Top stitch connector piece 1/4″ from edge along sewn edges. You’re done!