background preloader

Home hacks

Facebook Twitter

Do-it-yourself lampshade tutorial. I love garage sales. Even better is when I have a laundry list of improvements around the house, and find all I need in the $5 pile somewhere - like this lamp. I have dreams of making a corner of my bedroom into a little reading spot - a nice little slipper chair, maybe a small table and a lamp. I priced some at Target (not the best quality) and Lowe's (wayyy too expensive) and wondered how that would ever happen. Then I happened across this little baby hiding in a basement corner at an estate sale. I used a number of tutorials to get started, and then ended up doing my own thing in the end. The basic instructions often use a spray adhesive to attach the fabric to the lampshade, but some have also used fabric glue to tack it down. I started by spray painting the lamp base in a nice nickel finish so it would match the other light fixtures in our bedroom.
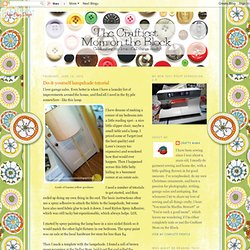
Then I made a template with the lampshade. Once I had my template, I sprayed on the adhesive and attached the fabric. Fabric Covered Lampshade Tutorial. There are some big changes beginning in my finished basement. The closet is almost done. We are in the process of pricing out an a/c unit for the room and once that is installed we will be making some other changes as well. The a/c is holding us up right now, but not stopping me from going forward with some smaller projects for the room. I love this aqua lamp I bought from Home Goods a few years ago. The shade is plain white. I recently moved the lamp to this side of the room. I had a little of my favorite fabric left over - Aviary by Thomas Paul. I started by using fabric glue and ran a thin line of glue along the seam of the shade. Then I folded the fabric under and again used fabric glue to adhere the fabric and end up with a clean edge. I alternated from top to bottom until I made it all around the shade. Once all the way around I cut the remaining fabric leaving approximately an inch.
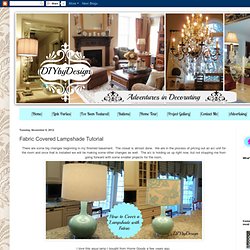
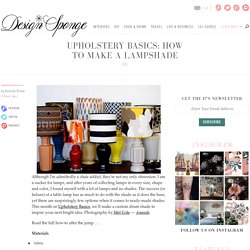
Using fabric glue again, I adhered matching ribbon to the bottom... and then the top. -Judy. Upholstery basics: how to make a lampshade. Although I’m admittedly a chair addict, they’re not my only obsession. I am a sucker for lamps, and after years of collecting lamps in every size, shape and color, I found myself with a lot of lamps and no shades. The success (or failure) of a table lamp has as much to do with the shade as it does the base, yet there are surprisingly few options when it comes to ready-made shades. This month on Upholstery Basics, we’ll make a custom drum shade to inspire your next bright idea. Photography by Mel Cole — Amanda Read the full how-to after the jump . . . Materials fabricpainter’s tapemeasuring tapechalksquareyardstickpressure sensitive styrenepencilscissorshard, flat object like a plastic rulerbottom and top ringsbulldog clipswhite craft gluesmall paint brushweights for the seampaper tapesewing machinethreadiron Resources Fabric: Amy Butler Lampshade Supplies: Lamp Shop Don’t forget to check out Upholstery Basics: Tool Time to learn more about the tools we’re using today.
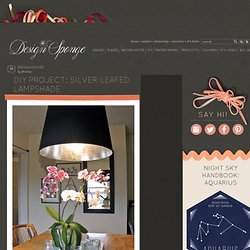
Instructions 1. 2. 3. Silver-leafed lampshade. When we moved into our current rental, it had a hideous ceiling fan and light hanging in just about the oddest place you could put it. Needless to say, it was the first thing to go. This left us with the dilemma of not having a light source in our dining and living room. I found an oversized shade at IKEA and hung it on a cord and socket (also from IKEA). This solution brought the light that we needed, but the shade was missing something. Its white interior was stark and boring. I thought about painting it, but decided to follow the metallic trend (which I think I am in love with) and add a little glamour with some silver leaf. Read the full how-to after the jump… Materials large lamp shade preferably with a plastic interior (You want the bulb to be a safe distance from the edges of the shade. Instructions 1. 2. 3. 4. 5. 6. 7. 8. 9. Friday Flowers: Ruffled Lotus Lantern. This latest flower project was inspired by stories from my friend Erika, who briefly lived in Seoul Korea about ten years ago.

Apparently, every May, the good people of South Korea celebrate Buddah’s birthday with the Lotus Lantern Festival, a time when everyone in town decks the streets with thousands of beautiful paper lanterns. They make them out of paper cups and tissue paper, then hang them from trees and fence posts and exchange them with strangers. Doesn’t that sound wonderful? Can you imagine a whole giant city lit up with paper lanterns? Man, I got to get to South Korea in the Springtime! Anyhoot, my friend Bird needed a lamp, so when we went to Chinatown last weekend, this giant white lantern came home. Now, the plain paper lantern are nice enough, but we thought it could use some dressing up. This project is so simple, it really doesn’t warrant a tutorial. Wrong way: Glue them on in tight clusters. Tips (images above, left to right) Happy weekend!

Project 1 Week 1 – Ruffled Coffee Filter Pendant Lamp. Hello and welcome to the 3 R’s, the blog about my mission to live life based on the concepts of “Reduce, Reuse, Redecorate!” If you want to learn more about who I am, and this mission, then check out the About Me section above. In short, I am a crafty architecture school graduate, and I have decided to embark on what I’ve termed, The 30x30x3 Project, a mission to create and blog about 30 projects in 30 weeks based on the 3 R’s. So without further ado, I might as well jump right into my first project, a large pendant light made from a simple paper lantern, and approximately 699 coffee filters!
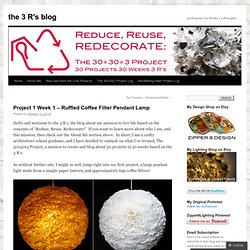
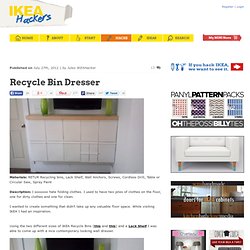
The project started when I spotted Aunt Peaches’ Ruffled Lotus Lantern on her amazing website. If you haven’t heard of her, you must must must check out her website, she does the most fabulous crafts with household items! I don’t have many process photos, unfortunately, but the concept is really very simple. Ciao for now, Allison Like this: Like Loading... Recycle Bin Dresser. Featured Published on July 27th, 2012 | by Jules IKEAHacker Materials: RETUR Recycling bins, Lack Shelf, Wall Anchors, Screws, Cordless Drill, Table or Circular Saw, Spray Paint Description: I soooooo hate folding clothes. I used to have two piles of clothes on the floor, one for dirty clothes and one for clean. I wanted to create something that didn’t take up any valuable floor space. Using the two different sizes of IKEA Recycle Bins (this and this) and a Lack Shelf I was able to come up with a nice contemporary looking wall dresser. The storage bins come in white but they were not white enough (my bedroom is painted bright white) so I spray painted them in my garage.

To mount them to the wall, all it took was a few plastic wall anchors, screws and about 20 minutes of time. And just like that, I have a great wall dresser that I can just drop my clean underwear, socks, t-shirts, etc into with absolutely no folding whatsoever! ~ Daniel P Poling, Miamisburg, Ohio The Author. Kitchen turntable. Bonde Credenza Hack. Bonde Published on November 12th, 2010 | by Jules IKEAHacker Materials: Bonde Description: Here are a few pics of a recent hack to the Bonde credenza I’ve had since college. I was inspired by George Nelson and Florence Knoll and tried to give it more of a mid-century modern look. The basic how to:First, we removed the doors from the piece, making sure to keep all of the original hardware together.
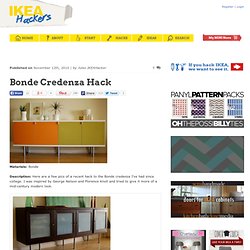
Then I lightly sanded it, and primed it with a high adhesion oil based primer. After he was done with that, I primed those as well. Then, we put the original hardware on the new doors and attached those to the main cabinet. See more if the Bonde credenza ~ Iris The Author Jules IKEAHacker "I am Jules, the engine behind IKEAHackers and the one who keeps this site up and running. The Quick Fix Fabric on Walls - Using fabric Instead of Wallpaper. If you want to add life to your white walls, try wallpapering your walls with fabric!
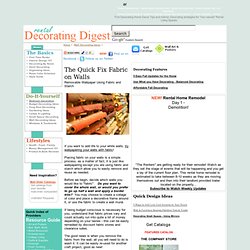
Placing fabric on your walls is a simple process, as a matter of fact, it is just like wallpapering except you are using fabric and starch which allow you to easily remove and reuse as needed. Before we begin, decide which walls you would like to "fabric". Do you want to cover the whole wall, or would you prefer to go up half a wall and apply a border trim? You may choose to create a collage of color and place a decorative frame around it, or use the fabric to create a wall mural. If being budget conscious is necessary for you, understand that fabric prices vary and could actually run into quite a bit of money depending on your tastes - this can be easily remedied by discount fabric stores and clearance sales. The good news is when you remove the fabric from the wall, all you will need to do is wash it.

Keeping all that in mind - let's get busy. Materials: Create House Floor Plans Online with Free Floor Plan Software. How to Make a Couch Slipcover Part 1. Bettina Drüke: Sofa beziehen. Aus einem altbackenen Sofa kann man selber mit Stoff und einem Tacker ganz einfach ein frisches Möbel machen. Dieses Sofa beziehe ich hier zum dritten Mal.

Anfang der Neunziger hatte ich schon mal so eins. Das habe ich sehr geschätzt, weil es nicht nur super bequem war, sondern weil man es auch zum Schlafen nutzen konnte und es sogar einen Bettkasten hatte. Mein Kaninchen liebte es auch – besonders gern nagte es an dem rot gemusterten Bezug. So mußte ich es das erste Mal neu beziehen – mit roten Blumen. Nach einem Umzug passte der neue Bezug nicht mehr so recht, also wurde es ein zweites Mal bezogen – mit rotem Streifensatin. Nun finde ich in meinem Wochenendhäuschen genau das gleiche Sofa vor – immer noch bequem und praktisch aber blau gemustert. Musik: Rotz Nach dem Sofa war die Eckbank in der Wohnküche dran: Es handelt sich um ein wirklich handwerklich grundsolide gefertigtes und hervorragend gepflegtes Sitzmöbel. Ikea Sofa Hack « Honey Badger Home. What we had: Eight years of matching espresso “leather” sofas that endured two trans-atlantic PCSs and a Rhodesian ridgeback puppy… Time for a change.

The shark-toothed ginger brummie, Nahla. Truly a thing of beauty –– posted on Craig’s List and left on the curb. Gone in 30 minutes! What we want: Crate and Barrel Petrie Sofa, $1,699 Thrive Tyler Sofa $2,069 What we can afford: Oh snap Karlstad Sofa, $599, Ikea. And here is how we hacked the sofa to get the look we wanted for a whole lot less: 1st Step: Ditch ugly Ikea block legs I ordered these mid-century style legs from Home Depot and stained them dark walnut. Waddell 6″ round taper legs, $2.89 each, Home Depot Dark Walnut Stain, $4.78, Home Depot 2nd Step: Convert non-metric legs There were some issues regarding the conversion of these screw in legs {damn you and your metric system, Sweden… and your socialized healthcare and mouth-watering meatballs}.

Mid-century legs! 3rd Step: Short break “If you’re not too busy… maybe rub my belly.” Lookin’ good! Homemade Home: Great Online DIY Upholstery Resources. After looking at some of the tools needed for basic upholstery last week, you might want to try your hand at your very own "Before and After" upholstery project. To help guide and inspire you we have gathered some great tutorials and inspiring posts from around the Internet. Happy re-upholstering! Tutorials Design Sponge : Amanda Brown has many fantastic (and very detailed) posts explaining a range of DIY Upholstery projects .

DIY Upholstery Supply : They have several How To Videos explaining different upholstery techniques and they also sell the supplies you will need. All Things Thrifty : Upholstery 101: How to Re-upholster an Armchair . You might also want to read their Top 10 Upholstery Tips . DIY OnlineMag.com : They have several upholstery tutorials and handy guides including upholstery terminology, types of tufting, etc. DIY Network : Has several upholstery repair and re-upholstery tutorials. Country Living : Has a helpful article on How to Reupholster a Chair . The Ultimate Collection of Moving Tips!

Posted by Laura on August 4, 2010 · 25 Comments Welcome! Simplify your blog reading by signing up to read my blog via RSS (get updates in a feed reader) or via email (get updates delivered daily to your inbox). Over the last couple of weeks I’ve found several terrific moving posts from around blogland that have been helpful and I wanted to compile them here for anyone else in the midst of moving. 10 Best Shortcuts to Get Your House Ready for a Move ~ @ Buttoned Up Free Moving Label Kit ~ @ World Label Moving as Sanctification Part One and Part Two and Part Three ~ @ Extravagant Grace An Essential Checklist for Moving into a New Home ~ @ Simple Mom The Bullet List {Moving Tips} ~ @ The Mother Huddle Professional Organizer Moving Tips ~ @ Organize Right Now The Start-to-Finish Guide for Moving to a New Place ~ @ Lifehacker A Successful Move ~ @ Unclutterer The Ultimate Moving Checklist for Families ~ @ Frugal Mama Awesome Printable Moving Checklist and Planner ~ @ Squawkfox.
Cycle Crazy: 14 Smart & Stylish Bike Storage Solutions. Once an afterthought, bicycle storage racks, hooks and devices are now seen as part of a home’s decor and as public sculpture on city sidewalks. More than simply getting bicycles out of the way, they turn them from potential eyesores into sculptural objects in and of themselves, especially when starkly displayed against an interior wall. Get inspired for bike storage at home and check out the creative, innovative bike racks that are popping up in urban areas. Pit In Bicycle Table by Store Muu (images via: 5magazine) Japan’s Store Muu Design Studio dreamed up this uber-practical bike storage solution that lets your bike double as a seat at a table.

Minimalist Wood Bike Rack by Chris Brigham (image via: knife and saw) Simple and elegant, this bike storage solution was created by woodworker Chris Brigham of Knife & Saw. Bike Rack Shaped Like a Comb (image via: knowhow shop la) Rotating Vertical Bike Rack for Korea (image via: archdaily) Racor Bicycle Hoist (image via: racor) Gladiator Claw Bike Hook. Storage ideas. Hardware Binder- Organizing Chargers, Cables and Instructions.. Yes, I’m still here friends… I can’t seem to get my head above water the last few weeks but I think I may be getting close to coming up for air. I sure hope you all had a wonderful Christmas. Right now we are knee deep in packing up Christmas and trying to wade our way through getting ourselves organized and back on track.

Christmas was all about tech stuff this year for us. Whether it was new phones, lap tops, tablets, games, Kindles, ect…, we are now totally wired up in every way. Scary, but I think my 7-year-old could probably launch a missle now simple by sitting down at her desk. We are drowning in cords, chargers, USB cables, ear buds, flash drives, instruction booklets and all of the accessories that go with each of them. This project is such an easy and great way to store cords, cables, chargers, instructions and accessories all in one compact and accessible place in a 3-ring binder.

Well friends, I hope you all have a wonderful New Year and I am so excited to jump into 2012. 10 Simple Items for Organization | The New Home Ec. BYGEL Stiletto Shoe Rack. Solutions for Small Spaces. Small Space Design & Decorating. Vom Marktplatz zum gemütlichen Wohnraum - Wohnzimmer. Schmaler Wohnraum entdeckt seine wahre Größe - Wohnzimmer. Small Space Solutions. How to Restore Old Wood Furniture : Cleaning the Furniture When Refinishing Wood Furniture. How to Refinish an Old Buffet, Furniture Re-do!

Restoring Vintage Furniture. Reupholstering a Chair, Part 1: Stripping.