
Making a worm farm. What better to do on a rainy day than go on a worm hunt?

My girls are loving these slimy little creatures lately so we found a way that we could keep a few as "pets" for a while. To make your own worm farm you need just a few basic things: an empty 2 liter bottle (or something similar in size)small rocks sanddirtwormsblack construction paper Start by cutting off the top of your bottle (of course, this is a parent's job). I added some tape around the rim of the bottle so there were no sharp edges.
The girls took turns adding the rocks to the bottom for drainage, then about a 2 inch layer of sand, and finally 2 inch layer of soil (just from our garden). Don't forget to put in some worms with those layers of dirt. This is how the final product looked after taping the top of the bottle back onto the base, although I decided to remove the bottle cap to allow for more air flow. After a couple of days we were able to remove the black paper and see what the worms had been up to. Easy Arctic Animals Walrus Craft. Junk Drawer Decor. Winter. Put some holiday cheer into your kids bento lunches this season with these great Christmas bento ideas.

Make colorful, creative, and nutritious lunches that will inspire you children. Ho Ho Ho! 1. Colonel Sanders Christmas Bento Box Recipe 2. 3. 4. 5. 6. 7. 8. 9. 10. 11. 12. 13. 14. 15. 16. Our Busy Little Bunch: Mini Clutch Tutorial. These mini clutches were a big hit at my daughter's birthday party, and my daughters have found lots of uses for theirs.
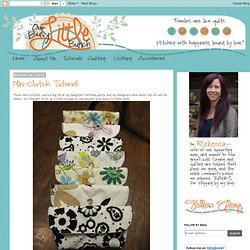
So I thought I'd do up a little tutorial in case anyone else wants to make some. First, cut out your pieces: From the outer fabric, lining, and batting - cut one main piece 8.5" x 10" From the outer fabric, lining, and batting - cut one flap piece 8" x 3.5" Prepare your flap piece: First, find something round and use it to cut the bottom edges of the flap pieces in a curve. If you'd like to use an elastic loop and button closure, center the elastic on the outer flap fabric and place between the outer fabric and lining, right sides together. Sew all three layers together with a 1/4" seam allowance. Clip curves, turn right-side out and press. Prepare your main pieces: Layer the outer fabric on a piece of batting and fold in half, with outer fabric right-sides together.
Push out one of the corners and mark a 2" line across and sew on line. Attach flap to outer piece: Finish bag: Decorate, Make, Create! What if I told you you can make little Fuzzy Felted Ball beads (tiny pom poms) out of a few inches of wool yarn?

AND that you could use them to embellish jewelry, accessories, clothing, and home decor! I already had an old gold chain necklace, which I added Fuzzy Felted Balls to by sewing through them with gold metallic thread and through a seed bead, then back through the Fuzzy Felted Ball and around each chain. It was easy. And just imagine the possibilities! You could make any color you like. To make Fuzzy Felted Balls is EASY! Here’s a plain pillow I already had, I just sewed on black Fuzzy Felted Balls to it. And I added white Fuzzy Felted Balls to a lampshade and added a few to the chain pull as well. And of course I had to add Fuzzy Felted Balls to a white chiffon scarf I had. This scarf makes me feel like Grace Kelly when I wear it. There are so many uses for these felted beads, I know you’ll come up with a few of your own.
Now, I can do that! Talk Crafty To Me - Dedicated to all things handmade. Sustainable products, ideas & DIYs to help you on the path to green living.