
Gallery of cyanotype process prints. Exploring a historical alternative photographic process Malin Fabbri and Gary Fabbri An excellent beginners’ guide to cyanotypes!

Customer rating: Rated 9,9 – based on 34 votes Format: Paperback, 68 pages, full colorSize on Lulu: 8.5 x 11 inchesSize on Createspace: 8 x 10 inchesISBN on Lulu: 978-1-4116-9838-3ISBN on Createspace: 978-1456342227Publisher: AlternativePhotography.com (2006)Download the first 22 pages of Blueprint to cyanotypes free.View table of contentPress release See it before you buy? A copy of the book can bee seen at William Morris Hunt Memorial Library at the Museum of Fine Arts, Boston. About the book The cyanotype is often the first alternative process that people try. Blueprint to cyanotypes is all you will need to get started with cyanotypes.
Blueprint to cyanotypes is published by AlternativePhotography.com – a website and information center dedicated to alternative photographic processes. From Malin Fabbri: Why a book on cyanotypes? About the authors - Wendy Currie. Digital Tri-Color Photography with free Photoshop action « Digital ImageMaker. An old technique has a new lease on life in the digital world of Photoshop to create interesting images from both compact digital cameras and from dSLRs.

Back in the dark ages when I shot film I used a creative technique called tri-color photography. In this technique I would set my camera, then a wonderful Canon T90, into multiple exposure mode, mount a Cokin filter holder and then, with the camera on a good tripod, shoot three exposures onto the same frame, one through a strong red filter, one through a green and one through a blue. The resulting transparency (that’s what I normally shot) would show a roughly naturally colored image of anything that did not move but wonderful color effects on subjects in motion.
The technique worked well but it was not without its issues. Now that I work digitally this technique is even easier. Digitally, the tri-color process consists of the following steps: You want to time the shooting so there is opportunity for movement to occur between shots. 2. Photosynthesis: A world where you can grow your own photographic supplies « Photosynthesis. Writer and photography / Rosemary Horn Rosie Horn lets her images develop slowly on the actual plant.
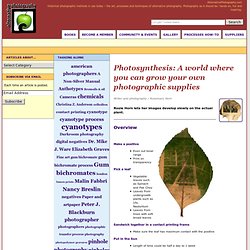
Overview Make a positive Even out tonal rangePrint on transparency Pick a leaf Vegetable leaves such as Spinach and Pak ChoyLeaves from undergrowth plants such as Lily, NasturtiumLeaves from trees with soft broad leaves Sandwich together in a contact printing frame Make sure the leaf has maximum contact with the positive Put in the Sun Length of time could be half a day to 1 week Materials Inkjet printerInkjet transparencySellotapeScissorsLeavesContact printing frame Image above right: An example of an image that didn’t get quite enough sun. Making prints on leaves is a hit and miss affair. The key area to focus on is creating a good positive, this will make the world of difference to your success rate. After taking photos (I use digital) you then need to process them in Photoshop to convert them to black and white. I print the finished positive using an inkjet printer onto transparency.
Like this: