
DIY fashion. DIY Satsuma Candle. A friend of mine DIYed her own candles, made from the peels of Satsuma oranges, for a recent dinner party.
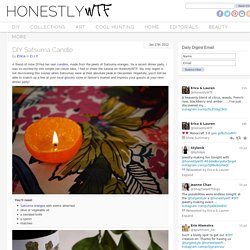
I was so excited by this simple yet clever idea, I had to share the tutorial on HonestlyWTF. My only regret is not discovering this sooner when Satsumas were at their absolute peak in December. Hopefully, you’ll still be able to snatch up a few at your local grocery store or farmer’s market and impress your guests at your next dinner party! The stem side of the Satsuma will be the bottom and base of the candle. Lightly score a ring around the top 1/3 portion of the orange. Because Satsumas are known for their loosely attached peels, the orange should easily be removed. Once the flesh of the orange is taken out, the pith connecting the outer stem should remain. Pour a few glugs of olive oil into the orange, leaving just the very tip of the pith exposed. Depending on the length of the pith, the candle should burn for at least a couple of hours.
(all images via HonestlyWTF) DIY Floral Sunglasses. We always claim to see the world through rose colored glasses . . . but how about rose trimmed glasses?

In honor of the widespread floral trend and our love of Dolce & Gabbana‘s Baroque-inspired fall collection, we’re DIYing a pair of outrageously fabulous sunglasses using the same charming little ceramic roses from a recent tutorial. These will surely be a pair of shades you won’t go unnoticed in this summer! You’ll need:a pair of sunglassesa variety of ceramic roses and flowersdisposable container or popsicle sticka handful of toothpicksE6000 Start by squeezing a small amount of E6000 into a disposable container or onto a wooden popsicle stick.
I like to use a small amount at a time, as the glue tends to dry quickly. Press the flower firmly onto the outer corner of the sunglasses. Add a few small flowers down the right side of the glasses. Repeat on the other side and allow to dry for a couple of hours. Your floral shades are ready to wear!
Dip Dye Clothing DIY – Do It Yourself Dip Dye. This week we’re sharing some of the blog’s greatest hits!
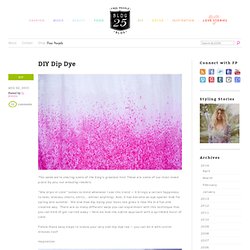
These are some of our most loved posts by you, our amazing readers. “She drips in color” comes to mind whenever I see this trend — it brings a certain happiness to tees, dresses, shorts, shirts… almost anything! And, it has become an eye opener look for spring and summer. We love how dip dying your basic tee gives it new life in a fun and creative way. There are so many different ways you can experiment with this technique that you can kind of get carried away – here we love the subtle approach with a sprinkled burst of color. Follow these easy steps to create your very own dip dye tee — you can do it with cotton dresses too!! Inspiration: What you need: A tray, 1 measuring cup, salt, Dylon dye of any color (not the machine washable ones), heavy duty cleaning gloves and a basic white tee.
Mix a quarter of the Dylon dying powder into the tray with 4 cups of warm water and 4 tablespoons of salt. Hang to dry.