
How to Create a Flaming Photo Manipulation. In this tutorial, we'll manipulate a picture so it looks like a woman burning in flames.
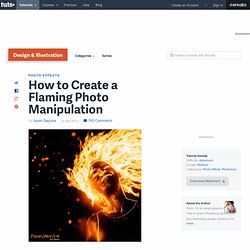
The idea behind this manipulation was to create a nice looking illustration, only by using simple techniques and tools such as the Brush tool and Warp command. I hope you enjoy the tutorial and try it with your own stock imagery. Editor's note: This tutorial was originally published on Psdtuts in January 2009. Step 1 For this project, I used two nice images that suits for the manipulation; image1, image2. Step 2 Let's start with image1, open and duplicate this image by using the Image > Duplicate command from the menu bar.
Step 3 With the "PassionFire" image active, duplicate the "background" layer. Step 4 Reactivate "Layer 1," then press Command + Shift + U to apply desaturate command. Step 5 Duplicate "Layer 1," then apply the find edges filter from Filter > Stylized > Find Edges. Step 6 To give the white line more contrast, duplicate the "Layer 1" copy then change the Blending Mode to Screen. Step 7. Video Tutorials. Your Adobe Photoshop Elements 11 Starter Kit. Thanks for your interest in Photoshop Elements Techniques.
Below you will find download links for your free issues and below that a selection of our favorite videos and tutorials for you to view as often as you like! Looking for the Photoshop Elements 10 Starter Kit? Click here to find it! (It might take a minute for the issues to open the first time…) In this set of videos, we’ve selected a variety of reader-favorite videos produced by our veteran photographers, writers, and Elements experts. The Multiply Blend Mode Matt distills the loads of blend modes down to the single tool that will provide the biggest bang for the buck. Customize Your Brushes Learn how to customize your Brush tool options and create straight and dotted lines, along with a nice scalloped edge that can be used as a unique photo frame. Color Toning with Gradient Maps Crop Overlay Guide Mike shows us the ever-improving Overlay tool introduced in Elements 10, explaining when and how to use its various options on our images.
Elements. Photoshop Elements. Photoshop vs Elements. That’s a simplification, in that Photoshop Elements isn’t just a cut down Photoshop, it really is a different program. That will hopefully become clear below. The differences between Photoshop CS4 and CS4 Extended are much smaller relatively speaking. If you decide to get all or part of a Creative Suite bundle, you should consider which one would suit you better. I like Adobe’s take on it: "If you work in film, video, multimedia, 3D, manufacturing, architecture, engineering, medicine, or science, Photoshop Extended is for you.
" A short and sweet summary. The easiest way to start to look at the differences is to look at the things that Photoshop has but Elements doesn’t. CMYK and LAB Color Modes One of the reasons Photoshop Elements isn’t an option for professional graphical development is that it doesn’t support the image color modes that are used for professional print work. Channels and the Channels Palette Smart Objects Layer Masks and Quick Mask Mode Masks are really useful.