
How to solve the Rubik's Cube - Part 2. Rubiks Cube.
ZBrush - Novidades - Criar Referências em 3D. How To Draw A Wave. This art tutorial, kindly donated by surfing comic strip illustrator and surf artist Bob Penuelas covers how to draw a wave the Wilbur Kookmeyer way!
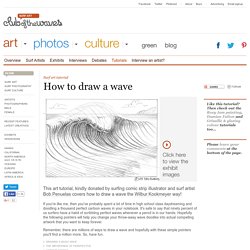
If you're like me, then you've probably spent a lot of time in high school class daydreaming and doodling a thousand perfect cartoon waves in your notebook. It's safe to say that ninety percent of us surfers have a habit of scribbling perfect waves whenever a pencil is in our hands. Hopefully the following pointers will help you change your throw-away wave doodles into actual compelling artwork that you want to keep forever.
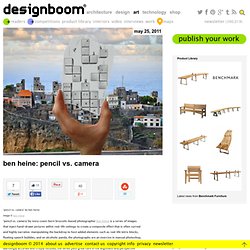
Remember, there are millions of ways to draw a wave and hopefully with these simple pointers you'll find a million more. So, have fun. Drawing a basic wave The following illustrations and captions by Bob Penuelas take you through the basic steps of drawing a wave… Step 1 Sketch in the basic shape of the curl, spray, foam and base of the wave. Step 2 Step 3 Step 4 Add the rest of the flow lines. Step 5 Step 6 Tips… Paddler's view. Ben heine: pencil vs. camera. May 25, 2011 ben heine: pencil vs. camera ‘pencil vs. camera’ by ben heine image © ben heine ‘pencil vs. camera’ by ivory coast-born brussels-based photographer ben heine is a series of images that inject hand-drawn pictures within real-life settings to create a composite effect that is often surreal and highly narrative. manipulating the backdrop to host added elements such as real-life tetris blocks, floating speech bubbles, and an alcoholic panda, the photographs are an exercise in manual photoshop, always including heine’s hand which holds up the sketched piece of paper in the foreground. alarmingly accurate and crisply focused, the series puts great care in the alignment and perspective required to successfully pull off the optical illusion. heine creates seemingly effortless snapshots that are highly imaginative and contextual. image © ben heine via mymodernmet erika kim I designboom.
Introduction to Anisotropic Shading. In this tutorial you will discover: What Anisotropy isWhen to use itHow to use it to create a realistic saucepan If you’ve heard the term “Anisotropic” thrown around the blender community recently, it’s because the last release (2.65) included a new shader called Anisotropy.

This new shader allows you to create some complex materials like brushed metal, vinyl, saucepans, kitchen sinks and other materials which have been sanded. It’s kinda like the glossy shader but nerdier. In this tutorial I’ll be giving you some in-depth information on what it is, when it should be used and how to use it. Finished Result Download the HDR kitchen lighting probe used in the tutorial here. Text Summary Not a fan of videos? What is Anisotropy? A real world example of Radial Anisotropy. Anisotropy is similar to a glossy shader, only it pulls the reflection in a certain direction: Comparison of a glossy shader and a (linear) Anisotropic Shader. How to Make a Rainy Window. In this tutorial you will discover how to: Model rain dropsRealistically texture a wet pane of glassUse depth of field effectively Final Result Download the Finished .blend Resources: Text Summary Making the Rain Drops Delete the default cube and lamp, and replace with a plane rotated at 90 degrees.

Position the camera front on to the plane. Move to a new layer and add a UV sphere. In side view mode, rotate the sphere 90 degrees. Using proportional editing (O), move the vertex inwards, to create a squashed droplet. Split the view to a UV image editor and load in this reference image. Model 6-8 more droplets based off the reference images. Select all the droplets and press Ctrl+G to form a group. Assign it a material with a glass shader, and apply it to all the droplets.
Blender.