DIY Stain Pretreater & Other Laundry Tips. Funny story, a couple years ago our women's group at church was having a Saturday meeting and I was asked to teach a class on making your own cleaning products.

I'm not sure why I was asked as I had never done any of this before. My mother-in-law was in charge of the meeting and I'm not sure if she thought I made my own stuff or what. lol I had always wanted to make my own cleaners; I'd bookmarked (back in the days before Pinterest) several sites and recipes I wanted to try but had never gotten around to it. So I did a bunch of research, tested out a few things, and ended up with a several page handout of awesome cleaning recipes. :) Anyway, today I'll share my laundry tips and recipes.
Here is one of my very favorites: Stain Pretreater ½ c. vinegar½ c. ammonia½ c. I also found this recipe for laundry soap - it's all over the internet. Liquid Laundry Soap- Front or top load machine- best value. Somewhere to hang my ... glass. Brallis Published on February 23rd, 2011 | by Jules IKEAHacker Materials: 1 BRALLIS cloths hanger, 2 “thumbscrew” design aluminum connectors (part # ADR11-B1 Thomas & Betts ‘Blackburn’ connectors), 1 flathead hand screwdriver, 1 power screw driver, 2 metal 1/4″ dowels or headless bolts, 2 wood screws.

Description: Here’s how a clothes hanger can become a modern looking, attractive storage for glassware: Take a BRALLIS hanger,which is constructed of metal tubing, remove the 2 black rubber nubs from the two tube ends, insert 2 metal 1/4″ dowels or headless bolts into these openings, and attach 2 “thumbscrew” design aluminum (part # ADR11-B1 Thomas & Betts ‘Blackburn’connectors) — these can be purchased in the electronics dept. at HomeDepot — to the protruding metal dowels. Tighten using an (archaic) flathead screwdriver. You can orient to your liking the “tracks” for the wine glass bases to slide upside down. . ~ Don Deutsch, Minneapolis, MN USA The Author. Entryway Seat RAST Hack. Landing Published on June 17th, 2011 | by Jules IKEAHacker Materials: RAST nightstandDescription: We had used this RAST “night stand” as a shoe shelf in the old place and I thought it would be perfect.

One coat of “antique chestnut” stain immediately helped the piece looked more finished and tied into the laminate flooring. The stain I bought was a two-in-one varnish so I didn’t need another coat to get the glossy look. Great time saver. The fun part came when cutting the foam. Wrap the foam in fabric overlapping about two inches on the bottom of what will be the seat cushion, and cut. Turn the pillow cover right-side-in, making sure to poke out the corners, and stuff the foam inside. See more of the entryway bench. ~ Eve-Marie Rodrigues, Canada The Author. Dressing Table. Earring holder. Cake Stands and Candy Dishes. Accessories Published on April 15th, 2011 | by Jules IKEAHacker Materials: OPPEN plate/bowl, NEGLINGE candlestick, E6000 epoxy Description: Cake stands are always so expensive at retail stores like Target and the like, when they are basically just elevated plates.

Why not elevate your own? 1: Remove the labels from everything and wash carefully. 2: Mark the exact center of a glass OPPEN plate or bowl, on the top face, with a black marker. 3: Apply E6000 evenly to the top face of the NEGLINGE candlestick. 4: Align the plate/bowl with the center of the candlestick and press down firmly. While this is drying, prepare your favorite cake or candy to fill the bowl. . ~ AJ W., Lansing, MI The Author. a1-726007.jpg (800×597)
Hoop art. Best Jewelry Closet EVER! Materials: SKAR Cabinet with Mirror Description: IKEA pictures this with keys, etc on hooks, but I installed in my bedroom and made it into a jewelry cabinet.

Install per IKEA instructions with 16 hooks provided. Add 12 3M hooks in between the cabinet hooks. If needed add 3M hooks on inside of door for even more storage. I love it because it is well organized, easy to see all, but closed up in the cabinet not getting dusty. ~ Christine, Bucks County, PA The Author Jules IKEAHacker "I am Jules, the engine behind IKEAHackers and the one who keeps this site up and running.
Geektastic lighting. Hemma Published on March 22nd, 2011 | by Jules IKEAHacker Materials: Hemma Cord Set, copper wire, blank printed circuit boardsDescription: I wanted to create some lighting for my apartment that would have a very geeky feel.
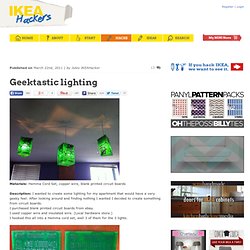
After looking around and finding nothing I wanted I decided to create something from circuit boards. I purchased blank printed circuit boards from ebay. I used copper wire and insulated wire. I wired the circuit boards together with the copper wiring visible as one square and two triangles. I then suspended the Hemma fixture inside with insulated wiring.
The circuit boards create a lot of visual interest because they have many different levels of light they let through. Total cost was around $50 with materials left over. ~ Sara Reller The Author.