How to Make a Plush Owl. How To Make A Stylish Photo Frame For Several Photos. Here is a simple yet stylish photo frame that can accomodate quite many photos at once. The idea is very simple. Fasten twines on the empty frame and hang photos using clothes pins on them. You can use a frame you bought or a frame you made by yourself. To make it you just need to find some wood strips, sand them, paint or stain them and fasten together with the staples and nails. Yes, everything is as simple as it sounds. Geometric Photo Art Project. Amanda, of Indie Jane, and I have been dreaming up extra pretty projects for you this coming season.

When the idea of a geometic photo collage was tossed around we both got really excited about it! What we love about this project is how personal it can become. I'm thinking of making one with wedding photos for my bedroom... how sweet would that be? Supplies Needed: Poster board (cut slightly larger than the frame you wish to use), glue or double-sided tape, scissors, triangle template to trace (mine was 2.5 inches on each side of the triangle using a ruler), paint swatches in colors you love, vintage book pages, and a few of your favorite photos. 1. Display your new art in your home! DIY Typographic String Art. Man Made DIY, is one of my favourite craft/DIY blog and they posted this tutorial.

Which I am in love with! Its a very modern twist on the popular 7os trend of string art. It’s very simple to make, and looks amazing! Chris made this by projecting the words onto a piece of painted plywood and tracing it. Do-it-Yourself DIY String Wedding Lanterns Yarn Chandeliers. Jessica of Wednesday Inc shows us how to make those gorgeous twine chandeliers from the inspiration shoot she shared with us this morning.

Using balloons, glue and twine, you can also make these lanterns for your wedding – and then bring it home and use it as your very own mid century lampshade. What you will need are: balloons, glue, yarn, tray for glue, corn starch 1/2 cup of Corn starch, 1/4 cup of Warm water, clear fast drying spray paint, hanging lamp cord or fishing line (depending on your desired final product), and a lighting kit if you’re looking for a fully functional lantern. Jessica recommends using a sharpie to mark on the inflated balloon how much room you need to leave for the lighting cord. She also recommends coating the balloon with vaseline prior to wrapping the yarn coated with glue so it doesn’t stick on the balloon once it’s dry. You can see all the details on Jessica’s blog.
Are you getting excited to try to do this at home as much I am? Instructions: How to make gift bags from newspaper. When I bought something at a store recently, the clerk handed me my purchase in a bag made from a newspaper.
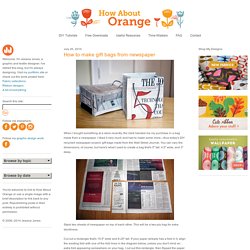
I liked it very much and had to make some more—thus today's DIY recycled newspaper project: gift bags made from the Wall Street Journal. You can vary the dimensions, of course, but here's what I used to create a bag that's 5" tall, 4.5" wide, and 3" deep. Stack two sheets of newspaper on top of each other. This will be a two-ply bag for extra sturdiness. Cut out a rectangle that's 15.5" wide and 8.25" tall. Fold a flap 1.25" down from the top.