
Cragside. ‘Model-making Basics’ – creating surfaces. This is the fourth of five outline accounts dealing with what I consider to be the five defining areas of model-making work; main construction, fine construction, modelling/shaping, creating surfaces and painting.
I’ve written these overviews in preparation for teaching sessions at RADA ( Royal Academy of Dramatic Art ) in London. So they’re tuned towards the specialities of theatre design model work, but most of the points will be relevant in general terms to model work in other disciplines. I’ve started with the general ‘themes’ or requirements of the subject, followed by more specific and practical guidance on the materials and methods which can be used. Using standard black foamboard. Kapa-line foamboard (the ‘peelable’ type with the cream-coloured foam inside which I’m forever recommending for a wide variety of surface effects) doesn’t come cheap and it’s only available from a handful of suppliers.
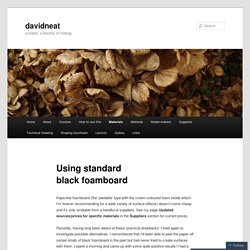
See my page Updated sources/prices for specific materials in the Suppliers section for current prices Recently, having long been aware of these ‘practical drawbacks’ I tried again to investigate possible alternatives. I remembered that I’d been able to peel the paper off certain kinds of black foamboard in the past but had never tried to create surfaces with them. Reference for various types of brick/stone wall patterns. Miniature House: Brick Wall Part 2. In this post about making a brick-wall (part 2) I will show you how I coloured and cut the sheets of sanding-paper that I used for creating my bricks.

After priming the sheets ( I think used about 10 or 15 sheets all together) with gesso, I covered them all with a transparant layer of burnt sienna (this is called a "glacis" in dutch) . I let this dry throroughly. On top of that I put some burnt umber, sometimes diluted with lots of water, sometimes apllied a bit thicker. With the burnt umber still a bit wet, I applied another layer of transparant colour, this time I used some cadmium red. Because the layer underneath is still a bit wet, both colours mix in a surprisingly way.
I made sure to cover all the sheets of sanding-paper with multiple transparant layers of colour, but I did not treat every sheet exactly the same as the other. Miniature House: Brick Wall Part 1. 1:24 Bricks Victorian red Pk50. Turret. The Tudor House………………. Thanet is steeped in history, we are lucky enough to wander through beautiful streets with incredible architecture on a daily basis and therefore it is easy to overlook something magnificent because it is so familiar to us.
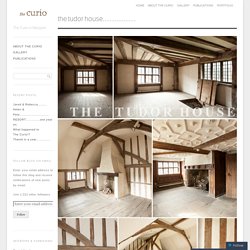
From time to time ‘The Curio’ is going to highlight some these buildings and what better place to start with than The Tudor House. A building that sits on the edge of the old town and has such a story to tell if only walls could talk…. The Tudor House is one of the Margate’s oldest buildings, it was built in the second quarter of the 16th Century and is “classic ‘transitional’ form” – a cross between a medieval-style house which had a double-height hall in the middle and an early modern house which had two stories throughout. Up until the 20th Century the buildings were well cared for but by 1936 they had become so derelict they were condemned to demolition. The council, as part of a slum clearance scheme finally bought the house. Tudor Row Houses – Part 2 « Zaboobadidoo. Tudor Row Houses « Zaboobadidoo. Glorious Twelfth: Tutorials. As our "tutorials" section has gotten rather large, I thought it would be fun to organize them by house part, and area.
I want to make... How To Make a Tudor Casement Window: Here, I demonstrate one way to create an historically accurate, appealing window using commonly available materials. Once you start making your own windows, you'll wonder why you ever settled for store bought! Creating building components from scratch can be a little intimidating at first, but, trust me, it's worth the effort to learn! How To Make a Lead Paned Window: This tutorial introduces the basic notion of using lead golfer's tape and varnish to create an extremely realistic-looking window. How To Make Plastic Sheet "Bricks": This tutorial teaches you how to make realistic-looking grouted "bricks" with inexpensive and readily available plastic sheets. Is there something else you'd like to see? Stone walls. *Life in Miniature*: Making aged slate roof shingles.
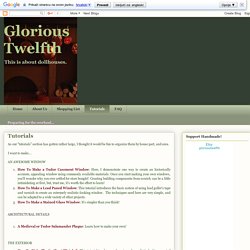
This month we have another tutorial from Judy Kingsley of Chelsea, Quebec (check out her fabulous fireplace project that was previously featured.)
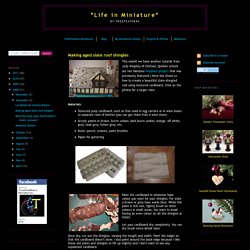
Here she shows us how to create a beautiful slate-shingled roof using textured cardboard. Click on the photos for a larger view. Materials: Textured pulp cardboard, such as that used in egg cartons or in wine boxes to separate rows of bottles (you can get them from a wine store)Acrylic paints in brown, burnt umber, dark burnt umber, orange, off white, grey, lead grey, lichen grey, etc.Ruler, pencil, scissors, paint brushesPaper for guttering Paint the cardboard in whatever base colour you want for your shingles. Let your cardboard dry completely. Once dry, cut out the shingles, varying the length and width. Once the shingles are cut, mix them all in a pile so that you will be picking them out randomly.
Paint your roof the base colour you used for the shingles, so that any spaces between them will not show. Oates Res Window by Built4ever on DeviantArt. Wrought Iron Sketches by Built4ever on DeviantArt. Gates of Charleston by Built4ever on DeviantArt. Victoria Miniland - Garden Steps. Mini Mansion - Stone Steps Project. In order to get the look and feel of stone,a sort of real clay which can be burnt or airdryed was used to cover the steps with.
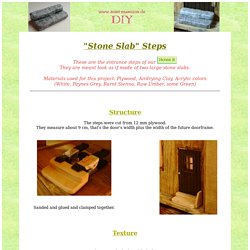
Color doesn't matter at this stage. To make the steps look like large flat fieldstones, slightly press in your fingertip here and there. You should get clear elevations and roundish depressions. Don't make them too regular. (See picture above, right.) In any case, as a final step take a soft toothbrush or stiff paintbrush and very very gently press it into the clay. Click to enlarge Almost dry. Fill gaps or cracks where the clay might come loose with a little white glue, wood glue or ceramic glue. Color I used acrylic artist colors, miscelleanous brands. FZD School of Design. Environmental Design on Pinterest. Heather Gibson's EPQ.