
In App Purchase Tutorial. iPhone Tutorial – In-App Purchases. Update: MKStoreKit 4.0, an updated version of the one presented here is available. Please check it out and use 4.0 instead of this.Update: A Chinese translation is available here. Last week, Apple announced that in-app purchases will be available for free apps as well. This could probably free developers from creating “lite” and “pro” versions of the app and allow developers to “unlock” features inside the app and create business models that the AppStore haven’t seen. This model could be a great boon for developers like us to upsell our apps (provided they are of good quality) and to reduce piracy.
In this article, we will look at how to incorporate StoreKit to do In-App purchases for your iPhone Application. Update: Did it really free you from creating “lite” and “pro” versions? Apple allows three types of purchases within the app and Apple terms them as consumables, non-consumables and subscriptions. Consumables are products that are “consumed” immediately. Step 1: Step 2: Step 3: In App Purchases: A Full Walkthrough. At first glance, adding in-app purchases seems like it would be a walk in the park.
Apple provides plenty of documentation that should get developers up and running in no time. So, why is adding in-app purchases such a royal pain in the arse? Because, inevitably, something will go wrong. And when that moment arrives, you’re screwed. Apple provides a beastly amount of documentation on in-app purchases, but they don’t provide the right kind of documentation. You are left to flounder and flail like a wet noodle as you exhaustively try every possible solution on the web. Losing days of productivity on this is ridiculous. Without further ado, let’s get started. Overview Ok, folks, here’s the secret to getting in-app purchases working: break it into two distinct steps: Create and fetch a product descriptionPurchase a product The first step is where you will likely run into problems. We’ll tackle the product description step first.
Create and Fetch a Product Description. In-App Purchase Programming Guide: Introduction. In-App Purchase allows you to embed a store inside your app using the Store Kit framework.
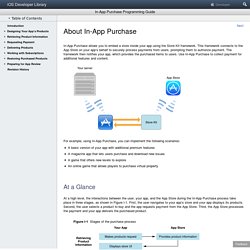
This framework connects to the App Store on your app’s behalf to securely process payments from users, prompting them to authorize payment. The framework then notifies your app, which provides the purchased items to users. Use In-App Purchase to collect payment for additional features and content. For example, using In-App Purchase, you can implement the following scenarios: A basic version of your app with additional premium featuresA magazine app that lets users purchase and download new issuesA game that offers new levels to exploreAn online game that allows players to purchase virtual property At a Glance At a high level, the interactions between the user, your app, and the App Store during the In-App Purchase process take place in three stages, as shown in Figure I-1.
You Create and Configure Products in iTunes Connect. La programmation iPhone / Tutoriel Membre par DricABrac : In App Purchase. Tutoriel par DricABrac Voici un tutoriel pour mettre en place et tester l'In App Purchase pour une application.
En quoi cela consiste t'il ? Proposer du contenu payant que l'on peut ajouter directement depuis votre application.Par exemple, dans un jeu de shoot, vous pourrez proposer au joueur d'acheter des armes supplémentaires. Ce tutoriel va donc vous guider pas à pas ! Attention, vous ne pouvez proposer du contenu payant que si votre application est payante à la base. Voir les docs d'Apple : Guide du "Store Kit" Il y a différentes étapes pour mettre en place cette fonctionnalité. [titre]1. Connectez vous sur votre compte développeur Apple «Developer Program Portal».Dans l'onglet App IDs, cliquez sur New App ID et remplissez les informations demandées (ex. com.testdomain.testinapp)ATTENTION : Ne pas mettre une * dans le Bundle Identifier !!!