
Suppliers. AVR Visual Studio ATOMIC. TCC. Open Hardware. Electronique. Hardware. Long range RFID hacking tool to be released at Black Hat. Makeblock. MakeBlock. Why Hackers and Makers Latest Toy is Puerto Rican. There are still a few hours left to contribute to the BLEduino Kickstarter campaign, but the operation is already a tremendous success.
Not only did it reach its funding goal in fifty-two hours, but it has now exceeded its initial target by more than 430 percent. This is even more impressive when you take into account that this was the first hardware crowdfunding campaign to ever come out of Puerto Rico. It is the brainchild of Caguas-based startup Kytelabs, whose three co-founders are on a mission to turn their island into a great home for hackers and makers. BLEduino: Bluetooth made easy When Jonathan Gonzalez, Ramon Gonzalez and Angel Viera decided to create an Arduino-compatible board that would support Bluetooth 4.0, they were essentially scratching their own itch. Although they soon discovered some Bluetooth-enabled boards in the market, they also noticed that these had several flaws.
This app-based approach is likely one of the key elements of BLEduino’s appeal and accessibility. Power off from an Arduino Sketch using the Pololu Power Switch -Arduino for Projects. If you need an Arduino to shut off from within your Sketch, this is the solution.
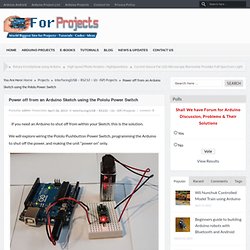
We will explore wiring the Pololu Pushbutton Power Switch, programming the Arduino to shut off the power, and making the unit “power on” only. The Pololu Pushbutton Power Switch comes in two versions – the SV version geared towards 4.5V-20V range, and the LV which specifies 2.5V-7.0V range. I will use a 9V battery for this demo, and thus the SV version of the power switch. Webpage for the Pololu Pushbutton Power Switch Step 1: Getting familiar with the Pololu Power Switch The power switch has 2 connectors each for GND, VIN and VOUT, allowing multiple attachment points for your projects. Download. Downloaded 5177530 times.
Arduino Template Express - Installation. The Arduino ecosystem consist of an IDE, development boards, development libraries and a vibrant and engaging community involved in the support and expansion of all of the components that make the ecosystem.
I acknowledge the pedagogical benefits of the Arduino IDE but if you are already used to Atmel Studio, the Arduino IDE feels like developing with training wheels. The Arduino Template Express (ATE) enables Atmel Studio to create sketches using Arduino libraries and development boards. AVR developers can take the best of the Arduino and continue using Atmel Studio and all the benefits it provides. This post will walk you through the installation of ATE. In order to install ATE you must have already installed Atmel Studio 6.1 and Arduino 1.0.4 or higher. Cosa. Netduino. C.cc: Home. Wiring. Limor. Nudatech. Debug Arduino - Overview. Above image is just an example, the code does not do anything useful!
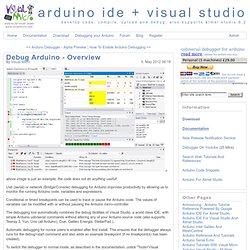
Usb (serial) or network (Bridge/Console) debugging for Arduino improves productivity by allowing us to monitor the running Arduino code, variables and expressions. Conditional or timed breakpoints can be used to trace or pause the Arduino code. The values of variables can be modified with or without pausing the Arduino micro-controller. The debugging tool automatically combines the debug facilities of Visual Studio, a world class IDE, with simple Arduino usb/serial commands without altering any of your Arduino source code (also supports Teensy 3, Yun, Uno (all Arduino), Due, Galileo Energia, StellarPad ). Automatic debugging for novice users is enabled after first install.
To switch the debugger to normal mode, as described in the documentation, untick "Tools>Visual Micro>Automatic Debugging" More info & blurb note: Click the image for more details. Improves Productivity - Works over usb, xbee, bluetooth and more Technical. Raw Micro. An Online Opensource Robot and Hardware Shop.
Detecting an IR Beam Break with the Arduino IR Library. One reader asked how to use my Arduino Infrared Library to detect breakage of an IR beam.
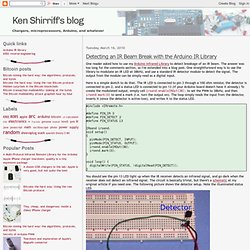
The answer was too long for the comments section, so I've extended into a blog post. One straightforward way is to use the library to modulate an IR LED at 38kHz, and use a standard IR detector module to detect the signal. The output from the module can be simply read as a digital input. Here is a simple sketch to do that. The IR LED is connected to pin 3 through a 100 ohm resistor, the detector is connected to pin 2, and a status LED is connected to pin 13 (if your Arduino board doesn't have it already.) #include <IRremote.h> #define PIN_IR 3 #define PIN_DETECT 2 #define PIN_STATUS 13 IRsend irsend; void setup() { pinMode(PIN_DETECT, INPUT); pinMode(PIN_STATUS, OUTPUT); irsend.enableIROut(38); irsend.mark(0); } void loop() { digitalWrite(PIN_STATUS, ! Arduino Motor Shield. The Arduino Motor shield comes with TinkerKit!

Connectors on the board. They can be used to control inputs, outputs and TWI TinkerKit! Devices. In this tutorial we’ll be driving a DC motor with a potentiometer, changing its direction and even printing the output values on an LCD. In order to see the rotation of the DC motor, we designed a blade, that you can download here, and a base.