
Spread the love: heart pattern friendship bracelets « la manufacture. Growing up, I spent countless hours making colorful friendship bracelets.
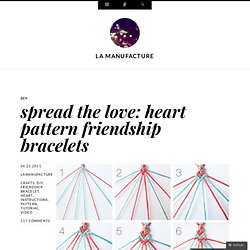
Their resurgence prompted me to rediscover this summer pastime. Here are instructions for one of my favorite patterns – hearts! You will need embroidery thread in two colors. Measure the thread using twice the length of your arm (from your fingertips to your shoulder and then back to your fingertips) for each string. Cut it. The basics: Hold the second string with your left hand as you use your right hand to take the first string over and then under the second string. Hold the seventh string with your right hand as you use your left hand to take the eighth string over and then under the seventh string. The pattern: 1: Lay your strings out as shown. 2: Make your first row by following the instructions for making a row of knots going right and then left. 3: Make a second row of knots in the same way, this time with the second color. 4: Take the second string and knot it around the first string going left.
PERMANENT MARKER TIE DYE. I decided to try the "Sharpie Tie Dye" technique and figured it would be better to start off with something small.
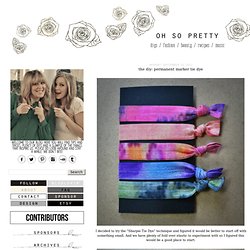
And we have plenty of fold over elastic to experiment with so I figured this would be a good place to start. I'll be doing the same design on 5 different colors of elastic. Squiggle some sharpie onto random parts of the elastic. Fill in most of the gaps with any kind of permanent markers. Place the elastic on a paper towel. Drizzle rubbing alcohol onto the elastic. Fold the paper towel over and dab the elastic to smudge the designs a little more. Let the elastic dry completely and then rinse with warm water. Lay the elastic out to dry and then create some hair ties out of the pieces! There you have it! Sew Sock Skeleton With A Pair Of White Socks. I think this is the most spooky cute handmade I have ever made … ha ha ha… Even I feel eerie watching them sitting there….
Welcome the Mr. & Mrs Skeleton!!! [More pictures in the gallery] Let them startle your guests when they come for trick or treating!!! You might be interested to make the pumpkin and the spider from pom pom as well and set them up in a corner of your door step, and Boo ooo ooo ooo ooo !!! I was searching for Halloween decoration ideas when I stumbled upon Martha Stewart website and found the basic sock skeleton (aka the Mr. So, there I was, cast my first trial, it was really an easy-peasy job. By the way, before jumping to the how-to, I have a story to tell…. {Get full details on .} Craft Project: Spooky Halloween Mirror at WomansDay. Scared of your own reflection?
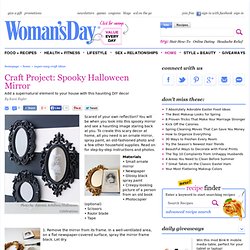
You will be when you look into this spooky mirror and see a haunting image staring back at you. To create this scary decor at home, all you need is an ornate mirror, spray paint, an old-fashioned photo and a few other household supplies. Read on for step-by-step instructions and photos. Materials • Small ornate mirror • Newspaper • Glossy black spray paint • Creepy-looking picture of a person from an old book • Photocopier (optional) • Scissors • Razor blade• Tape 1. How to Make a Smoke Bomb Video - About.com. How to Make Glowing Water Video - About.com. Soap Making Recipes and Tutorials. Turn Photo Negatives Into Artsy, Personalized Lamps. Print Hula Hoop Rug Page. How to Make Cherry Blossom Lights.
Paper Flowers – Anyone Can Do That. Japanese Kusudama, this tutorial is featured on Craftuts Anyone can do that, I assure you.

The proof: I can, just take a quick look at my result below. And, believe me, I am neither meticulous nor particularly patient. You could even say I’m the opposite. Below you can see my very first attempt to create paper flowers.
DIY Doily Lamp. Tiny Polaroid Magnets. Hi there!
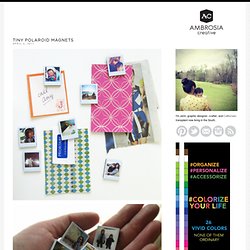
It’s felt like forever since I’ve last blogged, and has felt like an eternity since I’ve done anything crafty and nifty. Since my morning sickness has gone into full speed (yes, we’re expecting our third this fall!) I haven’t felt like myself. But nothing like inspiration to wake one out of a reverie — or nightmare, in my constantly sick state.
I came across these DIY Pantone chip magnets on How About Orange and wanted to do something similar. You will need: Cardboard (mine was the backing of a sketchbook — much thicker than the back of a regular spiral bound notebook) or 2-3 sheets of white cardstock or poster board spray-mounted together to use as a sturdy backing to the magnetsOpaque white marker (necessary only if your cardboard is not white) Craft knife Metal straight edge/ruler Clear packing tape or frisk film. Step 1: Download a Photoshop file of the Polaroid frames below. Step 2: Print out photos onto photo paper. Step 4: Trim out photos with craft knife. 487 Comments. Oh the lovely things.