
ASP.NET Image Resizing, Cropping, & Upload Module for IIS - Free & Open Source. CodeCarvings Piczard V1.1 Help. Using The Package Manager Console. This topic describes how to find, install, remove, and update NuGet packages using PowerShell commands.
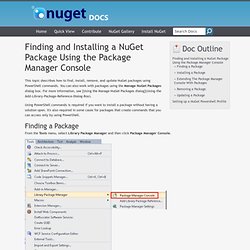
You can also work with packages using the Manage NuGet Packages dialog box. For more information, see [Using the Manage NuGet Packages dialog](Using-the Add-Library-Package-Reference-Dialog-Box). Using PowerShell commands is required if you want to install a package without having a solution open. It's also required in some cases for packages that create commands that you can access only by using PowerShell. Finding a Package From the Tools menu, select Library Package Manager and then click Package Manager Console. The Package Manager Console window is displayed. The two drop-down lists set default values that let you omit parameters from the commands you enter in the window: In the Package source list, select the default source (NuGet package feed) that you want your commands to use.
When you enter commands, you can override these defaults. ASP.NET Dynamic Data Presentation Layer Customization. The topic you requested is included in another documentation set.
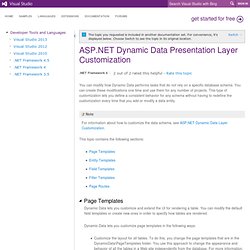
For convenience, it's displayed below. Choose Switch to see the topic in its original location. You can modify how Dynamic Data performs tasks that do not rely on a specific database schema. You can create these modifications one time and use them for any number of projects. This type of customization lets you define a consistent behavior for any schema without having to redefine the customization every time that you add or modify a data entity. This topic contains the following sections: Dynamic Data lets you customize and extend the UI for rendering a table. Dynamic Data lets you customize page templates in the following ways: Entity templates are user controls that let you customize the layout for a whole data row in a table. Customize the layout for all tables. These custom templates must be in the DynamicData\EntityTemplates folder. Dynamic Data uses ASP.NET routing to match and handle URL requests.
AJAX Control Toolkit. Managing Nuget Packages Using The Dialog. This topic describes how to find, install, remove, and update NuGet packages using the Manage NuGet Packages dialog box.
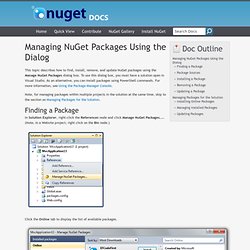
To use this dialog box, you must have a solution open in Visual Studio. As an alternative, you can install packages using PowerShell commands. For more information, see Using the Package Manager Console. Note, for managing packages within multiple projects in the solution at the same time, skip to the section on Managing Packages for the Solution. Finding a Package In Solution Explorer, right-click the References node and click Manage NuGet Packages.... Click the Online tab to display the list of available packages. Browse through the list, or search for a package using the search box at the top right of the dialog box.
Long lists are divided into pages. When you select a package, an Install button appears, and a description is shown in the right-hand pane. Package Sources NuGet can display packages from multiple package sources. How To: Protect From SQL Injection in ASP.NET. MSDN Library patterns & practices Retired Solution Development Fundamentals Security Security Guidance for Applications How Tos.
Walkthrough: Displaying Formatted Data in Web Pages with the FormView Web Server Control. The topic you requested is included in another documentation set.
For convenience, it's displayed below. Choose Switch to see the topic in its original location. A Visual Studio project with source code is available to accompany this topic: Download. Tasks illustrated in this walkthrough include the following: In order to complete this walkthrough, you will need: In the first part of the walkthrough, you will create a new Web site and add the Northwind sample database to it. To create a file system Web site Open Visual Web Developer.On the File menu, click New, and then click Web Site. To add the Northwind sample database file to the Web site To create and populate a drop-down list You can now test the drop-down list. To test the drop-down list Press CTRL+F5 to run the page.When the page is displayed, examine the drop-down list.Select a different product name to make sure that the list performs a postback.
To add a FormView control.