
Those amazing crochet shorts! Free charts and written patterns of the motifs! DISCLAIMER!
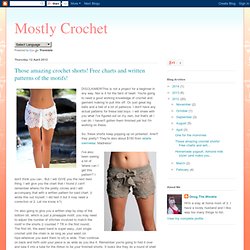
This is not a project for a beginner in any way. Nor is it for the faint of heart. You're going to need a good working knowledge of crochet and garment making to pull this off. Or, just great big balls and a hell of a lot of patience. I don't have any actual patterns for these bad boys. So, these shorts keep popping up on pinterest. I've also been seeing a lot of 'where can I get this pattern'? I'm also going to give you a written step by step of the bottom bit, which is just a pineapple motif, you may need to adjust the number of stitches involved to match the motif in the shorts (I counted 7 TR in the first round) The first bit, the waist band is super easy, Just single crochet until the chain is as long as your waist (or hips-wherever you want them to sit) is wide.
The next bit is just a bunch of these pretty circles: Notes. join each round, R1: 12 DC in magic ring. join. The next bit is pineapple motifs. DessySims's media. Simply Vintagegirl Blog » Blog Archive » notebook . . . easy to make . . . easy to use. 8 September 2008 Here is a project I thoroughly enjoyed.

With a combination of several different items that are easy to come by, you can come up with a wonderfully attractive little notebook to flip through. Supplies: • Tabbed Index Cards – used ten 4″x6″ sized cards • Scrapbook Paper – for extra beauty • Two Metal Rings – to bind notebook together • Tape – double-stick tape or adhesive squares • Pen – for writing section name on tabs • Memo Book - one of the dirt cheap ones (same size as index cards – 4″x6″) • Brads (optional) – for tacking down small frame • Metal Frame (optional) – found in scrapbooking department, preferably a small size Directions: 1. 7. 13. This is of the back and front covers of my little notebook. On the covers, I scrapbooked on both the front and the back side of the index card.
Momma’s is farthest away – Robin’s Egg Blue. Both Momma’s and Breezy’s tabs are alphabetically labeled, as in A, B, C, D, etc. Rambly blog: Lesson# 144 The Best Gifts are Homemade {Natural Chapstick} After searching FAR AND WIDE for an awesome Christmas gift for my girlfriends this year...
I finally landed on the best gift project I'm made thus far. I mean, this is way better than painted frames, decorated mugs and puff painted totes. Introducing the gift that's inexpensive, fun to make, and is actually useful in real life! WOAH! What a concept, right? Homemade Natural Chapstick (because who needs another crocheted tissue box cover?) 1.5 oz beeswax (1 and a half tablets) 6 vitamin E capsules 2-3 tablespoons of olive oil (2=more rigid, 3=softer) 2-3 teaspoons of coconut oil 2-3 teaspoons of cocoa butter 25-30 empty chap stick tubes OR 15 lip balm containers DIRECTIONS 1.
Book Page Corner Heart Origami Bookmark. This is another heart tutorial.
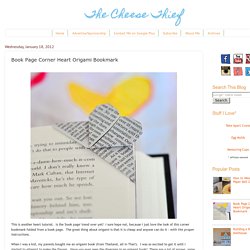
Is the 'book page' trend over yet? I sure hope not, because I just love the look of this corner bookmark folded from a book page. The great thing about origami is that it is cheap and anyone can do it - with the proper instructions. When I was a kid, my parents bought me an origami book (from Thailand, all in Thai!). I was so excited to get it until I started to attempt to make the figures. I still see origami instructions out there that completely confuse me. Crayon Candle. Fourth of July Star Jars. These transformed mason jars are a fun way to both decorate an outdoor table for a 4th of July celebration or a safe way to entertain the kids during fireworks.

Red spray paint Mason Jars Star stickers Newspaper Scatter star stickers onto the mason jar, make sure they’re stuck on very tight Screw on the mason jar lid and cap and place on top of a table covered in newspaper in a well ventilated area Spray with the paint from a nice distance around the entire jar until it’s coated well but without drips. Wait at least a couple hours for the jar to dry and carefully peel off the star stickers Place 2-3 battery operated votive candles in each jar and enjoy your festive 4th of July evening! Craft: Valentine's Day Wall Art. I loved how my Valentine's Day garland and wreath looked so I decided to make another Valentine's Day decoration.
In our living room we have a big blank wall that is patiently waiting for us to finish the wall art we plan on hanging. I decided to use that space and try to make a simple, cheap wall art. Supplies: Card stock, pattern to print (I did sheet music), scissors, tapeCost: $0 (I already had all of the supplies) I started off by printing off sheet music. Inspiration: Origami Cranes. It is said that when one folds 1000 origami paper cranes they are granted a wish.

Source Source Source Source Source. Serendipity (otherwise known as a diy laundry bag)