
Raspberry Pi Initial Setup – Part 8: Connecting to Your Pi via Ssh - Ok, we have the pi powered up, plugged in and have figured out its IPv4 address.
Now we can log into it over the netwok using ssh, the secure shell. A shell is a command line interface to a computer (though, as we’ll see in a minute, ssh can be used to run graphical programs, too, and a lot else besides), and the secure bit in ssh’s name, rather unsurprisingly, means that all communication using it is encrypted. Starting ssh is pretty straight forward: ssh [options] username@remote computer By default your Raspberry Pi has the username:pi and the password:raspberry. Ssh pi@10.42.0.68. Raspberry Pi Initial Setup – Part 7: Finding Your Pi on the Network - Still have a working computer?
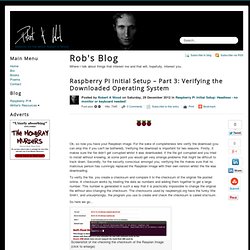
Good. Now you can stick the SD card in the pi and have another working computer! First though, if we want to be able to do anything useful with it, we need to connect it to the network. The pi’s default networking setup sets it to wait for a piece of software called a DHCP server to give it details about the network it is going to connect to. If you have a standard home network, your router is the DHCP server. If you don’t have a router or a spare network socket on it, a couple of clicks will set up your computer as a DHCP server and share its internet connection with the pi. Straight and Crossover Network Cables (click to enlarge)
Raspberry Pi Initial Setup – Part 6: Actually Writing the Image to Disk - Ok the time has come to actually write this sucker to the disk.

If you remember, we are going to do this using dd, and we’re using dd (a) because we’re cool and (b) because the image doesn’t just contain the files but also the MBR, partitions, and filesystems. Because of this we need a way to access the disk at low level. On Linux, low level access to devices is provided by the /dev directory.
Here you will find your hardware represented as files that you can read from and write to (if it makes logical sense to do so). You will also find in here some virtual pieces of hardware that you might want to have a look at. Raspberry Pi Initial Setup – Part 5: File Systems - So, continuing from my last post, we know that a formatted hard disk is divided into numerous partitions (the minimum number of partitions being one).
Each of these partitions start with a bit of information about what type of partition it is and how to boot an operating system off it (if one is actually installed on it), which works in conjunction with boot information in the MBR. The partition then has a file system written to it. The file system includes the information needed to locate and store data (i.e your files) on the partition. There are lots of different types of file system all with advantages and disadvantages.
However, for a desktop user, the most important differences are between what are called journalling and non-journalling file systems, the security features offered by the different file systems and the maximum sizes supported. You might well think that, because of this, non-journalling file systems are a thing of the past but unfortunately not. Raspberry Pi Initial Setup – Part 4: Disks and Partitions -
Ok, I've recovered from my paranoia.
Let’s get this sucker installed. Now, there are some nice easy graphical programs for writing images to disk. If you want to take this route, install usb-creator-gtk, but the cool kids are going to do this the low level way from the command line. The program we are going to use is dd. dd is short for data destroyer, due to its ability to destroy all the data on your computer if used incorrectly (well ok, it’s not really short for data destroyer, but the real reason for its odd name has been lost in the mists of time).
Now, on linux, all hardware is represented as files that you can read from and write to (if such things make sense e.g. you can play music by copying a suitable music file to the soundcard device file). A formatted disk, like our sd card, is commonly made up of various parts that can be accessed and modified with software. There are many reasons you might partition a disk into several pieces. Raspberry Pi Initial Setup – Part 3: Verifying the Downloaded Operating System - Ok, so now you have your Raspbian image.
For the sake of completeness lets verify the download (you can skip this if you can't be bothered). Verifying the download is important for two reasons. Firstly, it makes sure the file didn’t get corrupted whilst it was downloaded. If the file got corrupted and you tried to install without knowing, at some point you would get very strange problems that might be difficult to track down. Secondly, for the security conscious amongst you, verifying the file makes sure that no malicious person has cunningly replaced the Raspbian Image with their own version whilst the file was downloading. Raspberry Pi Initial Setup – Part 2: Getting the Operating System - So, the first thing we need to do is download and install the Raspberry Pi’s operating system.

For general purpose and/or NAS/fileserver usage you want to install the Raspbian distribution. If you are fairly new to computers, don't worry too much about the terminology, you'll get the hang of it. Plus, people (especially marketing people) misuse the terms so much that you can interchange things a lot anyway and no one is going to mind. Now then, if you're going to install an operating system, it is probably useful to know what one is. Raspberry Pi Initial Setup – Part 1: Introduction - Raspberry Pi Initial Setup – Part 9: raspi-config - Now the moment you’ve all been waiting for.
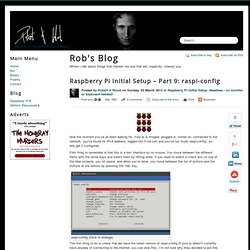
Your pi is imaged, plugged in, turned on, connected to the network, you’ve found its IPv4 address, logged into it via ssh and you’ve run “sudo raspi-config”, so lets get it configured. First thing to remember is that this is a text interface so no mouse. You move between the different items with the arrow keys and select them by hitting enter.