
Make-up Magnet Board. We all know with craft blogs that original ideas are often hard to come by, we find ideas we love and make them our own but we didn't come up with the idea ourselves.
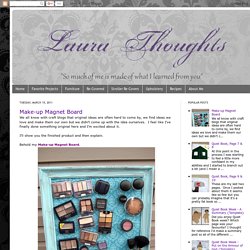
I feel like I've finally done something original here and I'm excited about it. I'll show you the finished product and then explain. Behold my Make-up Magnet Board. I have a friend who is beautiful and stylish and has always loved make-up but recently took a course that intensified her love. Her renewed interest has worn off on me and it made me remember eye shadows I'd hidden away that were gathering dust. The basket was a mess and I was overwhelmed with all my choices never knowing what to use, digging through to see what I had and find what I wanted was a pain. I painted it (The hard way, with a brush instead of spray paint. I went to the hardware store and picked up some metal and had them cut it to fit inside my frame.
Here comes the brilliant part though. Homemade sun jar. We made sun jars using these instructions by Cre8tor at Instructables: Home-made Sun Jar.
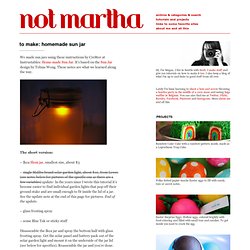
It’s based on the Sun Jar design by Tobias Wong. These notes are what we learned along the way. The short version: – Ikea Slom jar, smallest size, about $3 – single Malibu brand solar garden light, about $10, from Lowes (see notes below for pictures of the specific one as there are a few variables) update: In the years since I wrote this tutorial it’s become easier to find individual garden lights that pop off their ground stake and are small enough to fit inside the lid of a jar. . – glass frosting spray – some Blue Tak or sticky stuff Disassemble the Ikea jar and spray the bottom half with glass frosting spray. The long version: The guts of the homemade sun jar are made using a solar garden light. At stores I also found solar lights for floating in pools, and ones made to sit on patio tables, a lantern and even, oh my gosh, a light-up squirrel.
BAD – Two batteries, couldn’t get open. Lightbulb Bud Vase. Do-it-yourself decorating allows you to customize your home, apartment, condo, or room with DIY accents that transform your space on a budget without completing a full-scale remodel.

Whether you're a beginner or an expert, we guide you with instructions, tutorials, and step-by-step photos for indoor and outdoor projects and room makeovers. We have tips, techniques, and tools to get you started on paint projects, the easiest way to freshen up a space or decor item. But it doesn't stop there! We'll demonstrate how to make over furniture with paint, reupholster cushions with fabric, update garage sale items with wallet-friendly crafts tutorials using fabric and paper, and create DIY wall art for any space using a variety of materials and techniques.
If you want to tackle bigger DIY projects, rethink your kitchen with remodeling ideas you can complete yourself (such as tiling a backsplash and creating a kitchen island) and browse our best bathroom makeovers. Paper Flowers – Anyone Can Do That. Japanese Kusudama, this tutorial is featured on Craftuts Anyone can do that, I assure you.

The proof: I can, just take a quick look at my result below. And, believe me, I am neither meticulous nor particularly patient. You could even say I’m the opposite. Below you can see my very first attempt to create paper flowers. What you will need to make your own Kusudama paper ball? 1. 3. 4. (optionally) I prefer torn paper instead of cut. You have to start with a single petal. Now you have to glue your 5 petals into a flower.
Apply the glue to only one side of each petal, except for the last one, in this case cover both sides with glue. Your first flower is done. Don’t glue every petal right after you make it. When all 12 flowers are finished you have to glue them together. When two halves of Kusudama Flower Ball are ready you have to glue them together.