
Mini-Tablesaw / Router / Shaper for Dremel rotary tool - All. Mini-Tablesaw / Router / Shaper for Dremel rotary tool - All. Wooden precision mini plunge router base for rotary tool (with cardboard prototype) - All. I have laminated floor leftovers and it seems to be good base material.
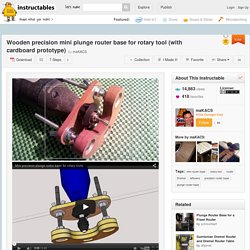
It's flat, the surface is strong and tough enogh, easy to work with. Needed some screws and glue. Materials laminated floor or some wood (6 mm thick) wood glue 3 pcs of 6x80mm hex head bolt screw 12 pcs of 18/6mm washers 6 pcs of 6 mm nuts 3 pcs of 6 mm wing screws citron oil Tools flat and round files flat and round needle files needle polishing stick pencil hobby knife (OLFA) jewellers saw with wood blade metal saw screwdriver with 10 mm hex head nut setter bit 10 mm wrench 6 and 7 mm wood twist drill bits 18 mm wood flat drill bit Dremel router bit vise clamps various grit sandpapers for sanding and polishing masking tape (Tesa) paper glue stick (Pritt) strong universal glue rotary tool hand drill angle grinder You can download the printable template in PDF format and the SketchUp files of the 3D model.
DIY Charging Station. My kitchen needs some MAJOR organizational help.
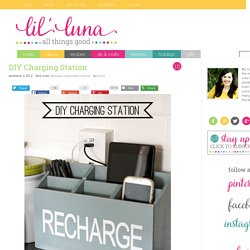
I spent a ton of time organizing the kitchen when we first moved in over a year ago, but haven’t really done much to it since. I’ve noticed that the drawers and counters are getting a little more clutter and it’s driving me wild! Some of the things adding some clutter to the counters are the chargers for our tablets and phones. Yes, I hate admitting it but with 2 phones and 3 tablets (iPad is for hubby’s work, I have a tablet, and we also have a family tablet – the only one with games) cords are all over the place and I can’t stand the mess it makes on the counters. :/ I had been wanting a little “Charging Station” to keep it organized and hadn’t been able to find any in my shopping excursions, so we decided to make one. We knew we could make it for cheap and pretty easily if we just sat down and mapped it out. Here is what you’ll need if you’d like to make one of these as well… – 1 – 2′ x 5 1⁄2” x1/4″ board – 1 – 3′ x 3 1⁄2” x 1/4″ board.
Loving... DIY with Dremel {project & giveaway} - Thingsdeeloves. Last week I shared my weathered photo frame project which I completed with our new Dremel Micro.
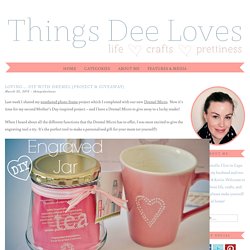
Now it’s time for my second Mother’s Day-inspired project – and I have a Dremel Micro to give away to a lucky reader! When I heard about all the different functions that the Dremel Micro has to offer, I was most excited to give the engraving tool a try. It’s the perfect tool to make a personalised gift for your mom (or yourself!) What you’ll need: glass jarword template, printed to the desired sizewashi tape/prestick/cellotapedark cloth or paperDremel Micro with silicon carbide grinding tip Print out a design/word, and cut around the edges. Lie the jar on its side (I found it easiest to fold up a towel to lean the jar against). Remove the paper from inside the jar, and replace with a piece of dark paper or cloth. DIY laptop stand or laptop lap tray. DIY laptop stand or laptop lap tray I quite often find myself working in front of the TV to catch up on work, and also not to miss out of my few favourite TV programmes.
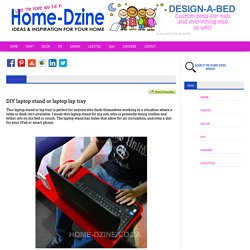
This laptop stand or laptop tray allows me to work comfortably while I relax. To make the laptop stand or lap tray all you need is an offcut of timber or board. I used a scrap piece of 16mm supawood for my tray. Piece of timber or board large enough to accommodate your laptop and iPad Wood glue 120- and 240-grit sandpaper Rust-Oleum 2X spray paint in your choice of colour TOOLS: Drill / Driver plus assorted bits Countersink bit 25mm spade bit Tape measure, steel rule and pencil OPTIONAL: Dremel MultiTool You will find everything you need for this project at your local Builders Warehouse. 1. 2. 3.
Dremel Projects. Dremel Projects. Dremel. Make this $78 Clip Organizer for Only $15. With spring fast approaching, now is certainly the time to get things organized and in order.
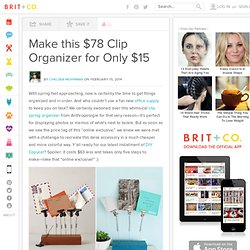
And who couldn’t use a fun new office supply to keep you on task? We certainly swooned over this whimsical clip spring organizer from Anthropologie for that very reason—it’s perfect for displaying photos or memos of what’s next to tackle. But as soon as we saw the price tag of this “online exclusive,” we knew we were met with a challenge to recreate this desk accessory in a much cheaper and more colorful way. Y’all ready for our latest installment of DIY Copycat? Spoiler: it costs $63 less and takes only five steps to make—take that “online exclusive!” Materials: - wood block - 3 extension springs with hook end and loop end - 3 1 ¼ inch bulldog clips - 3 machine screws (10-24 thread, ¼ long) - 3 hex nuts (10-24 thread) - wood glue - colorful paint (spray or brush paint) Dremel Ideas. Carving Rocks with a Dremel. There is something very gratifying about carving into a rock.
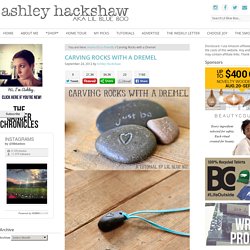
This project was kind of therapeutic. I was thinking I’d carve some words into rocks and maybe start leaving them around Palm Desert to see if people find them…. I love large river rocks: All you really need for this project is a Dremel (I used the new cordless Dremel 8220), a few different attachments, a bowl of water and rocks: For softer rocks a silicon carbide grinding stone is all you need. I drew a sketch onto my rock first: Then, at a low speed, I slowly etched my design into the rock: (Note: Make sure to wear protective eye wear!) I carefully went over my design, etching a little deeper each time. The finished carving: