
Marie Grace Designs: Smocking by Hand... Okay... here we go... let’s smock! This is part 2 of my pleating and smocking tutorial. Part 1, which explains how to hand-pleat fabric, can be found here. Smocking is very simple once you get a few basic rules straight. In its simplest form smocking is nothing but basic back stitching. My plan is to show you the basics and a few simple stitches that are often used in smocking. I appreciate the fact that smocking is functional and that’s really the reason that smocking was developed in the first place but my fascination is in the fact that its beautiful and so versatile and easy!
First of all, use a good needle. Installing an Invisible Zipper. Zippers can be daunting even for experienced sewers.

The reason? Zippers are often installed the wrong way. Lots of seam ripping and swearing ensues, especially when it’s a simple mistake. There’s no need to be scared of zippers anymore! We’re here to help. With this tutorial we cover how to install an invisible zipper. Items Needed: invisible zipperthreadscissorspinsinvisible zipper footzipper footgarment Before we start, take a look at the back of your invisible zipper. 1.
Zipper tape is usually smaller than 5/8″ 2. Place the pins parallel to the zipper 3. 4. Sewing slowly helps prevent the fabric from puckering 5. 6. Double check your zipper before sewing 7. Remember to back stitch at the end of the zipper 8. 9. Make sure the seam allowances line up 10. Keep your seam line even to avoid puckering 11. How to Make Bias Tape. Y’all know how much I love bias tape.

I’ve been showing you projects with pre-made bias tape, but we all know it’s so much cuter when you make your own. It seems a little complicated, but do it once and you’ll be hooked. Bias tape is great for two things: stabilizing curves and finishing edges. There are two major steps to making bias tape: Cutting Bias Strips and Ironing it into Bias Tape. Hand Stitching. 101 Sewing Tutorials for Summer! Tutorials. How to Make a Buttonhole. Sally from Sew Sally teaches sewing classes in Portland, Oregon and today she teaches us how to create a buttonhole.

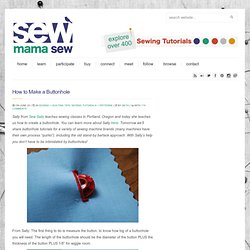
You can learn more about Sally here. Tomorrow we’ll share buttonhole tutorials for a variety of sewing machine brands (many machines have their own process “quirks”), including the old stand-by bartack approach. With Sally’s help you don’t have to be intimidated by buttonholes! From Sally: The first thing to do is measure the button, to know how big of a buttonhole you will need.
The length of the buttonhole should be the diameter of the button PLUS the thickness of the button PLUS 1/8” for wiggle room. If you are using a shank button, measure the diameter and the shank plus 1/8” for wiggle room. Now get your machine set up to sew a buttonhole. Some machines have a hole in the finger of the bobbin case.
Top 100 Tutorials of 2010. Hetterson: Monthly sewing tutorial ~ The (EPIC) scallop. How to Easily Gather Fabric. How to Easily Gather Fabric: A Sewing Tutorial Years ago I learned a really easy way to gather fabric and I wanted to share it with you.

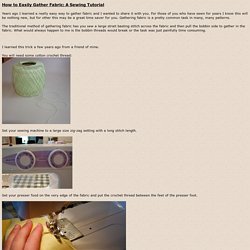
For those of you who have sewn for years I know this will be nothing new, but for other this may be a great time saver for you. Gathering fabric is a pretty common task in many, many patterns. The traditional method of gathering fabric has you sew a large strait basting stitch across the fabric and then pull the bobbin side to gather in the fabric. What would always happen to me is the bobbin threads would break or the task was just painfully time consuming. I learned this trick a few years ago from a friend of mine. You will need some cotton crochet thread: Set your sewing machine to a large size zig-zag setting with a long stitch length. Set your presser food on the very edge of the fabric and put the crochet thread between the feet of the presser foot. Now slowly begin to sew a zig-zag stitch with the cotton crochet thread in the center of the stitch.