Free Sewing Projects. Arts & Crafts.
Sticky Window Art. The other night I saw these two great activities while Blog hopping (Time For Play and Mom Tried It) and my brain kind of mashed them both together and we ended up with this sticky window activity (sorry to put 'mashed' and 'brain' in the same sentence but it's an accurate description, trust me).I was pretty sure Bubble would be into it but I didnt anticipate how much.
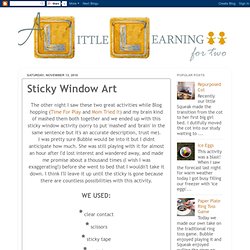
She was still playing with it for almost an hour after I'd lost interest and wandered away, and made me promise about a thousand times (I wish I was exaggerating!) Before she went to bed that I wouldn't take it down. I think I'll leave it up until the sticky is gone because there are countless possibilities with this activity. * clear contact* scissors* sticky tape* a window* anything you like to decorate with(we used coloured matchsticks, bottle tops and pattypans) Cut a large square of clear contact and tape it to your window with the sticky side out. An aeroplane. Bubble sticking on a pattypan sun. A windmill. Arts and crafts. Aktivitetstavla. Detta var egentligen tänkt som julklapp till L, men den hann inte bli färdig.
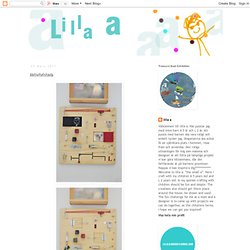
Men nu är den äntligen klar! En aktivitetstavla med massor av knappar, bultar, beslag och roliga delar. L har redan bra finmotorik, och nu kan han träna ännu mer på att öppna och stänga, skruva och pricka rätt. Skivan är en 20 mm byggplywood, som är bra att skruva i, den är lackad en gång. Beslagen har jag samlat ihop av sådant vi hade, hittat och köpt till i verktygshandeln, onoff knapparna köpte jag i en elektronikbutik. An activityboard for L that did not get ready for Christmas, but now it is! The board is 20 mm cheap plywood, and the fittings are found in the stash, or bought at the hardware store, the onoff switches came from a electronic store. Easy and fun DIY.
Aren't we always looking for a creative way to work on shapes and letters?
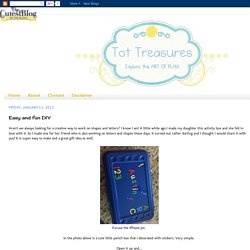
I know I am! A little while ago I made my daughter this activity box and she fell in love with it. So I made one for her friend who is also working on letters and shapes these days. It turned out rather darling and I thought I would share it with you! It is super easy to make and a great gift idea as well. Excuse the iPhone pic. In the photo above is a cute little pencil box that I decorated with stickers. Open it up and.... there are around 15 - 20 craft sticks in assorted colors. I placed Velcro circles at the end of each stick, on both sides. The sticks can be arranged to make letters... and shapes....
Such a simple concept, yet a great deal of fun. This idea was shared with me back in 2007 by the amazing Miss Gene. Happy Playing & Exploring! Please note (as stated in my disclaimer) that all activities on this blog are intended to be executed under adult supervision.
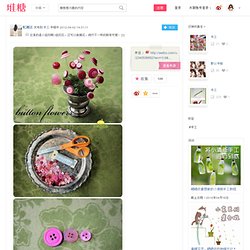
这真的是小纽扣哦~纽扣花,还可以做捧花,绝…_来自忆清江的图片分享. 堆糖网 分类 首页 热门 最新 良品购 特卖惠 家居生活 美食菜谱 手工DIY 时尚搭配 美妆造型 婚纱婚礼 设计 古风 插画绘画 壁纸 头像 文字句子 旅行 摄影 人文艺术 影音书 人物明星 动画漫画 植物多肉.
Bags, Totes, Purses, oh my! Ordning bland banden – Organized trims & ribbons. Fina tygband och spetsar är roligt att använda när man pysslar, syr eller slår in paket.
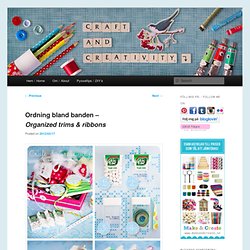
Mina band har dock hittills legat huller om buller, hoptrasslade med varandra och i flera olika lådor. Svårt att få någon överblick. Som så ofta innan hittade jag lösningen via en bild på Pinterest. Bilden ledde mig till en sida som heter Instructables (smart sida för övrigt!) Och där fanns en beskrivning på hur man använder TicTac-behållare som praktisk förvaring för tygband. Beautiful trims, ribbons and lace is fun to use when you’re crafting, sewing or wrapping gifts. As so often before I found the solution via an image on Pinterest.
TicTac-tabletterna hällde jag över i en större burk som jag piffade till med lite washi tejp (inget får förbli opyntat, det förstår ni va?). /I poured the TicTac tablets into a large jar and pimped the jar with some washi tape (nothing may remain unembellished, you get that right?). Resultatet blev både fint och överskådligt, tycker jag. Gift. Craft projects.
MY PEARL. Tiny happy: how to: a simple patchwork ball. Here is how I made some simple patchwork balls last week, for my children to play with inside.
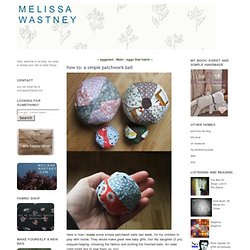
They would make great new baby gifts, too! My daughter (3 yrs) enjoyed helping- choosing the fabrics and stuffing the finished balls. An older child might like to sew them up, too! Materials: small scraps of cotton fabric (I like to use quilter's-weight cotton best, because it's strong and less likely to fray at the seams.) needle and thread, scissors, pins paper and pencil sewing machine (but you could sew the whole thing by hand, if you don't have a machine.) stuffing- polyfill is best for small babies, but you could also use fabric scraps or cotton or wool stuffing. optional: a small bell for a baby's ball, rice to put with the stuffing for extra weight, or fill with just rice to make a hacky sack/juggling ball. 1. 2. 3. 4. 5. 6.
Hand made.