
Bluff Road Art Glass. Wire weaving ring Tutorial. Elemental Ombre Necklace. Since ancient times there has been the idea that each and every thing on the planet (and beyond) is made up of a combination of the four elements Earth, Air, Fire, and Water.
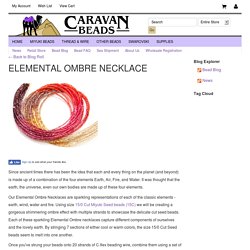
It was thought that the earth, the universe, even our own bodies are made up of these four elements. Our Elemental Ombre Necklaces are sparkling representations of each of the classic elements - earth, wind, water and fire. Using size 15/0 Cut Miyuki Seed beads (15C) we will be creating a gorgeous shimmering ombre effect with multiple strands to showcase the delicate cut seed beads. Each of these sparkling Elemental Ombre necklaces capture different components of ourselves and the lovely earth.
By stringing 7 sections of either cool or warm colors, the size 15/0 Cut Seed beads seem to melt into one another. Once you've strung your beads onto 20 strands of C-flex beading wire, combine them using a set of cones and chain for the full gradient effect. Be sure to have a ruler handy to measure your 2 inch sections. Firefly Wrap Bracelet. Materials: LMA-190FR: Miyuki Long Magatama Nickel Plated Matte AB - 1 tube8-1253: Miyuki 8/0 Matte Metallic Royal Blue Seed Bead - 1 tube283-000: Swarovski 3mm Amethyst Crystal Bicone - 1 package520-502-MS: Moose 1.5mm Greek Leather - 2 feet194-016-G: 17mm Gold Earth Button - 1 pieceMNT-15: Miyuki Nutmeg Nylon Beading Thread - 1 spool193-104: Japanese Thin Beading Needles - 1 package 520-124: Hypo Cement Jewelers Glue - 1 tube 505-017: Rainbow Embroidery Scissor - 1 pair Download a pdf of this project to read on your computer or tablet 1.

String the button onto the leather cord and bring it to the center. Fold the leather in half on either side of the button shank. 2. 3. 4. 5. Free-Form Peyote – PART 1 – Eureka Crystal Beads Blog. Hellooooo Beaders!
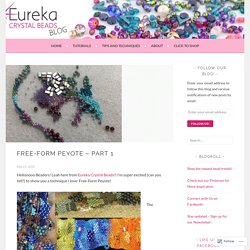
Leah here from Eureka Crystal Beads!! I’m super excited (can you tell?) To show you a technique I love: Free-Form Peyote! The compilation image I’ve included here is comprised of some lovely examples I found when I did a Google Image search. Check out Google or Pinterest to find some amazing eye-candy inspiration!! I’ve heard from many-a-beader that they are simply overwhelmed at the idea of free-form ANYTHING (free-form peyote, free-form brick stitch, etc.) because it’s not a pattern that you follow like many other projects or basic versions of various bead stitches.
I’m publishing this blog to show you some of the ins and outs of starting a Free-Form Peyote bracelet and next week I’ll be bringing you a continuation VIDEO for PART 2 on this project! First, you should know that Free-Form Peyote is a great way to utilize small amount of beads you have left that you love. In the following images, you’ll see how I’ve laid out the beads I’ve selected to work with! How to Use a Crimp Tool. Eureka Crystal Beads - Shopping Cart. Crimp beads that hold. Magpiegemstones.com. Starman TrendSetter Cypress Leaf Bracelet. Riletta Bracelet Pattern Tutorial For Crescent Beads. Riletta is an elegant design for a bracelet with Crescent beads.

Riletta Bead Pattern Tutorial is easy to follow. Riletta can be recreated in many color variations. It is simply fun to explore as many of them as you like. Combine two colors of Crescent beads, or use just one! Get ideas from photo illustrations! Contains 5 pages plus the Cover page. All rights reserved. Product Description Following beads are required to complete Riletta Bead Pattern Tutorial: Czech 2-hole Crescent beads, 4 mm or 5 mm glass pearls, 11o, and 8o seed beads.
Riletta Bracelet Pattern Tutorial includes: Step by step instructions.Each step is illustrated! Only logged in customers who have purchased this product may leave a review. ***Wire Wrapping 101- an overly detailed account!*** I use 20 gauge and 26 gauge wire here.
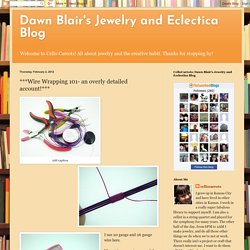
Wrap 26 gauge wire around the three support wires. The three wires need to stay flat and parallel. You can use blue painter's tape on either side of where you intend to wrap to hold the wires in place. Trim off the ends ensuring that they are both on the same side of the main support wires. Tap down the ends with your soft jaw pliers. Now you may begin to form the wires around the cabochon or focal bead. Holding the first bind in place with your soft jaw pliers, bend the front outside wire to angle against the bind.
Then repeat on the other side of the same wire. Beading Thread. Wire-weave technique: Double-weave ribbon - Facet Jewelry Making. The wires used in this style of weaving fall into two different categories.
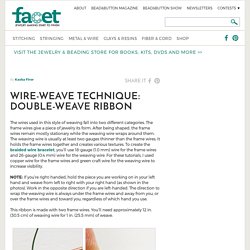
The frame wires give a piece of jewelry its form. After being shaped, the frame wires remain mostly stationary while the weaving wire wraps around them. The weaving wire is usually at least two gauges thinner than the frame wires. It holds the frame wires together and creates various textures. To create the braided wire bracelet, you’ll use 18-gauge (1.0 mm) wire for the frame wires and 26-gauge (0.4 mm) wire for the weaving wire.
NOTE: If you’re right-handed, hold the piece you are working on in your left hand and weave from left to right with your right hand (as shown in the photos). Elemental Ombre Necklace. Loam Links Convertible Silk Ribbon Necklace/Bracelet. Loam Links Convertible Silk Ribbon Necklace/Bracelet.